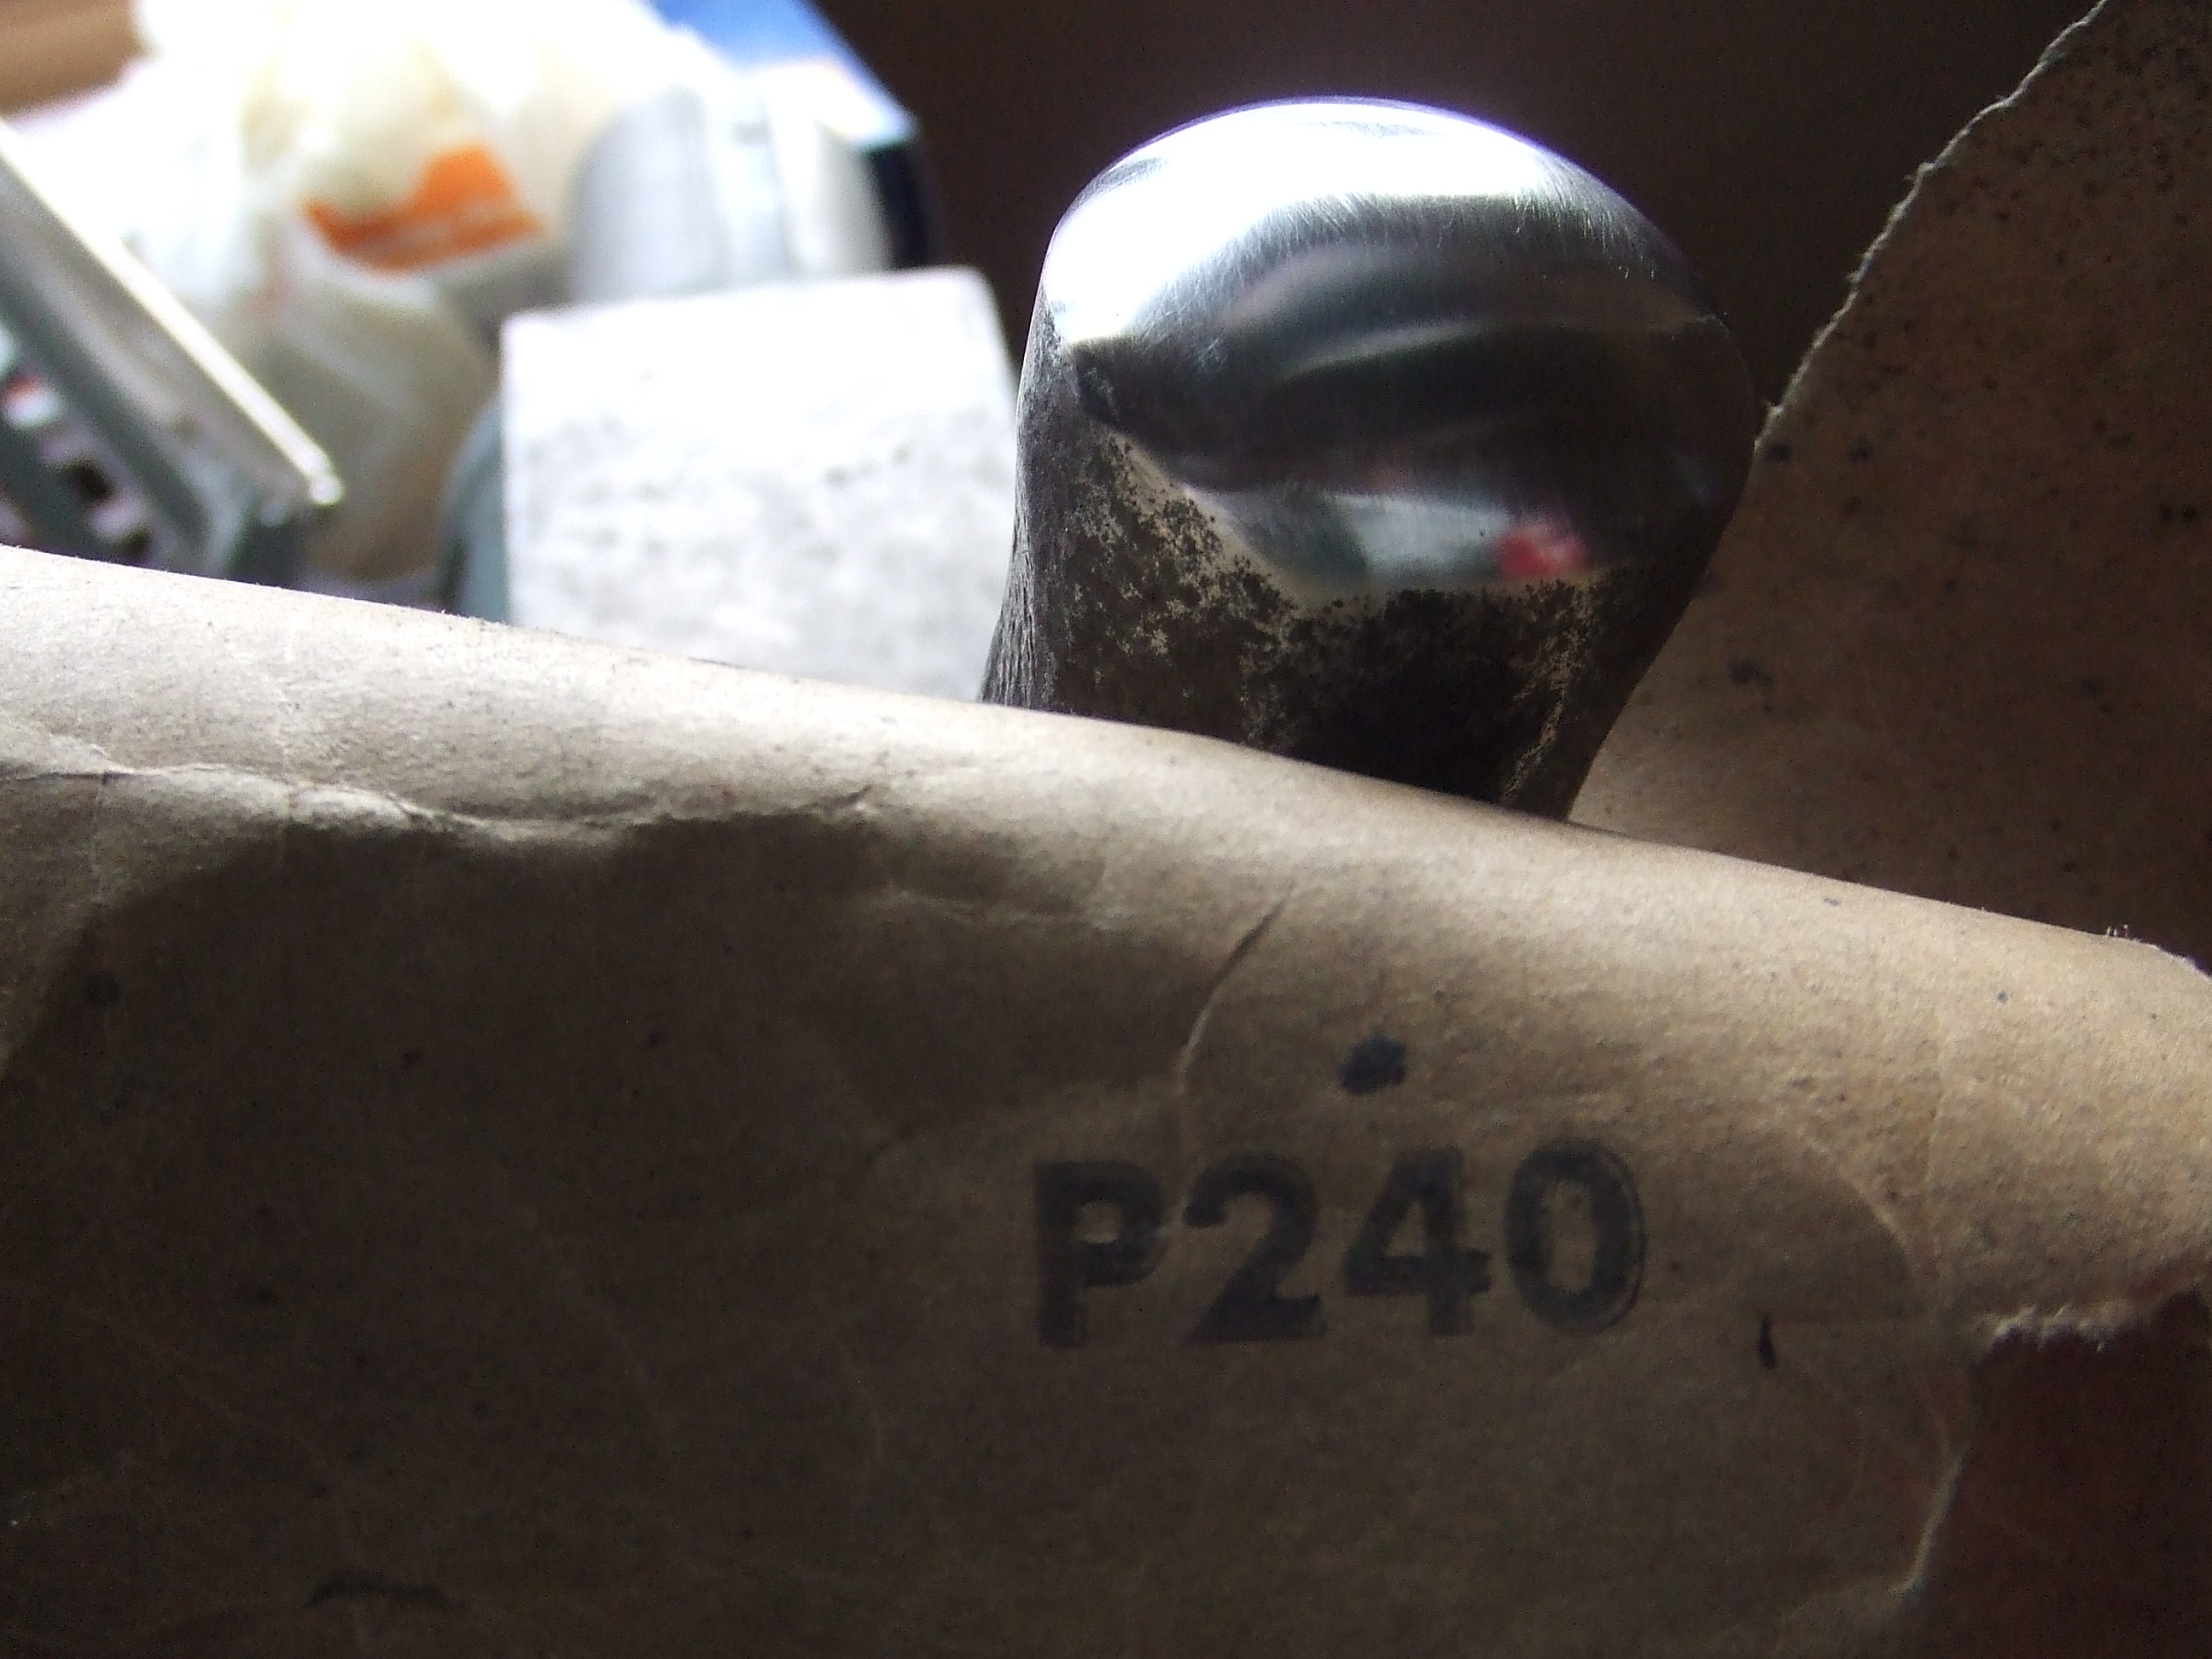
Raised Britannia silver bowl the start of planishing and problems encountered

DSCF3094 DSCF3095 DSCF3097 DSCF3100 DSCF3101 DSCF3102 DSCF3104 DSCF3106 DSCF3109 DSCF3151


Wato wato, summer has been great here, hope you are all enjoying a holiday, well hopefully anyway.

Starting to part planish the Britannia silver bowl before the rest of the shaping is carried out. I do this because planishing is a tricky skill to master. On the face of it, what could be simpler, just overlap the blows with a polished faced planishing hammer on a polished stake, no worries eh!

Stake selection is critical if you wish to achieve good results, also planishing is not a one shot deal, it happens over successive courses and becomes ever finer and gentler towards the end result of the finish you wish to create. I will go into a little more detail in the next post as I also wanted to highlight a massive boob I made in selecting a raising stake, in this case my cows tongue stake.

I turned it from its concave gentle curve the other side to a rather more aggressive convex curve. In the past I have managed to ‘bully’ copper into this slight depression, creating the wrinkles that I used to shrink the material, creating the narrowing mouth of the entrance as I wanted. In silversmithing this is perhaps a little misguided on my part, silver being altogether more resilient to hammer blows than copper.

Looking at the pictures you will notice that things were going quite nicely up to the 18th course. I keep things tidy after each round by truing up with a mallet on the stake to help me to keep track of where things are going, as well as cutting down on the time taken to planish at a later stage.

The next picture shows the stake with the convex curve that I tried to drive the silver into to help shrink the mouth and bring the shape in. The following pictures up to the 25th course will show the sorry result of the assumptions that I made, comparing my results with the copper vessels I had made previously.

The silver resisted the force of the hammer blows far more than the copper. This meant that as I landed my blows from my raising hammer, the stake acted like a kind of, equal and opposite hammer. This pushed the silver into the bulge you see up to this point. I am embarrassed to see the pictures and feel a little foolish for not noticing this effect earlier, correcting it sooner by going back to the concave side of the cows tongue stake.

Round 29 shows you the bowl after I took this action and went back to the ‘propper’ side of the stake. I tried to bring the sides in too fast and this was the result. Perhaps this was part of the reason the rim cracked, more of this in another post.

I have been made aware that I write, not to mention talk, too much making it difficult for people to keep attention to what I’m trying to convey. With this in mind I will leave this post for you to ponder, going into more depth with planishing, and the cracked rim in another post.

Thank you again for your kind messages, I very much appreciate them. Until next time.

All my very best wishes.

Stu Art 🙂

Advertisement

Raising Britannia silver bowl further along.

Wato wato.

Back to the Britannia silver bowl, here I will show the stages up to the completed first outer angle before coming back in to close the opening. Also I will show some corrective work needed to keep the form true.

Alas, I did not take pictures of the raising of the bottom, I feel you will be able to see it in your mind and do not feel this will hinder you’re understanding. As you raise you may well have to make some decisions as to what stake is best for you. Silversmiths will normally make custom stakes to make the shapes they desire before starting a project. A commercially available stake such as the cows tongue one here, present some good options for a variety of pleasant shapes without having to fashion a custom shape. A mix of time restraints and a not definite shape encouraged me to use what I had.

The large doming punch can only be used for a short time. Think about the shape of a dome, if used for too long the shape will come in on itself too much. This is where doing it will be far more beneficial than reading, I will do my best to explain it as I do it, you may like to share your own approaches, I would love to see them.

If you hold your form in front of you and bring your doming punch, or stake, up from behind you can ‘sight’ it if you will against a light or window. You can better envisage the shape of the stake against your form and relate it to the shape you wish to achieve. Similarly if you take these two stakes, well a doming punch and a stake, and hold them in front of you and play with the relationships in space, you can work out the transition from one to another.

I find this helpful as the commonest fault I have watched others make, including myself, is that the stake is just hit against without properly realising the subtle differences a few mm each way can make on the final shape, as the curves are progressive, not fixed, on most stakes. Again consistency can be better appreciated when you do this sighting exercise as the smallest of movements between each of the stakes can have quite dramatic results on the curves created. This also helps the imagination to run a little wild as you see shapes that you may not have considered. I find this, sometimes only after perhaps days when a thought pops into my head after I have seen something and relate it to the shapes I have made playing with stakes. As usual I have used many words when these few would do; most stakes have a myriad of possibilities that are more subtle than a casual glance may present.

Keeping your form even and correct throughout the raising process is important if you do not wish to have to cut off, or correct the rim too much at the end. With the picture of the piece shown on a flat plate it can be clearly seen that my technique is not consistant. I always, after a course of raising, just go over it again with a mallet to take out the lumps and bumps that the raising process creates. This serves to also give you an idea of how accurate you are, not very if you look at this. Now is a good time to correct this as you can imagine this will only get worse at the end, I will explain what I do to correct it.

Planishing is a very tricky skill to get right. Notice I didn’t say perfect as I am nowhere near as competent as I wish to be at this stage. There are many variables, stake selection, hammer profile, weight of hammer and the blow itself. I hope to cover this in more detail in at the end of this project, for now though I will just say that ‘spot planishing’, my made up term, was used to stretch the silver back into shape.

As you see the rough line drawn around the high spot, imagine if you will the silver being thicker in this boundary. By measured planishing in this particular area we can encourage the silver to flow out towards the edge. I did this over three annealing. As you know this was the first silver bowl I have raised and so I was perhaps a little timid, the results in the next picture shows that it was not altogether unsuccessful.

When I planished the bowl all over I used a flat faced planishing hammer, the surface being convex, like a dome, as opposed to concave, like a slice of eaten watermelon. For this technique to be a success however a domed planishing hammer was used. I hope not to confuse but I also used a cross peen as well in places. The slight dome compresses into the silver displacing it. If you make a ‘barrier’ along the line, nothing definite I’m afraid, it’s your call, experience will teach us all in the end. By a barrier, think work hardened line that the unhardened silver cannot cross. This forces the silver to flow towards the rim, trapped in the barrier you create by overlapping blows along the line, hardening it.

If you planish too hard you will cause unevenness and possible warping, this is why I annealed and went back to it. I planished on the cows tongue stake, making sure the area was in contact with the stake at all times. With patience and careful planishing you can restore the rim, as seen in the photographs.

I hope I have been clear to this point and will return again to explain the bringing in of the form, closing the entrance to the bowl.

Until next time, all my very best wishes.

Stu Art 🙂

Soldering great butt joints. Not nearly but really right.

Wato wato,

One of the hardest things for me to get right was making a great butt joint. I kick myself now as it is something I should have seen sooner, being as my hobby before silversmithing and jewellery is model engineering. I also worked in fabrication, as well as various motorcycle projects over the years. My excuse is that I have a tendency to be too ridged in my approaches to things and wanted to be more ‘flowing’ if you will regarding my approach to silversmithing and jewellery. I deliberately tried to forget my formal engineering approaches to help me be more spontaneous. This is another lesson in the interconnectedness of things. This is far too heavy and irrelevant a topic for here for sure.

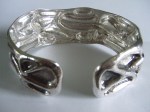
The textbooks are absolutely right here when they state solder will not hold well if gaps are present. If you look at the kind of strain and abuse I inflict on a join whilst forming with repousse´ it is clear that nearly right is nowhere near good enough. I hope to be able to explain how to create a join so strong that, well look at my cuffs and other work not yet shown here for proof. I dearly like empirical, rather than theoretical evidence, I hope to be able to demonstrate it here so you can attain the results you strive for.

Rings and cuff bracelets present different challanges, I will start with bar stock. By bar stock I mean round, square, oval or whatever, just solid bars of any thickness.

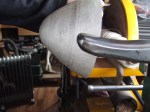
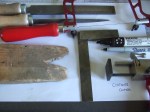
In the first photograph you see all the tools I use, except the needle files, I forgot to put them in the picture, for those who don’t know what they are, just very small files enabling more accurate specific spot removal of material that the bigger files cannot.

The easiest and probably most effective method is to use a chennier cutter. The bar is held firmly and the jewellers saw is accurately placed in a slot preventing the blade from twisting, therefore making a perfect cut with minimal finishing. These tools can be very expensive however, for a beginner or someone who just wants to do occasional work as a hobby they may not want to, or be able to afford such a tool. There is another way for no cost 🙂

An engineers square should be, in my humble opinion, an indispensable part if any toolkit. They come in various sizes and are very reasonably priced. Your bench pin will have a straight edge, with a pencil, I personally prefer to use a sharp scribe as it tears the wood fibres, creating a trench for the next part. If not, make sure your jewellers saw has a tight blade and follow the scribed line, creating a 90 degree little saw mark relative to the edge.

Using a square of triangular file you now carefully file a trench for your bar to rest in. I think the photographs explain better, as you can imagine it was not easy to hold and photograph at the same time. Providing you keep downwards pressure on your bar, wedging it into the groove, presenting it to the file slowly and making sure it cannot jump about. The act of keeping the file pressed against the true bench pin will ensure your two ends will be perfectly flat and true as the 90 degree angle ensures that, as long as you take your time and prevent rocking the file or wire. The human element has been taken out of the equation, the grove and edge being perfect ensures you don’t have to be, it will do it for you.

Sheet presents another challenge, you may be successful with narrow stock, however some of my cuff bracelets are 40mm or more wide. At this width it becomes difficult to coordinate, the filing as the sheet is difficult to locate accurately in the groove.

The trusty engineers square comes to the rescue again, more in a bit. Sharpie felt pens, or any, I use permanent markers, will make great marking guides. In engineering surfaces are checked for flatness with special plates and a beastly substance called engineers blue. Get it by all means is sticks like the preverbal sh12 to a blanket. On skin it will take an age to remove. I thought that marker pens would make a great substitute, they do.

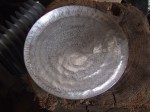
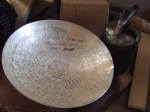
When you cut out your edge, no matter how good you are, the edge will not be entirely flat. To start, file it so it looks flat to you, stop and apply the marker pen to the filed edge. Using a flat plate, like your steel bench block, put some abrasive paper on it stretched tight. I use a piece of abrasive stuck to a piece of board, manmade boards like high grade plywood or MDF are made to tolerances that are useful.

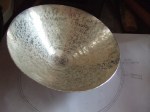
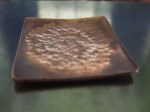
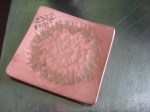
Now GENTLY stroke the piece along the paper making sure you present it to the paper as square on as you can. Now look at the edge, in the photograph I just picked a scrap piece of copper to give an example. Where the black marker has been removed leaving a shining mark, these are high spots, the black areas are low. Now use your file, whatever size is best for the task, gently file the shining bits, coat with the marker and go through the process again and again until you manage to get all the black removed with a single stroke on the flat abrasive paper. Once all of the surface is shinny, the edge is flat.

Not great practice, though I do use it in a hurry or if a particularly wide sheet is becoming difficult, I use the engineers square. Keeping the straight side against the fat part of the square, pushing it firmly against it, I slide the square along the paper whilst pushing the material against the paper. You know this is a perfect 90 degrees as material is being removed along the edge of the square only. This is not great practice as it, technically, makes the square less true as you scrape it along the paper. I would advise that this is done as a last resort, only after you have trued it up as much as you can the other way first. If you do this then you can minimise the damage to the square by using the finest grade of paper you can for the job.

When presenting the ends of your now perfect edges, bent them past and slowly pull them back so the natural spring of the material keeps the seam closed for you, making the wiring of the join not as necessary. I have never wired any of mine, you may still wish to do so. By shining a strong light behind, no light should be visible along the seam. If you see light then a piece of fine abrasive paper can be encouraged into the gap and gently pulled through both sides, using the pressure of the spring in the material, don’t squeeze.

If you follow these steps you will have a joint that is incredibly strong. I always use hard solder as it will return the best results, both strength and colour match. The other beauty of this is that the solder seam is truly wafer thin making invisible seams more attainable. Also for rings you can be confident that the joint will hold up to really quite extreme re sizing as the joint is pretty much guaranteed not to fail, the surrounding material making like a noodle as it shrinks from the join.

I hope this helps, let me know if you need further explanation, or if you know a better/different approach.

Until next time, all my very best wishes.

Stu Art

Sinking Britannia silver bowl, preparing for raising

Wato again,

back to work after all the show malarkey, I feel bound to say I much prefer the workshop to the marketplace, oh well we all have to do things we don’t like eh.

A previous post goes into more detail regarding sinking, please search back if anything is not clear.

The pictures are pretty much self explanatory, however I will try to add what I think is not. If you see experienced silversmiths at work they will invariably be less precious than me in the early stages. In another post I said that the material would not forget, it’s worse than that at times. A slight variation in the early stages ignored can turn into an unpleasant wrestle that costs more time than if you corrected it to start with. As a result I do not raise too much too quickly, my connection to the material is not good enough at this stage so I do everything I can to make sure corrections are as minimal as possible, more importantly corrected as they happen.

One of the most difficult things to master is consistency, this consistency is on many levels, I will try to put into words what I have experienced. The hammer blows need to be regular and controlled, you need to listen as every time the hammer make a sharp clang, you have compressed the silver at this point, remember what I said about clay, try to think of it this way, I find it helps. This will cause an area to distort and expand away from it’s surrounding material. In a future post I will show you how I correct this challenge, best left for now though.

Consistency of the placement of the silver disc as it is hammered to the stake. I use a very gentle domed stake to start raising, however this is a double edged sword; yes the curve is gentle and less likely to make your disc distort to look like a long flowing dress, worse a pringle crisp. The challenge is to keep presenting the disc in the same place throughout the round, the natural state being for the sheet to skeet about the top of the domed stake. The disc must be supported, angled slightly towards you, the hammer blow coming down just ahead of the contact point meaning you are using the hammer to kind of fold the material over the stake as it is in an air space, without hammering so hard as to drive it into the stake causing stretching. I hope this makes sense as it is a fluid movement that requires you do rather than just read. Use some scrap copper to practice, the best advice I can give through hard earned experience is do not hammer like crazy, every single hammer blow should be considered and accurate. A pro may well sound like a woodpecker, I pretty much guarantee you try it without many hours of experience and it will end in tears. Again it may not look too bad in the early stages. The silver will remind you later that you were less than diligent in your task as the errors multiply.

I show the silver on a sandbag resting on an engineers surface plate, silversmiths call it a flat iron. It is used to accurately mark out machined parts, great for box making as well, more on that in another post. The beauty of this plate is that it is truly flat. Between each round I check it agains this plate to ensure the disc is raising equally, again I will cover this in an upcoming post.

The raising stake I used for this bowl I made with the aid of an angle grinder and other abrasives. If interested I will show this. I made this one as the commercial cows tongue stake was too flat for the early stages of raising from the point. Stake selection is crucial, I am still trying to get a feel for it, nowhere near proficient at this stage, time will put that right though.

It is much easier to use a stake such as this as opposed to the domed stake being as it has a defined ledge to locate against, the silver being less prone to skidding around, the blows being more definite, less room for error. Please take time to look at the pencil lines I draw to show just how little I raise art each course. When I get a better feel I will be more aggressive, at this stage slow and steady is the order of the day.

Make sure the hammer face rests, at the end of each blow, squarely to the stake underneath. Rocking it side to side will cause unevenness, worse the edge of the hammer face can dig in causing a dink that can become impossible to remove if too deep. Other problems arise if the face is presents too far forward or back, just aim for all of the hammer face to contact at the same time. Consistency is hard with all of these considerations eh!

I wanted to free form this bowl as I didn’t want to be held back by looking at a definite plan. I think in the early stages this is no bad thing, however don’t let it become habit as, with all thats going on it is easy to become disoriented without a defined template to check against. I will use new next time to take my making skills to the next level.

I think thats enough for now, I hope this helps, please let me know if you would like clarification. I really think you would benefit from seeing a tutor who is experienced. I have a sack or two of failed experiments. As you see from my bowls acceptable results can be obtained with little more that looking at some demos. I feel certain I would be far further forward if someone had ‘held my hand’ in the early stages as it were. It is so easy to become despondent, no really!

Don’t be, just $*%ing hit it 🙂

All my very best wishes.

Stu Art

Studio photograph session with Paul Mounsey for my chased and repousse´ jewellery, art metal and silversmithing

http://www.paulmounsey.co.uk/

http://www.paulmounsey.blogspot.co.uk/

I came back from a session with Paul yesterday, I am blown away with the results and could not wait to share it with you all. Especially for people who have struggled to be heard with their work alone. I feel certain that with Pauls’ input my opportunities for being better represented have just taken a seismic shift into the unlimited possibilities zone.

I am so excited to see my work looking this great in print. As I have said before I have been slow to appreciate the importance of quality images, mistakenly assuming that buyers and gallery owners would see past the groggy images, being only interested in the finished article; don’t you new makers make the same mistake. A string of rejections and soul searching could have beed lessoned if I had images such as these to start with, as feedback from the people and places you approach is not common. The inevitable result, you are left floundering as to why people don’t bother to follow up on your enquiry. The reason, you are not seen as a professional, someone who has not paid attention to detail, and will continue not to do so, not the best trading partner.

I felt, as I’m sure most of you do, I was capable of taking a photograph, how hard can it be eh!

When I entered Pauls studio I was amazed at all the specialist equipment and his attention to detail. The computer alone looked as though it could handle much of the NASSA space programme. His lighting and the props he uses to tease out the smallest detail was truly astinishing. Without thinking and with the intuitiveness most of have for driving a car, he continually made minor adjustments to the lighting. Flash and reflective surfaces being altered for every shot, his intimate understanding of his subject made this an outing rather than a chore. I love to see people who are doers rather than talkers effortlessly practicing their hard fought for, practiced craft, making it appear effortless and seamless, the way that time served people can. This was a true treat and a fantastic experience that, as soon as I make more work that needs it, I will return, no hesitation.

The chased and repousse´ surfaces now come aline, punch textures become more defined and the reflective planished surfaces are simply stunning. He managed to capture the aged patina I wanted for the copper art metal bowl. Oxidisation looks more pronounced and less fuzzy helping to clearly define the raised texture left behind after polishing. Silversmithing items like the highly reflective surface of the Britannia silver bowl are notoriously hard to photograph, check out these beauties above!

Always a good start and the sign of a thoroughly good egg, good strong tea was provided and made the proper way. Paul has a very calm manor and is totally accommodating, listening to and responding to every request and offering suggestions, treating work with respect and careful handling. I could not be more happy, and wholeheartedly recommend him to anyone.

Well, just look at the images for yourself, I had to be a little selective as I felt like uploading all of them! A good example if the pendant from the previous post I asked for an opinion as to the best finish. You cannot deny this now looks like a completely different piece. It is unchanged from when I photographed it with my trusty point and shoot.

I went will Paul Pennington from the jewellery workshop in Porthleven, also attending the same course as me. Sandra Austin used images made by Paul Mounsey in her final presentation. This is what blew us away and led us to seek his services. This is another example of his flexibility and his accommodating nature. This is a last minute thing to get my promotional stuff ready tomorrow for the next day. Paul excelled himself and delivered, returning my images the same day, yesterday. Can’t get better than that can you. Just wish I was nearly as organised though.

I would like to thank Julia Rai from the Cornwall school of art craft and jewellery as she respond to a FB quote I made about photographing work, introducing Paul Mounsey. Well worth a visit, Julia has been a supporter of me since I attended a forging class. Sign up and be amazed at her PMC skills, Not my thing, no hammers required see 🙂 nonetheless awesome.

https://www.facebook.com/JuliaRai

https://www.facebook.com/CornwallSchoolOfArtCraftAndJewellery

Raised silver bowl, calking for a thickened edge

Wato wato all, back to the making of the Britannia silver bowl.

I feel somewhat of a fraud, talking about the thickened edge here as the completed bowl was not a complete success, having not gone entirely to plan. Annealing is a topic I will cover in another post, suffice to say at this stage over, or under annealing causes problems. In this case, near the end of raising the rim cracked. This meant I had to cut off my, hard fought for and carefully made thickened edge. Oh well, at least it wasn’t a complete disaster, I am still happy with the end result. I will explain in detail later in this process.

Quick re cap, the peening process moved material from the centre of the disc towards the edge. Calking pushes the edge down compressing the edge in on itself thickening the edge in the process.

Just as the raising process work hardens and will crack the silver if overworked, so only a single overlapping blow is desirable, or wise, at each and every calking stage for the same reason.

With the bowl to be resting on a sandbag for support, a soft faced cross peen hammer, I used a modified raising hammer, is bought down confidently, striking the edge. Accuracy is very important, each blow ideally overlaps slightly to lead into the next blow. The hammer must be square on, if not sharp ding or undulations will develop leading to uneven distribution of the silver. This will cause problems further down the raising process as the sides will become uneven, worse, it may encourage cracking due to the added stress caused by the gathering of a forceful blow on a very small ‘ding’. It may not develop into a crack until further along, you may not even be able to find a cause when it happens.

A thing I have learnt working with this slow process is that, you may well be able to cover up a misplaced blow, even forget you made it, the silver wont!!!!

Sooner or later something will happen, I will show uneven raising examples another time. The message I wish to convey this time is, take your time, don’t just hit it, measure and control your hammerblows. If you don’t, and hit it willy nilly, it will come back to haunt you later.

I found, as Christopher Lawerence showed on his demonstration, I had much more control and more feeling by holding the sandbag on my lap the whole time. Same rules as raising, move the disc, not the hammer, concentrating on keeping the hammer blows consistent and square to the edge. The picture shows one of my raising hammers that I softened, rounded off to reduce the chance of catching the edge of the silver with a sharp edge, as seen on the opposite side of the hammer showing the original as it came factory finished.

Knocking off removes the burr that is created by calking process. The beauty of this is that material is saved by re compressing it back into the rim rather than, as you would be forgiven for naturally doing, removing the burr with a scraper or file.

As can be imagined this is a delicate process, too hard and you will remove all of the work hammering the rim back on itself, too little force and the burr remains causing problems further along. This is done on a flat plate, hammering from the inside on a steel flat plate in the early stages. Later it becomes impossible to get a hammer in as the opening reduces in size. The picture of the copper one shows the knocking off process done on a mandrell. The hammer used is a collet, of domed faced planishing hammer.

Remember the pickling process is your friend. Every time you strike the silver it will stand out as a shining mark that clearly stands out from the pickled matt finish. No excuse for overworking as you can see where you have been, again don’t just hit it, measure your blows and make sure you are as consistent as possible.

After each round of sinking, then raising, calking process is applied until the end of the raising process, or when the desired thickness is reached, whichever comes first.

Hope you can follow this, please let me know if I’m not clear on something and I will add to this.

Thats all for now, raising proper starts next time, untill then. All my very best wishes.

Stu Art./

Victoria Lansford picture of the month June 2013

vlhos blog picwindows

Yesterday I completed the end of my BA in Jewellery and Silversmithing, I am minded of the old saying, one door closes and another opens.

As negative as this experience was it has been eclipsed by this fantastic honour to be picture of the month on Victoria Lansfords blog accessed through her excellent, informative website.

http://www.victorialansford.com/Pic-of-the-Month.html

For those of you who have followed my blog from day one will perhaps remember my introduction to her signature chasing tools. As my earliest ‘instructor’ its fair for me to say I would not have achieved any of the Eastern Repousse that you have seen so far. I also include the David Huang inspired bowl, I know she does not make this sort of thing, however the skills I learnt are completely transferable.

I want to take the opportunity sincerely thank her for such generous recognition and to give you all the reminder to visit her site again, to look at her fantastic work and learning resources that led me down the chasing and repousse path to start with.

This act of recognition that I have experienced here is akin to having the master recognise and praise the apprentice. This is a life changing moment for me and one that I will continually remind myself of when the black dog comes calling, as it does when I’m at my lowest ebb.

Many times not able to see any wood for trees, I try to remind myself that balance is to be aimed for. Just as my lows are very low, this is a fantastic, timely, very welcome and awesome high that will, I feel sure, help me to redress to a kinder perspective in future. Thank you so very much Victoria.

I will continue to post the, now completed, Britannia silver bowl raising process in another post to follow.

All I have to do now is start to make a living!!!!!

Until next time, all my very best wishes.

Stu Art

Silver bowl project; peening to make ready for thickened edge

DSCF2902 DSCF2662 DSCF3022 DSCF3023 DSCF3025 DSCF2666

I watched a film made by the Goldsmiths company to showcase silversmithing skills. The demonstrator was the awe inspiring Christopher Lawrence;

http://www.pearsonsilvercollection.com/biographies.html#lawrence

Christopher Lawrence embodies, for me anyhow, what is it is to be a true master craftsman. If you stop to dwell too long on his achievements, experience and sheer depth of knowledge, you could be forgiven for being disheartened. Trained from a very early age in a time when measurable performance meant far more than ideas and promise, it feel its fair to say the likes of these crafts masters are becoming ever rarer in a time where talking is far more valued than ‘walking’

Rant over! Lets look at peening the disc of Britannia silver before sinking, in preparation to raising. Peening is the same as the approach I presented in a previous post showing how to make simple curves or dishes without curved stakes. The difference being the working from the centre, as before, this time without the ‘dam’ or ‘moat’ I explained to contain the ‘wave’ of material as it is pushed to the outside edge.

The hammer I used is another junk shop find, very heavy, re-profiled and polished to act as a peening hammer. Consistency, as with much of this discipline, is key. My thinking was that a very heavy hammer can be used to keep the blows consistant. Rather than swinging a lighter hammer, with all the variance this would introduce to the force of each blow, I use the weight of the hammer. You see the gentle curve of the hammer face, all blows overlap to keep the ‘wave’ ahead of, and not behind the next blow. Working from the centre to the outside edge, a section of material at the edge is left. All the material is now concentrated there and ready for calking, more on that in another post.

I lift the hammer as precise a distance from the disk and let it fall on the disc of silver. My reasoning being if the height is consistent, the weight of the hammer will ensure the blows are as consistent as possible, I just have to ensure I keep turning the disc to present the next point of contact for each blow. Do not move the hammer, just the disc of silver flat on the steel trist, working in a perfect circle, hence the guide lines made with a compass, moving outward towards the edge.

The little copper model shown here with the calliper showing the width of the rime is to illustrate the sort of expansion you can achieve. The starting sheet of copper was 0.9mm thick. As you see from the digital read out, the size difference is substantial.

I followed Christopher’s lead and did three rounds of peening to achieve this result. Next time I will show you the stages that follow on from this to create the thickened edge as you go along raising your form.

Untill next time, all my very best wishes.

Stu Art.

Silver repousse cuff bracelet ready at last!

Wato wato

At last this cuff is finished! After completely messing up the first one and having more than a few challenges with this version I am happy to see it go to its new owner. I call this piece ‘wear your heart on your sleeve’. If you are in the area it is on show at the White Out exhibition in Truro until Friday.

It now belongs to Paul Pennington. You may recall his wife runs the Jewellery Workshop in Porthleven. He wanted this design to compliment the pebbles bangle I made for Clair that is shown in a previous posting. For those interested in the name it came about as a result of a College brief.

I thought that hearts abound in fashion, design and jewellery, as a child I was always fascinated by the very small. Typically beastly boy always muddy, grubbing about in the soil and ponds looking at amphibians and insects. When I discovered microscopic images I was blown away by the complexity and beauty of the hidden world right in front of us that we are not able to see with the naked eye. As an adult I was fortunate enough to be given a microscope for a birthday present, I wish I had more time to look at it, ah well the time constraints and pressures eh!

I went on-line and looked up microscopic images of heart muscle. At relatively low magnifications the heart muscle is like interconnected worms, well thats how it looks to me anyway. I took this set of images and interconnected them to make it more visually interesting and came up with the design you see here. As a bit of fun and a total fluke, the theme allows me to use the old saying of wearing your heart on your sleeve, I find I’m as chuffed about that as anything else about it. I love the fact that whoever wears it will be able to play guess the theme with whoever is looking at it.

Being a very highly raised design it stands out very well, not one for shrinking violets 😉 Being a chap I had given no thought to the gross factor that some of my lady peers expressed at the thought of wearing a representation of heart muscle, is it me?

The good news is that most people who view it for the first time associate it with interconnected vines or tree roots, good oh eh, far less embarrassing for me and another fantastic fluke.

Going on like this, I hope to give you some idea that beautiful accidents do happen. Think design opportunities, not mistakes. Again this is another creation of mine that has not universally won all popularity contests.The way I see it is that if you try to please everyone, not only is this not realistic, it is also timid.

When I bump up against a creative wall as it were, my long suffering supporter, best friend and brutally honest wife Reen has taken to telling me; ‘Just @*ing hit it” This has served me well on more than one occasion.

I respectively pass on her words of ‘encouragement’ to you as I am easily paralysed by indecision, as I’m sure many of you are. Know this however if you make a mess, at least you made something and a lesson was learned by you empirically in a world seemingly paralysed by academia, theory and the fear of getting it wrong. In a world of armchair experts it’s your opportunity to plough your own furrow and enter a wonderful, thrilling and ultimately sometimes scary world of the unknown that holds the promise of great adventures yet to be discovered. Until next time, JUST *@ING HIT IT 🙂 All my very best wishes. Stu Art.

An approach to make curves or shallow bowls in metal

Wato wato

I have to get a silver vessel ready for a show in Truro the week after next and have neglected my commitments here.  As promised, I will illustrate a way to create curves or bowls without stakes or depressions to form into.

The piece of copper was from a scrap corner of a disc I cut to make a raised copper bowl, more on that in a future post. I deliberately made it square to help you to think about curves in a different way. If I cut a circle then, perhaps, you may think why not just use a doming block or punch? If you try this with a square you may find the points don’t behave as you think they would, tending to crumple and become marked by the doming block, no such challenges with this way.

Please be aware that this is ‘a’ way; not ‘the’ way to approach making effects photographed here. I am minded to think of when I started and looking at all the stakes and hammers on offer, which one? How many? I feel certain you will have experienced just such confusion. I offer this way to you as I feel sure you already have, of can inexpensively come by the tools shown here to experiment,  creating your own sculptural shapes, adding to your deeper understanding of how to problem solve when you hit a creative wall as it were.

A steel bench block and a ball peen hammer are all you need, good oh eh 😉 if you are just ‘sketching’ as I do, then you will not even have to worry unduly about the surface finishes of the block or hammer. In fact you may be able to produce some beautiful effects with less than perfect surfaces, unique to you. It just gets better don’t you think.

I deliberately did not freshly anneal the piece to start. If you look further along the sequence you will see I have highlighted the help that a freshly annealed and pickled surface give to you as a guide to facilitate more accurate placements of your hammer blows. You may wish to start with a freshly pickled surface, your choice.

The idea behind this, and I will descend into metaphor to help explain to you how I see it; Again, before I do I am bound to say that this is how I see it, if anyone knows a better way please please do let me know and I will alter to be clearer and less confusing. Metal works like slow motion clay, also it flows a little like water under the hammer blow making a small ‘wave’ of material. If you hammer quite hard with the ball end of your hammer on a freshly annealed piece of material, copper silver or other types, on a steel block you will notice the contact point sunk with a ring of material surrounding the mark. Try it with a cross peen and again the ‘moat’ or wall of material will surround where the hammer has struck. This is the softer, un work hardened material being squished away from the compressed area.  The outside edge that I hammered to start creates a ‘moat’ or barrier of work hardened material. When you then go from the middle, overlapping blows you are trapping the soft state, not yet hammered and work hardened material towards it, eventually meeting a barrier it cannot cross. As the distance is covered the ‘wave’ is larger and will cause the material to curl as it gets closer to the edge.

Where the analogy with clay breaks down a little here is the one shot deal you get with metal. Metal will not stand repeated blows and will eventually crack if continually hammered on the same spot without annealing. For safety sake it is best to do one round, re anneal, pickle and start again. This way you will not be likely to cause the material to fail by overworking. Another bonus is that you will become far more accurate as you become aware of sticking to this one hit rule and using the colour change as a guide as the struck area becomes shiny.

I have only done three rounds to show what is possible, nothing to stop you taking it further if you wish. You will come up with limits eventually as you continually thin the material, as a result this is perhaps best left to create shallower forms. By holding the sheet at increasing angles as you strike it you can alter the depth, even making different depths on a single piece.

The other photographs illustrate this as they clearly show the way I have held the brooches at shallower and steeper angles to the block to obtain the transitional curves seen here. The ‘shrinking marks’ shown are made with a cross peen. I will explain how this works with examples an another post. To get you thinking about shrinking, (a poet and didn’t know it 🙂 think fold forming. I hope to show you why I think of metal as a kind of slow motion clay, try to think ‘barriers’ stretching and compressing waves.

Thank you again for reading and the kind messages. Until next time.

All my very best wishes

Stu Art