-
- First round from outside to middle with steel blocking hammer
-

- Still with the blocking hammer from center to the edge, lighter blows to even out.
-

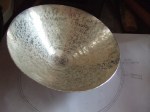
- Turned ready for raising. Not shown, though clear from this, reverse view. A light tidy up with rounded bossing wooden mallet.
-
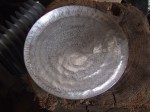
- As this is to have a rounded botton I started to raise with a lightly domed steel stake. The marks left through the raising process are clear to see
-

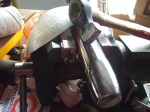
- Shown on a sandbag with a wooden mallet, both are resting on an engineers cast surface plate. I explain in the text.
-

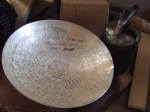
- Shown drawn on a sheet of A4 to give an idea of progress.
-
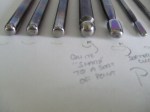
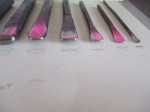
- Scrap piece of steel bar. I have no idea what kind of steel, polishes well, hard enough to do the job, good enough eh!
-
- See the lines, each is a new course, each require a new annealing before the next round.
Wato again,
back to work after all the show malarkey, I feel bound to say I much prefer the workshop to the marketplace, oh well we all have to do things we don’t like eh.
A previous post goes into more detail regarding sinking, please search back if anything is not clear.
The pictures are pretty much self explanatory, however I will try to add what I think is not. If you see experienced silversmiths at work they will invariably be less precious than me in the early stages. In another post I said that the material would not forget, it’s worse than that at times. A slight variation in the early stages ignored can turn into an unpleasant wrestle that costs more time than if you corrected it to start with. As a result I do not raise too much too quickly, my connection to the material is not good enough at this stage so I do everything I can to make sure corrections are as minimal as possible, more importantly corrected as they happen.
One of the most difficult things to master is consistency, this consistency is on many levels, I will try to put into words what I have experienced. The hammer blows need to be regular and controlled, you need to listen as every time the hammer make a sharp clang, you have compressed the silver at this point, remember what I said about clay, try to think of it this way, I find it helps. This will cause an area to distort and expand away from it’s surrounding material. In a future post I will show you how I correct this challenge, best left for now though.
Consistency of the placement of the silver disc as it is hammered to the stake. I use a very gentle domed stake to start raising, however this is a double edged sword; yes the curve is gentle and less likely to make your disc distort to look like a long flowing dress, worse a pringle crisp. The challenge is to keep presenting the disc in the same place throughout the round, the natural state being for the sheet to skeet about the top of the domed stake. The disc must be supported, angled slightly towards you, the hammer blow coming down just ahead of the contact point meaning you are using the hammer to kind of fold the material over the stake as it is in an air space, without hammering so hard as to drive it into the stake causing stretching. I hope this makes sense as it is a fluid movement that requires you do rather than just read. Use some scrap copper to practice, the best advice I can give through hard earned experience is do not hammer like crazy, every single hammer blow should be considered and accurate. A pro may well sound like a woodpecker, I pretty much guarantee you try it without many hours of experience and it will end in tears. Again it may not look too bad in the early stages. The silver will remind you later that you were less than diligent in your task as the errors multiply.
I show the silver on a sandbag resting on an engineers surface plate, silversmiths call it a flat iron. It is used to accurately mark out machined parts, great for box making as well, more on that in another post. The beauty of this plate is that it is truly flat. Between each round I check it agains this plate to ensure the disc is raising equally, again I will cover this in an upcoming post.
The raising stake I used for this bowl I made with the aid of an angle grinder and other abrasives. If interested I will show this. I made this one as the commercial cows tongue stake was too flat for the early stages of raising from the point. Stake selection is crucial, I am still trying to get a feel for it, nowhere near proficient at this stage, time will put that right though.
It is much easier to use a stake such as this as opposed to the domed stake being as it has a defined ledge to locate against, the silver being less prone to skidding around, the blows being more definite, less room for error. Please take time to look at the pencil lines I draw to show just how little I raise art each course. When I get a better feel I will be more aggressive, at this stage slow and steady is the order of the day.
Make sure the hammer face rests, at the end of each blow, squarely to the stake underneath. Rocking it side to side will cause unevenness, worse the edge of the hammer face can dig in causing a dink that can become impossible to remove if too deep. Other problems arise if the face is presents too far forward or back, just aim for all of the hammer face to contact at the same time. Consistency is hard with all of these considerations eh!
I wanted to free form this bowl as I didn’t want to be held back by looking at a definite plan. I think in the early stages this is no bad thing, however don’t let it become habit as, with all thats going on it is easy to become disoriented without a defined template to check against. I will use new next time to take my making skills to the next level.
I think thats enough for now, I hope this helps, please let me know if you would like clarification. I really think you would benefit from seeing a tutor who is experienced. I have a sack or two of failed experiments. As you see from my bowls acceptable results can be obtained with little more that looking at some demos. I feel certain I would be far further forward if someone had ‘held my hand’ in the early stages as it were. It is so easy to become despondent, no really!
Don’t be, just $*%ing hit it 🙂
All my very best wishes.
Stu Art