-

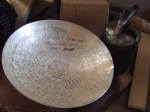
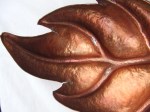
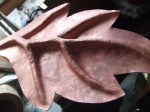
- Flame patinated
-

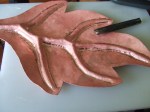
- completed copper leaf
-
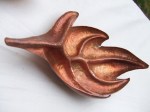
- burnished edges
-
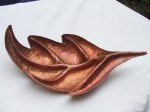
- made to curl to look like a fallen leaf
-
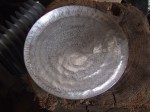
- underside
-

- smashing pillow like shapes
-
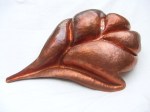
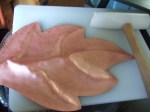
- now to the mistakes
-
- this is what happens when you ‘rush’ ;/ see text
-

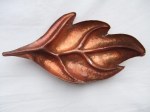
- close up of the differing textures
-

- some hammered, some punched
-

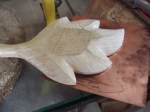
- the wood carved inspiration
-

- underside comparison, wood one not finished. You know me, much rather make in metal 😉
-
- outline traced on 0.9mm copper sheet
-

- permanent marker used to trace outline, scratched in. See how clear the scratched line is against the black, much easier to chase this line.
-
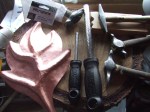
- right of picture you see a piece of wood with two groves. The two tools with black handles (Microplanes) made the groves. From a previous post, (I think) the hammers are my own modified ball pein air chasing trio. A traditional cross pein was also used to sharpen the outline.
-

- First round
-
- annealed after second round
-

- the fourth round
-

- pitch melted into spines
-
- ready for the following
-
- blunt push tool used to define lines and help to push up veins.
-

- too much too soon, what a twit.
-

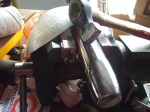
- sinking into a sandbag to create the curl.
-

- sinking hammers, two sizes, as well as various punches used.
-

- This is how the ‘bowls’ between each spine were made.
-

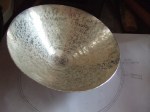
- Near complete, just more refining needed, a couple more annealings, not forgetting to bend over the very tips at the end to accent the curling effect.
Wato wato all,
Hope you’re all looking forward to the festive season.
I have mentioned before, Reen is the membership secretary for the Cornwall association of wood turners. I have relented to her request to join, but not for turning, one turner is enough for any household I think. I have had a go at carving quite some time ago and so I enrolled on the woodcarving beginners class to see how I would get on. As you are aware silver requires quite a hefty investment before you can start something larger, as a result I go back to my trusty copper.
I have struggled since leaving College to establish myself so I am soon to be back on the hamster wheel of regular employment, helping to fund my further attempts at making objects that people may wish to purchase. I think this also pushed me to try the carving, a welcome distraction from my failures, perhaps it would give me a different view, some inspiration as to a new, hopefully more commercial aesthetic that other people may better relate to.
The leaf you see here is a direct copy of the template given to us by Johnny, our tutor. It was great to be involved in another craft, meeting up with others with a passion for what they do, comparable to mine in my craft. For what its worth, I would recommend that this is an approach that may help others, as it has helped me, it is very easy to become insular, seeing things from a singular perspective. Great if you are bang on target with the market you wish to attract, pretty poor if, like me, you are so far short that a shot of outside inspiration can be like a refreshing cold shower.
Once a month the woodturning club has a social evening, inviting a guest speaker to present to the group. Reen put me forward to give a talk! What do you talk about to people who work in wood? How do I engage an audience that is wedded to colour and grain patterns? Make a leaf to compliment the carving thought I, so this is the result. The main body was first repousse´ then filled with pitch to chase before finally sinking the rest away from the veins. The copper lent itself to being more colourful and random, a little like grain or blotchy colours in wood. All good eh, well almost but not quite!
I am terrible at remembering dates and times, Reen told me the date, no worries thinks I. The Wednesday morning before the Friday talk Reen asks me how things are coming along. No worries I will have it completed by next Friday no problem, picture the scene, cheesy grin and self satisfied, smug expression. Now imaging the ensuing unraveling of this confident exterior as she informed me, this Friday you wally. Oh sh-1-2, why me :
I hope this goes some way to explain, though not excuse of course, the damage you see on the completed piece. I finished this leaf at approximately 3:30pm on the Friday of the talk, I had to be there to set up at 06:00pm.
The good news is that the nice bunch at the club enjoyed the talk and even offered excuses for my poor finishing, and ham fisted ness by saying it gave the piece character. Nice to have a sympathetic audience eh.
The pictures are not a complete time line, fair to say you will all have an idea of how this sort of project progresses along. As always, please do ask any questions if I have not been clear.
Reen is also a member of a quilting group, though I will not be attempting that anytime soon, the patterns and geometry employed have my very much more engaged. Who knows what I may come up with. Now I’m off to read this months edition of Magic Patch for quilters 😉
I hope you will be encouraged by my experience to give other crafts a look to see if you can become better inspired.
Happy Christmas to you all, just in case this is the last post this year, a very happy and creative 2014.
All my very best wishes.
Stu Art