Annealing and some modified ‘special’ tools

DSCF3584 DSCF3588 DSCF3585 DSCF3586 DSCF3583 DSCF3582 DSCF3581 DSCF3580


Wato wato one and all.

I trust all is tickety boo with you and yours, back to the making part of the journey, my favourite. Who thinks the business and marketing side is favourite for them? I need to party with you if you are that person 🙂 For the rest of us, lets talk tools.

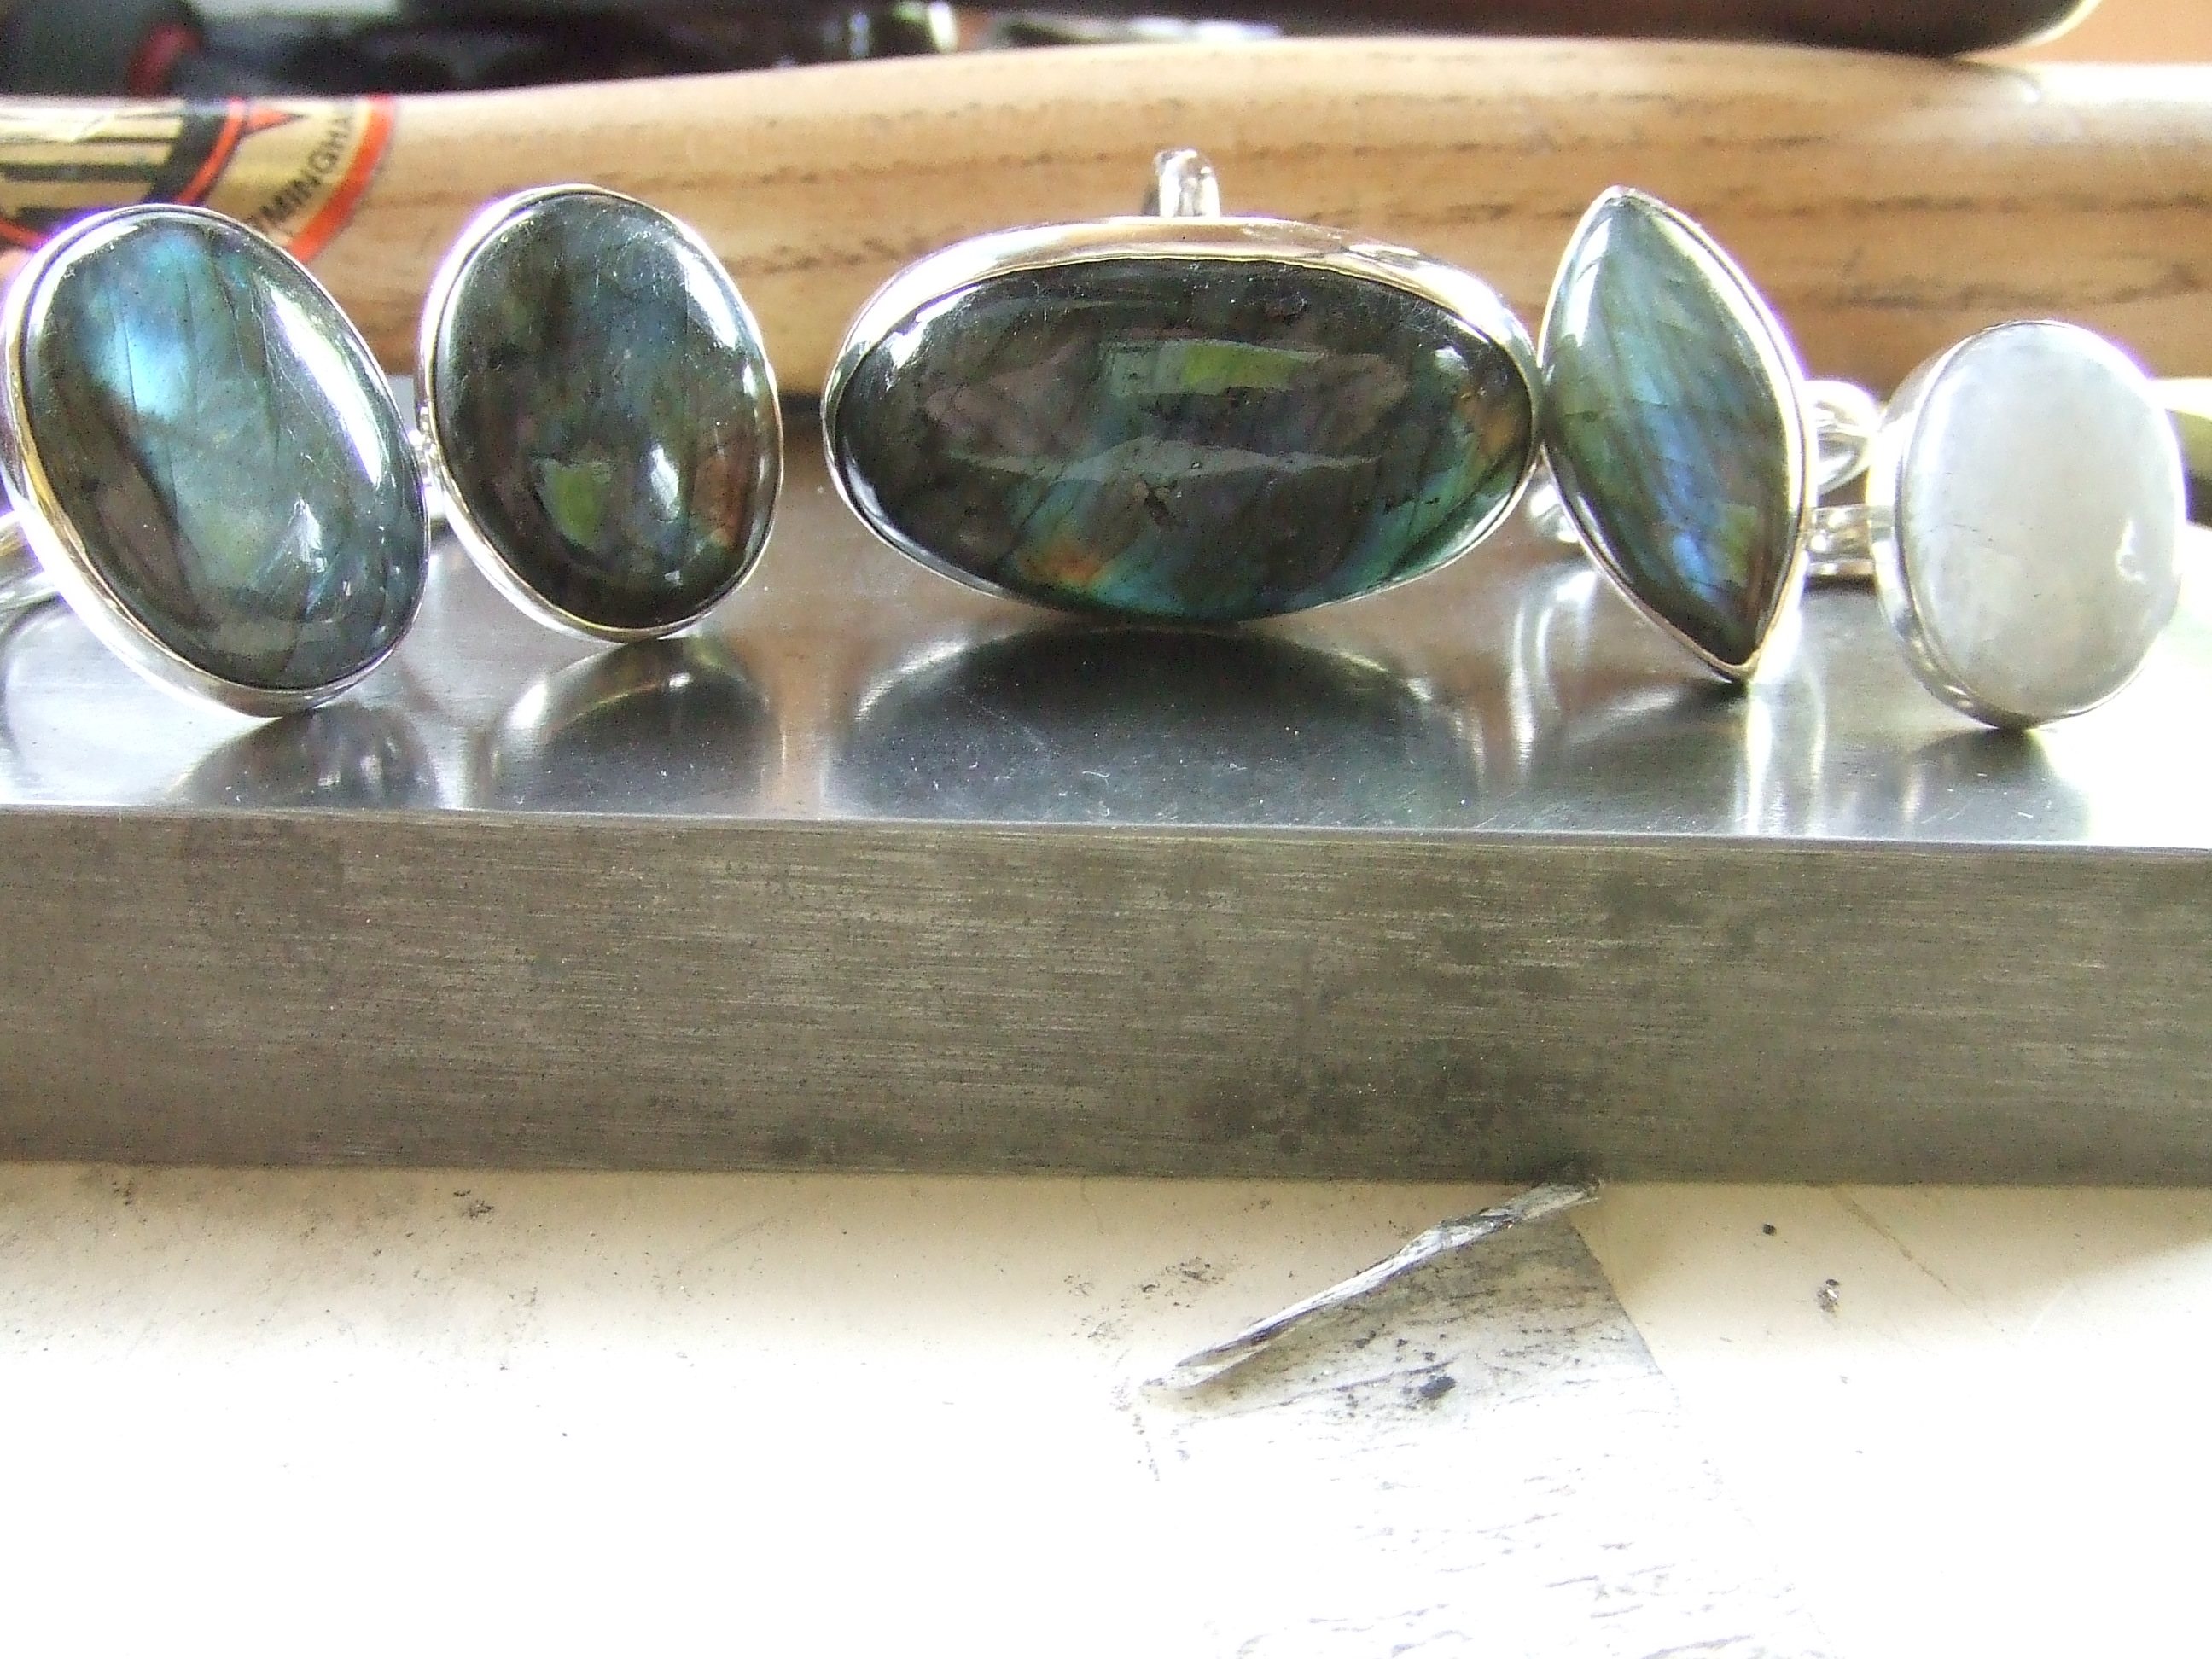
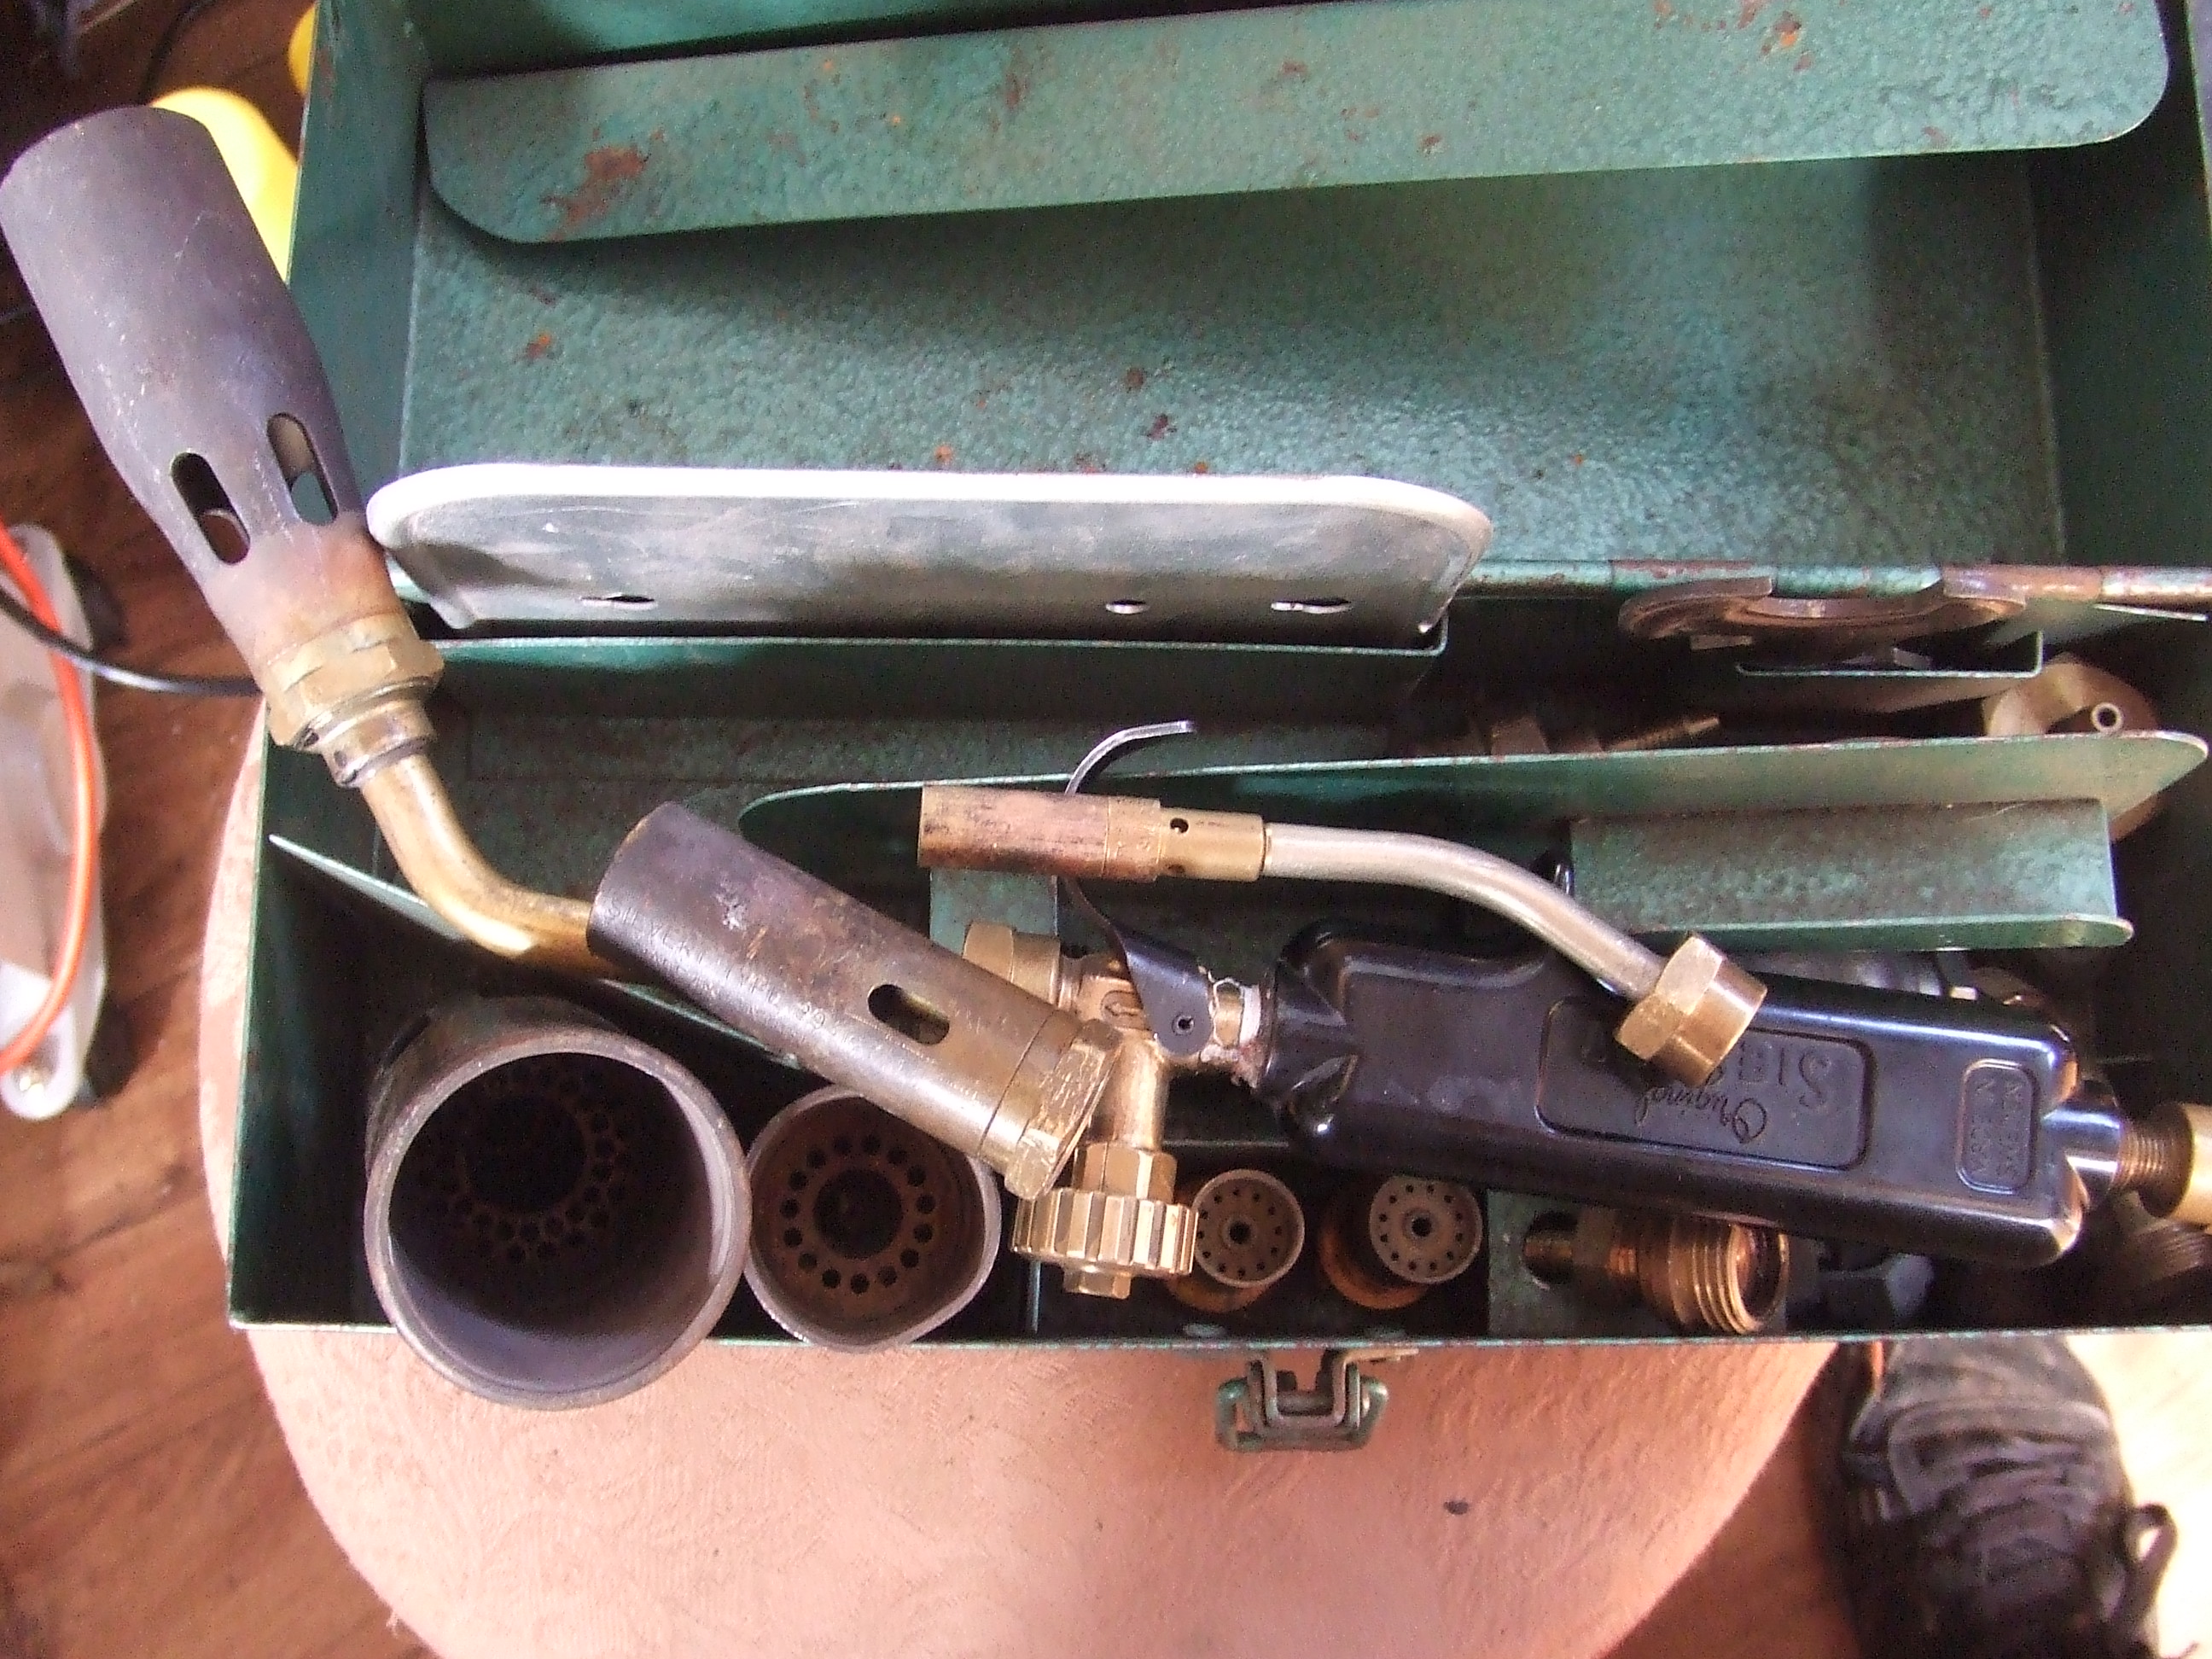
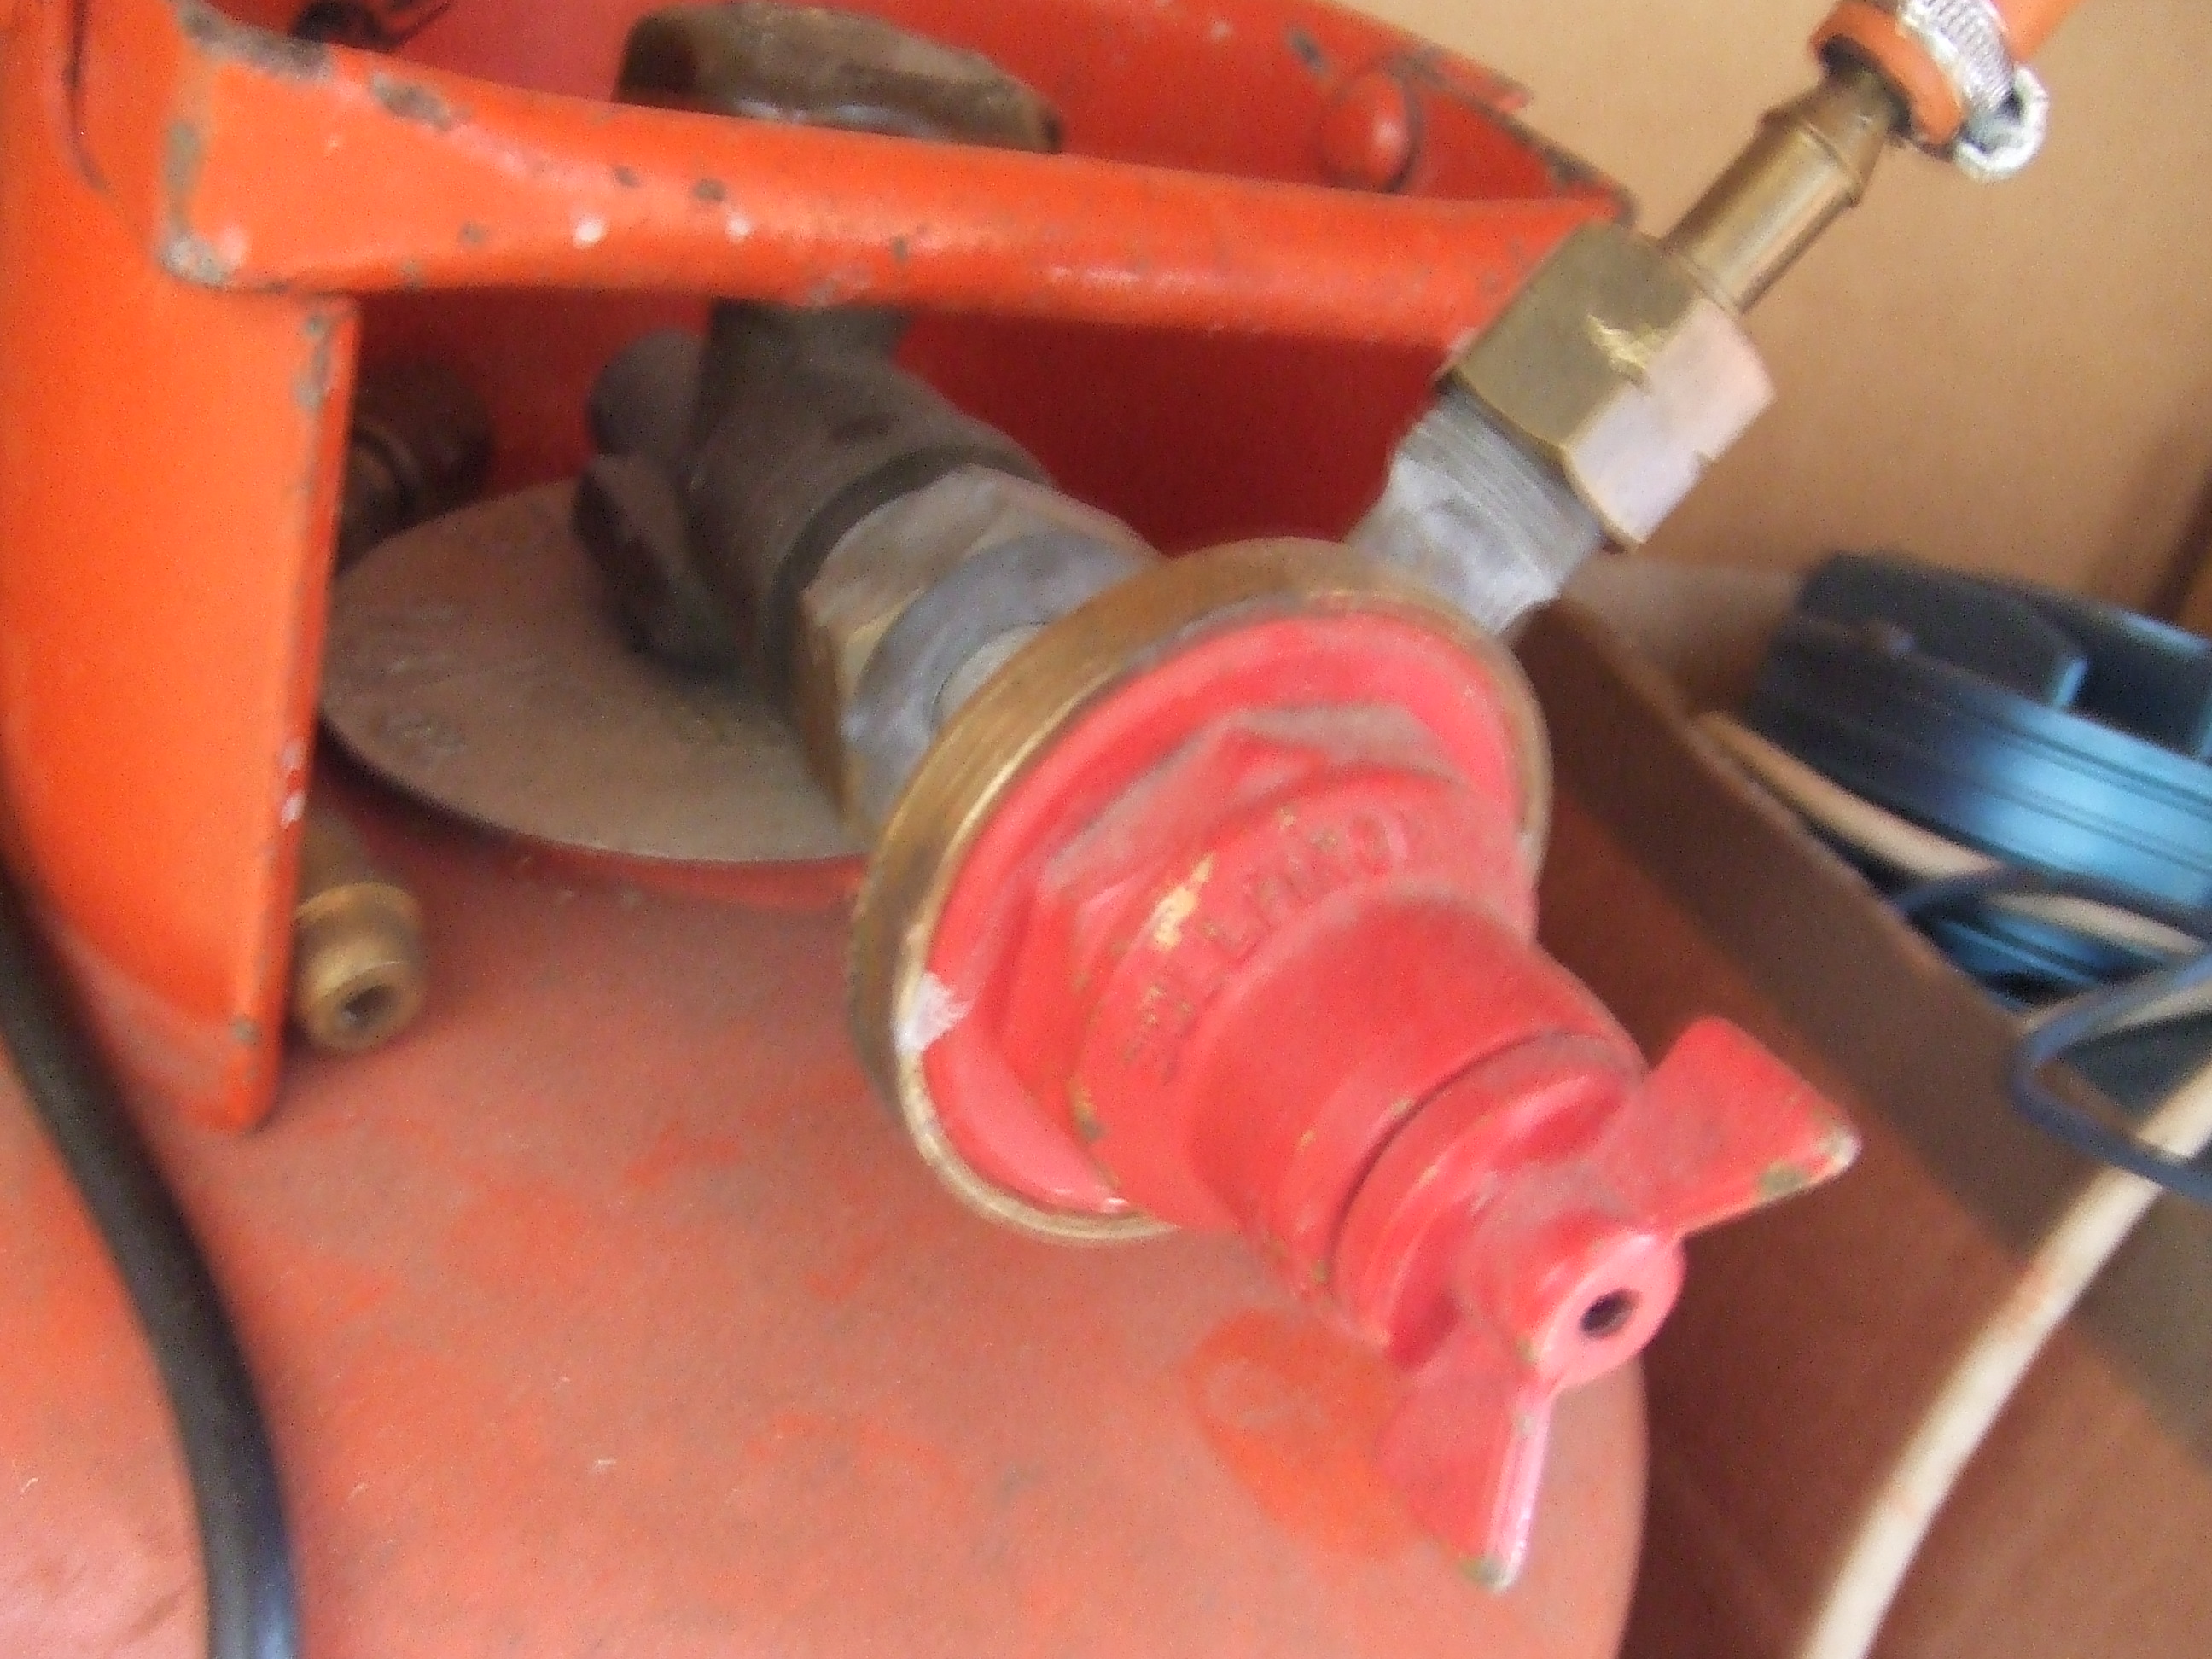
I had a question regarding the set up I use for annealing. The first picture shows my trusty Sievert set up. This is a very old set I purchased second hand on Ebay. Beware if you do similarly, this one leaked like a basket. On closer inspection the handle cracked and I had to modify/make new parts to make it gas tight. As far as I’m aware, Sievert no longer make this kit. However if you wish to have a set up like it for a fraction of the price, Machine Mart in the U/K have a comparable system, not Seivert, that looks very interesting and equally, if not more versatile than mine.

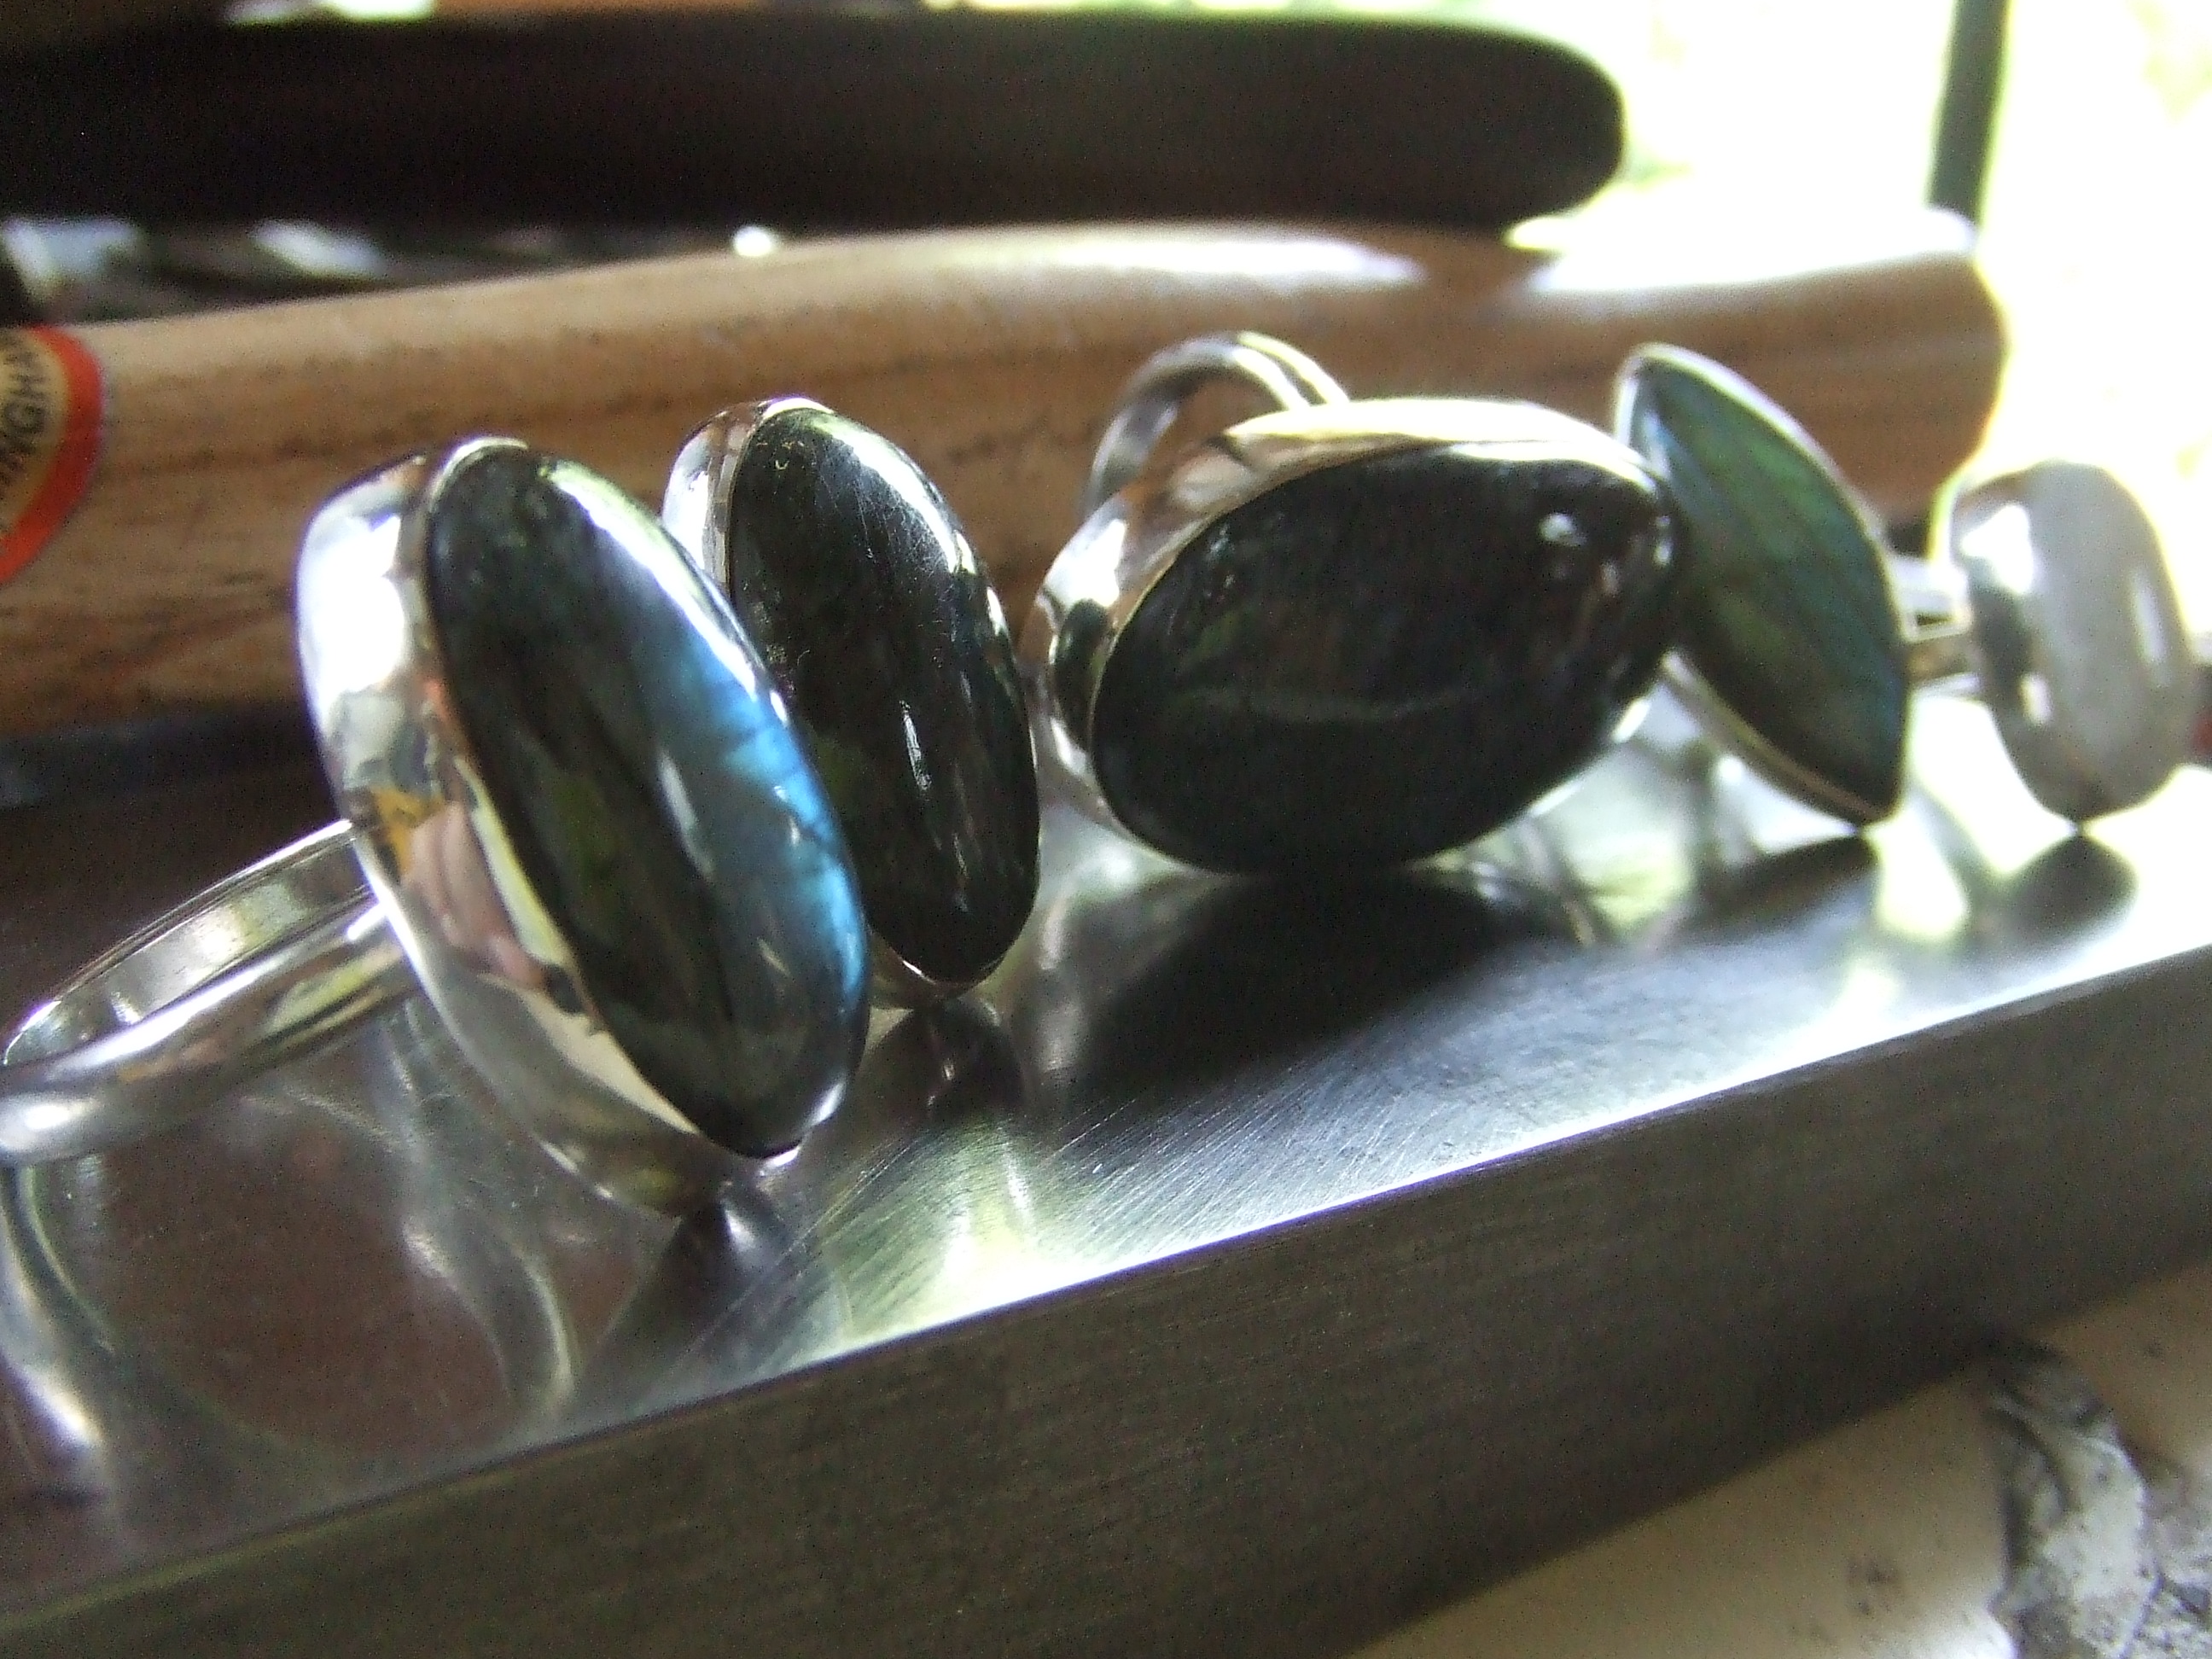
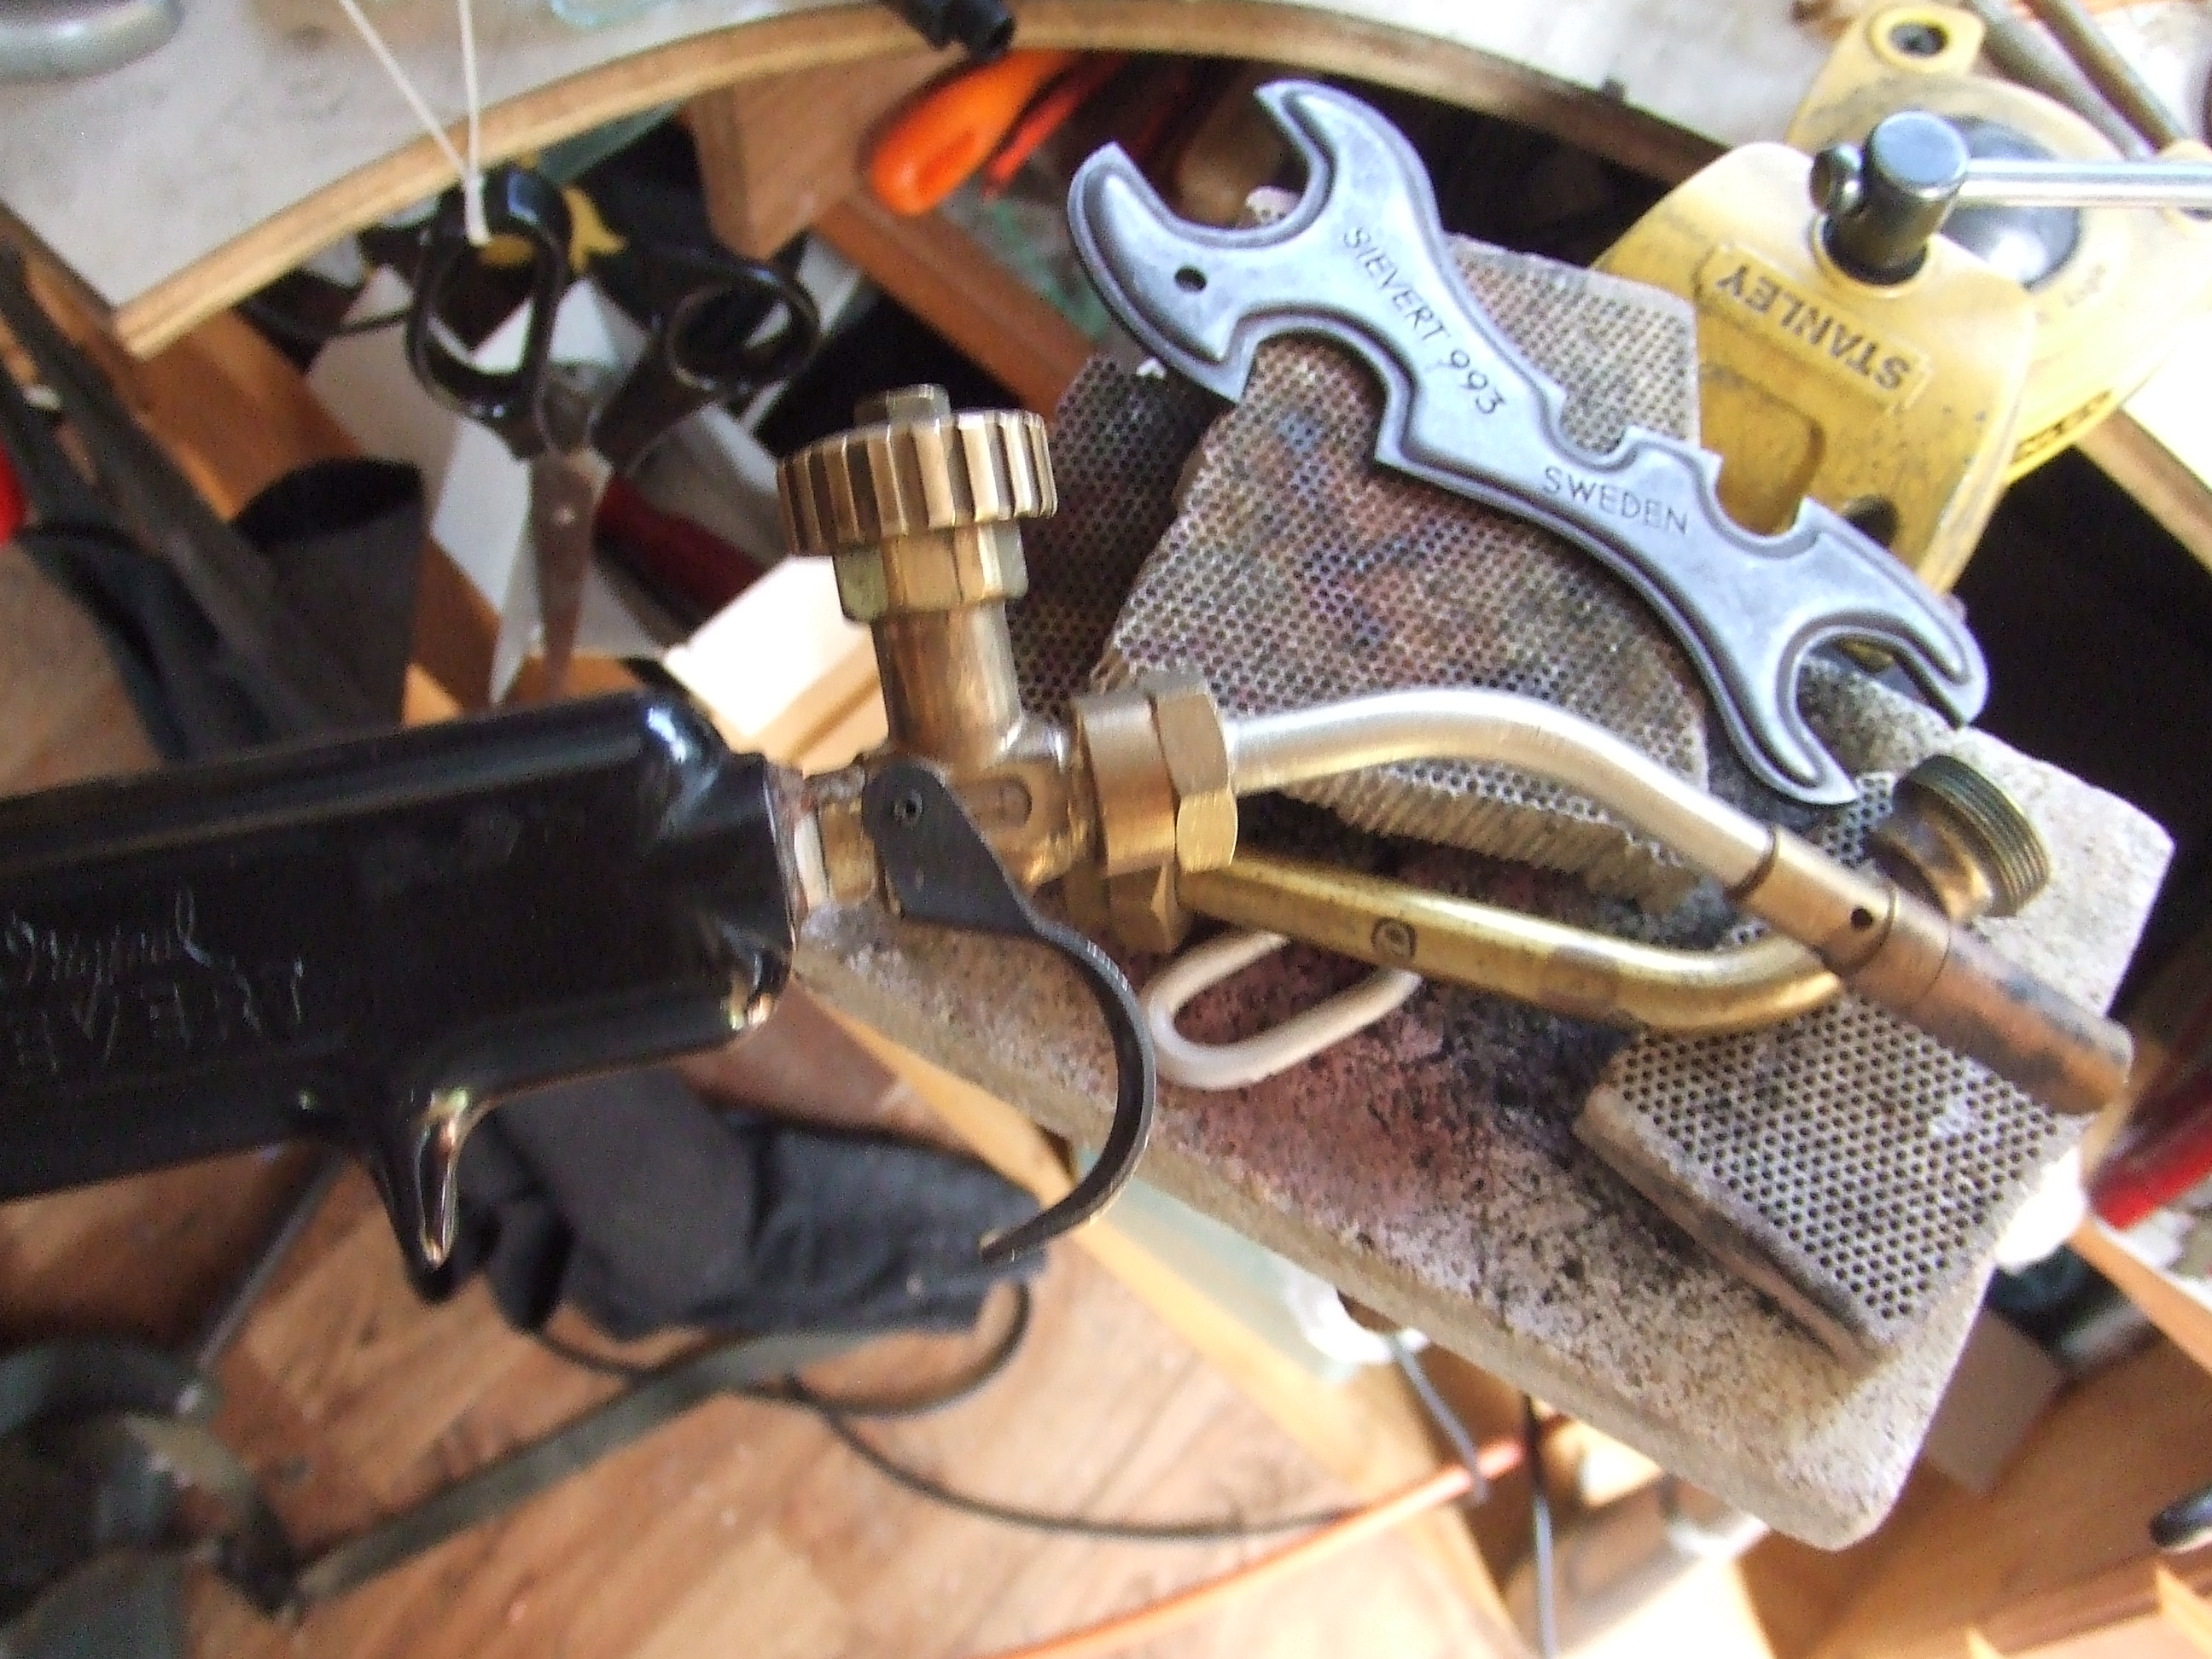
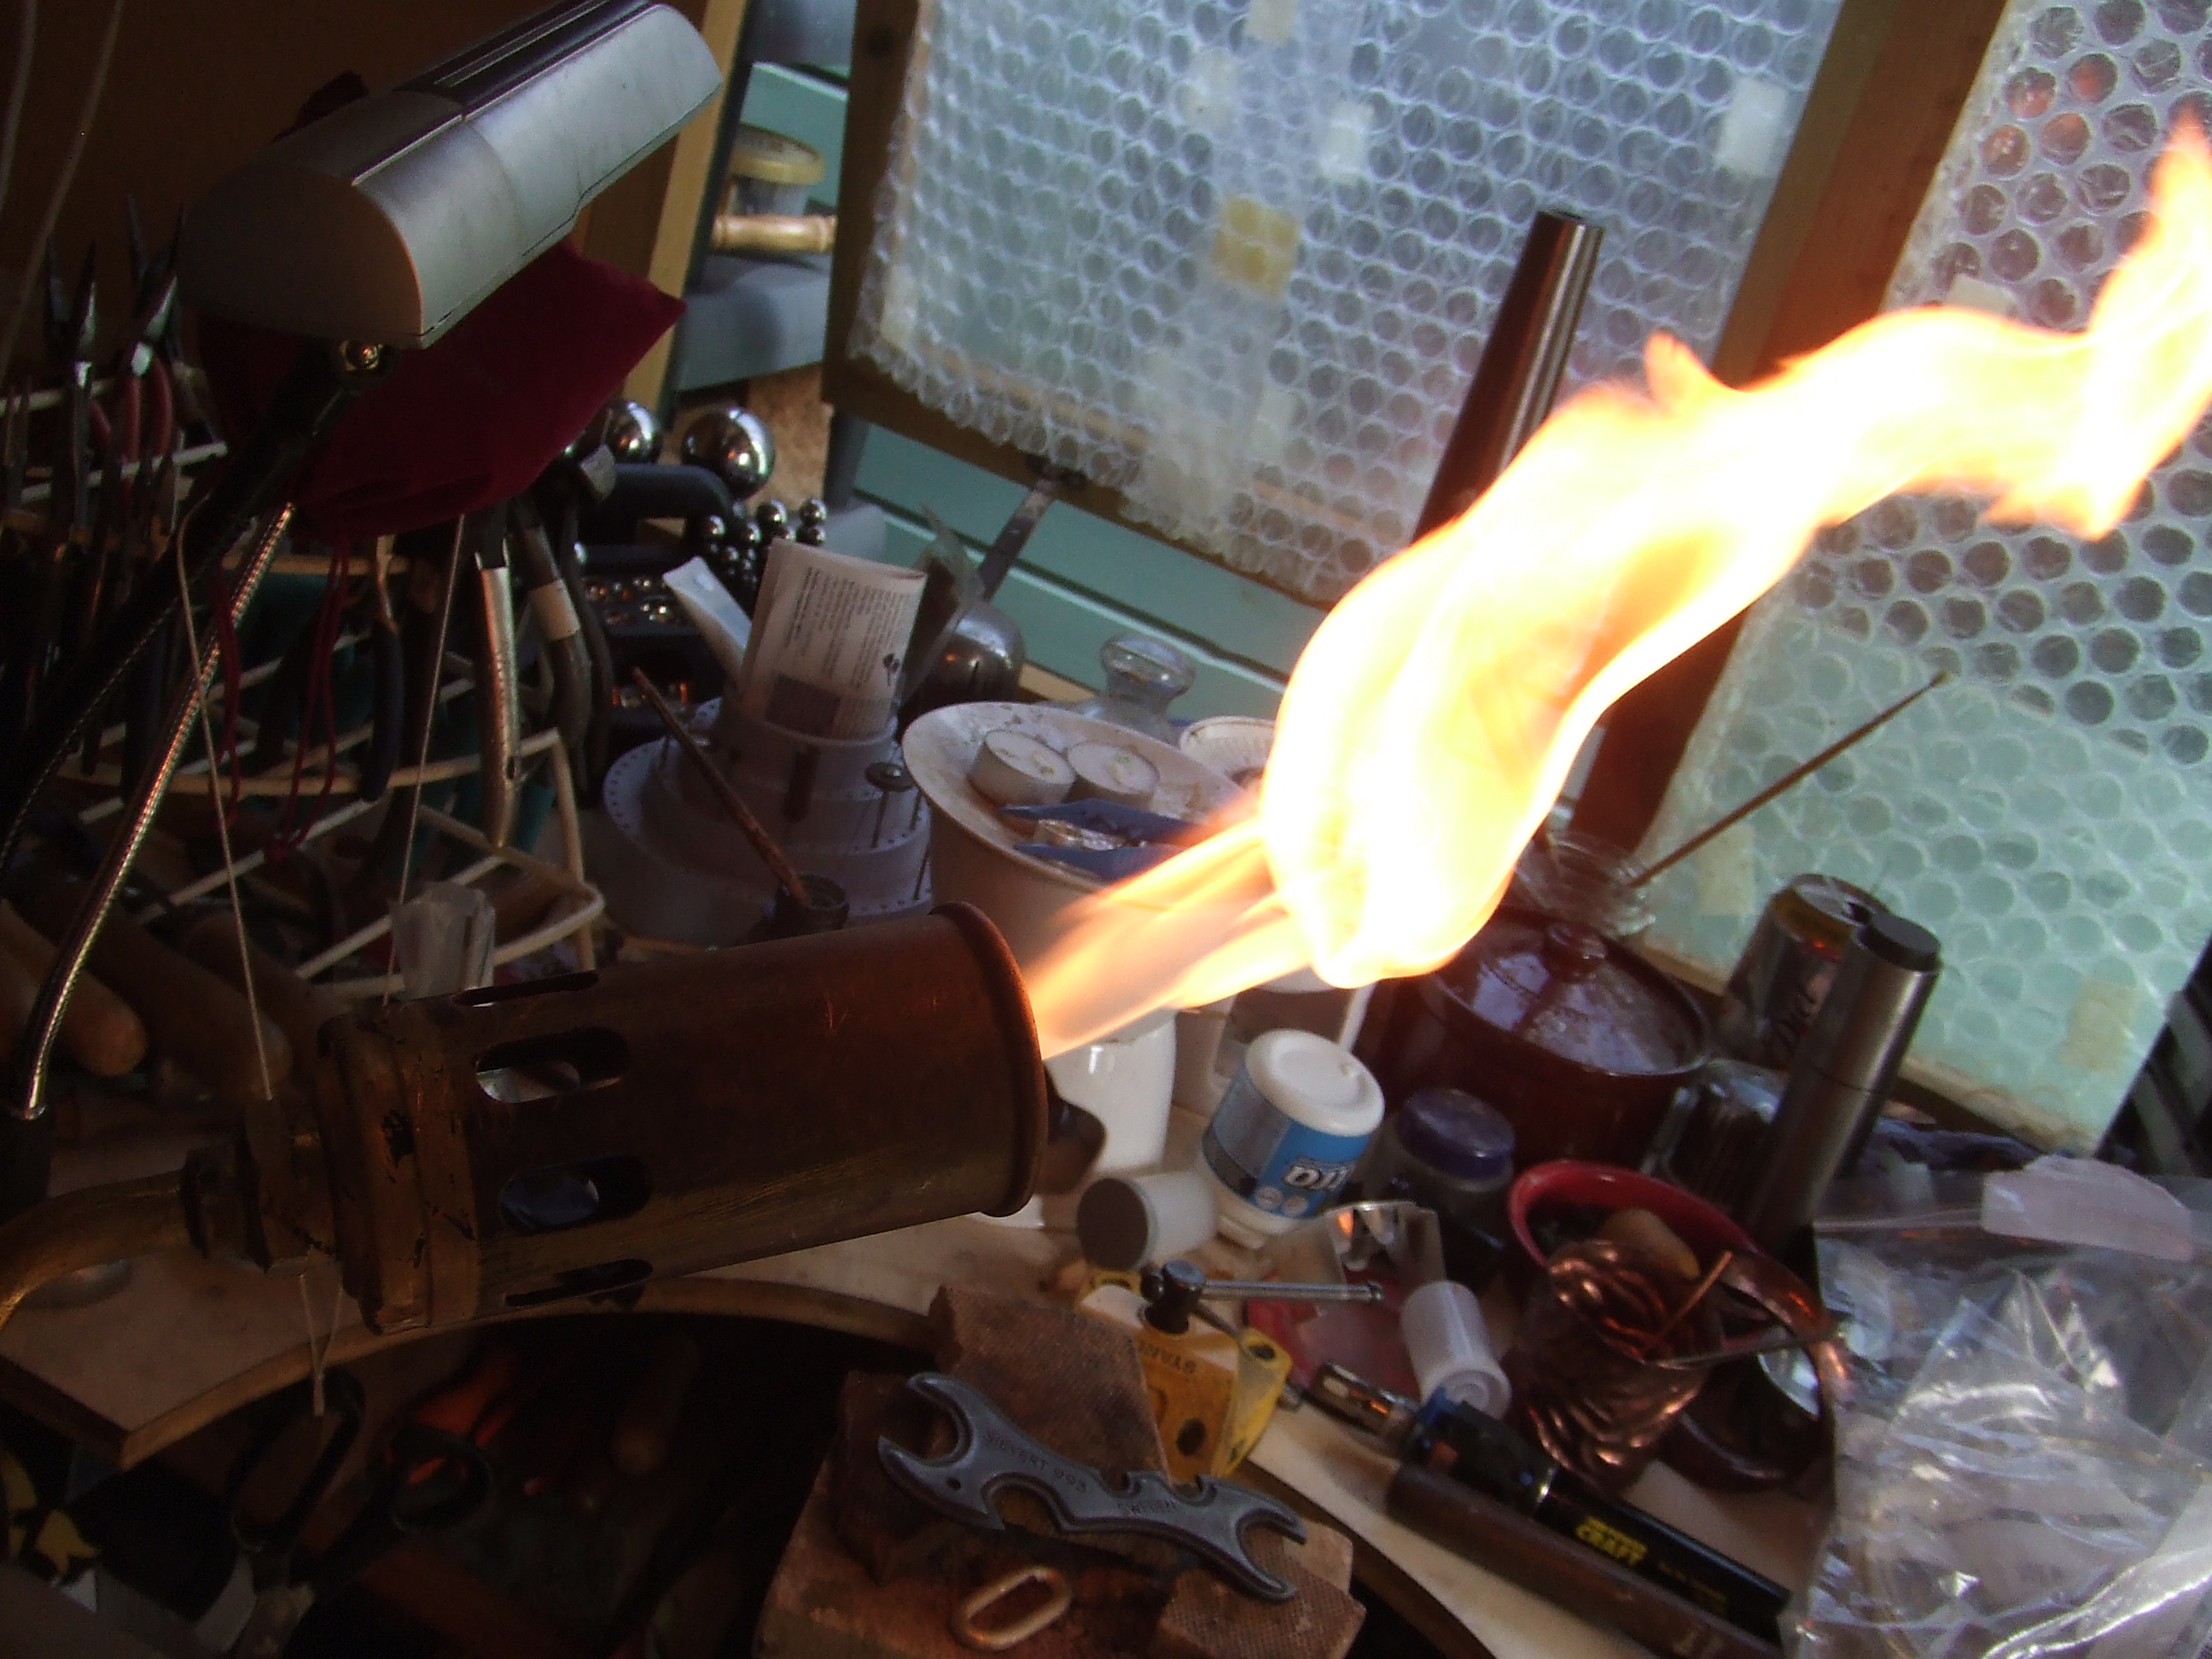
The first picture highlights the three nozzles I use most. The smallest one (part number 3937) is great for small work, think jump rings and the like. For general soldering and annealing of larger jewellery pieces, cuffs, large wire bangles ect, the one in the middle laying on the handle is great (part number 3941). For annealing vessels, quite large ones at that, in a shielded (firebrick) enclosure I have annealed a ten inch sheet with the nozzle shown attached to the handle in the first picture (part number 2943). The third and fourth picture show the smallest, with the needed small neck, and the largest in the kit. The largest nozzle I have (part number 3944) is shown lit on a very low setting. I show it here for you to see a soft flame is possible with this massive nozzle. I like that the flame given off is huge, it sounds just like a jet engine in the workshop, roaring away and bathing a very large surface area in a moderate to high heat. I find this creates an enveloping environment that is less likely to produce hot spots that more fierce and directed flames used by some twin pack set ups, like Oxy Acetylene for example. MAPP gas is hugely expensive. For large sheets I shudder to think of the cost. To my mind its overkill as the temperatures these systems are capable of are never needed if you stick to silver, copper and the like. The twin pack gasses are really best suited to precious metals where very much higher temperatures are required to anneal and solder. I appreciate this is my opinion derived through my experience. Please do comment if you have anything to add.

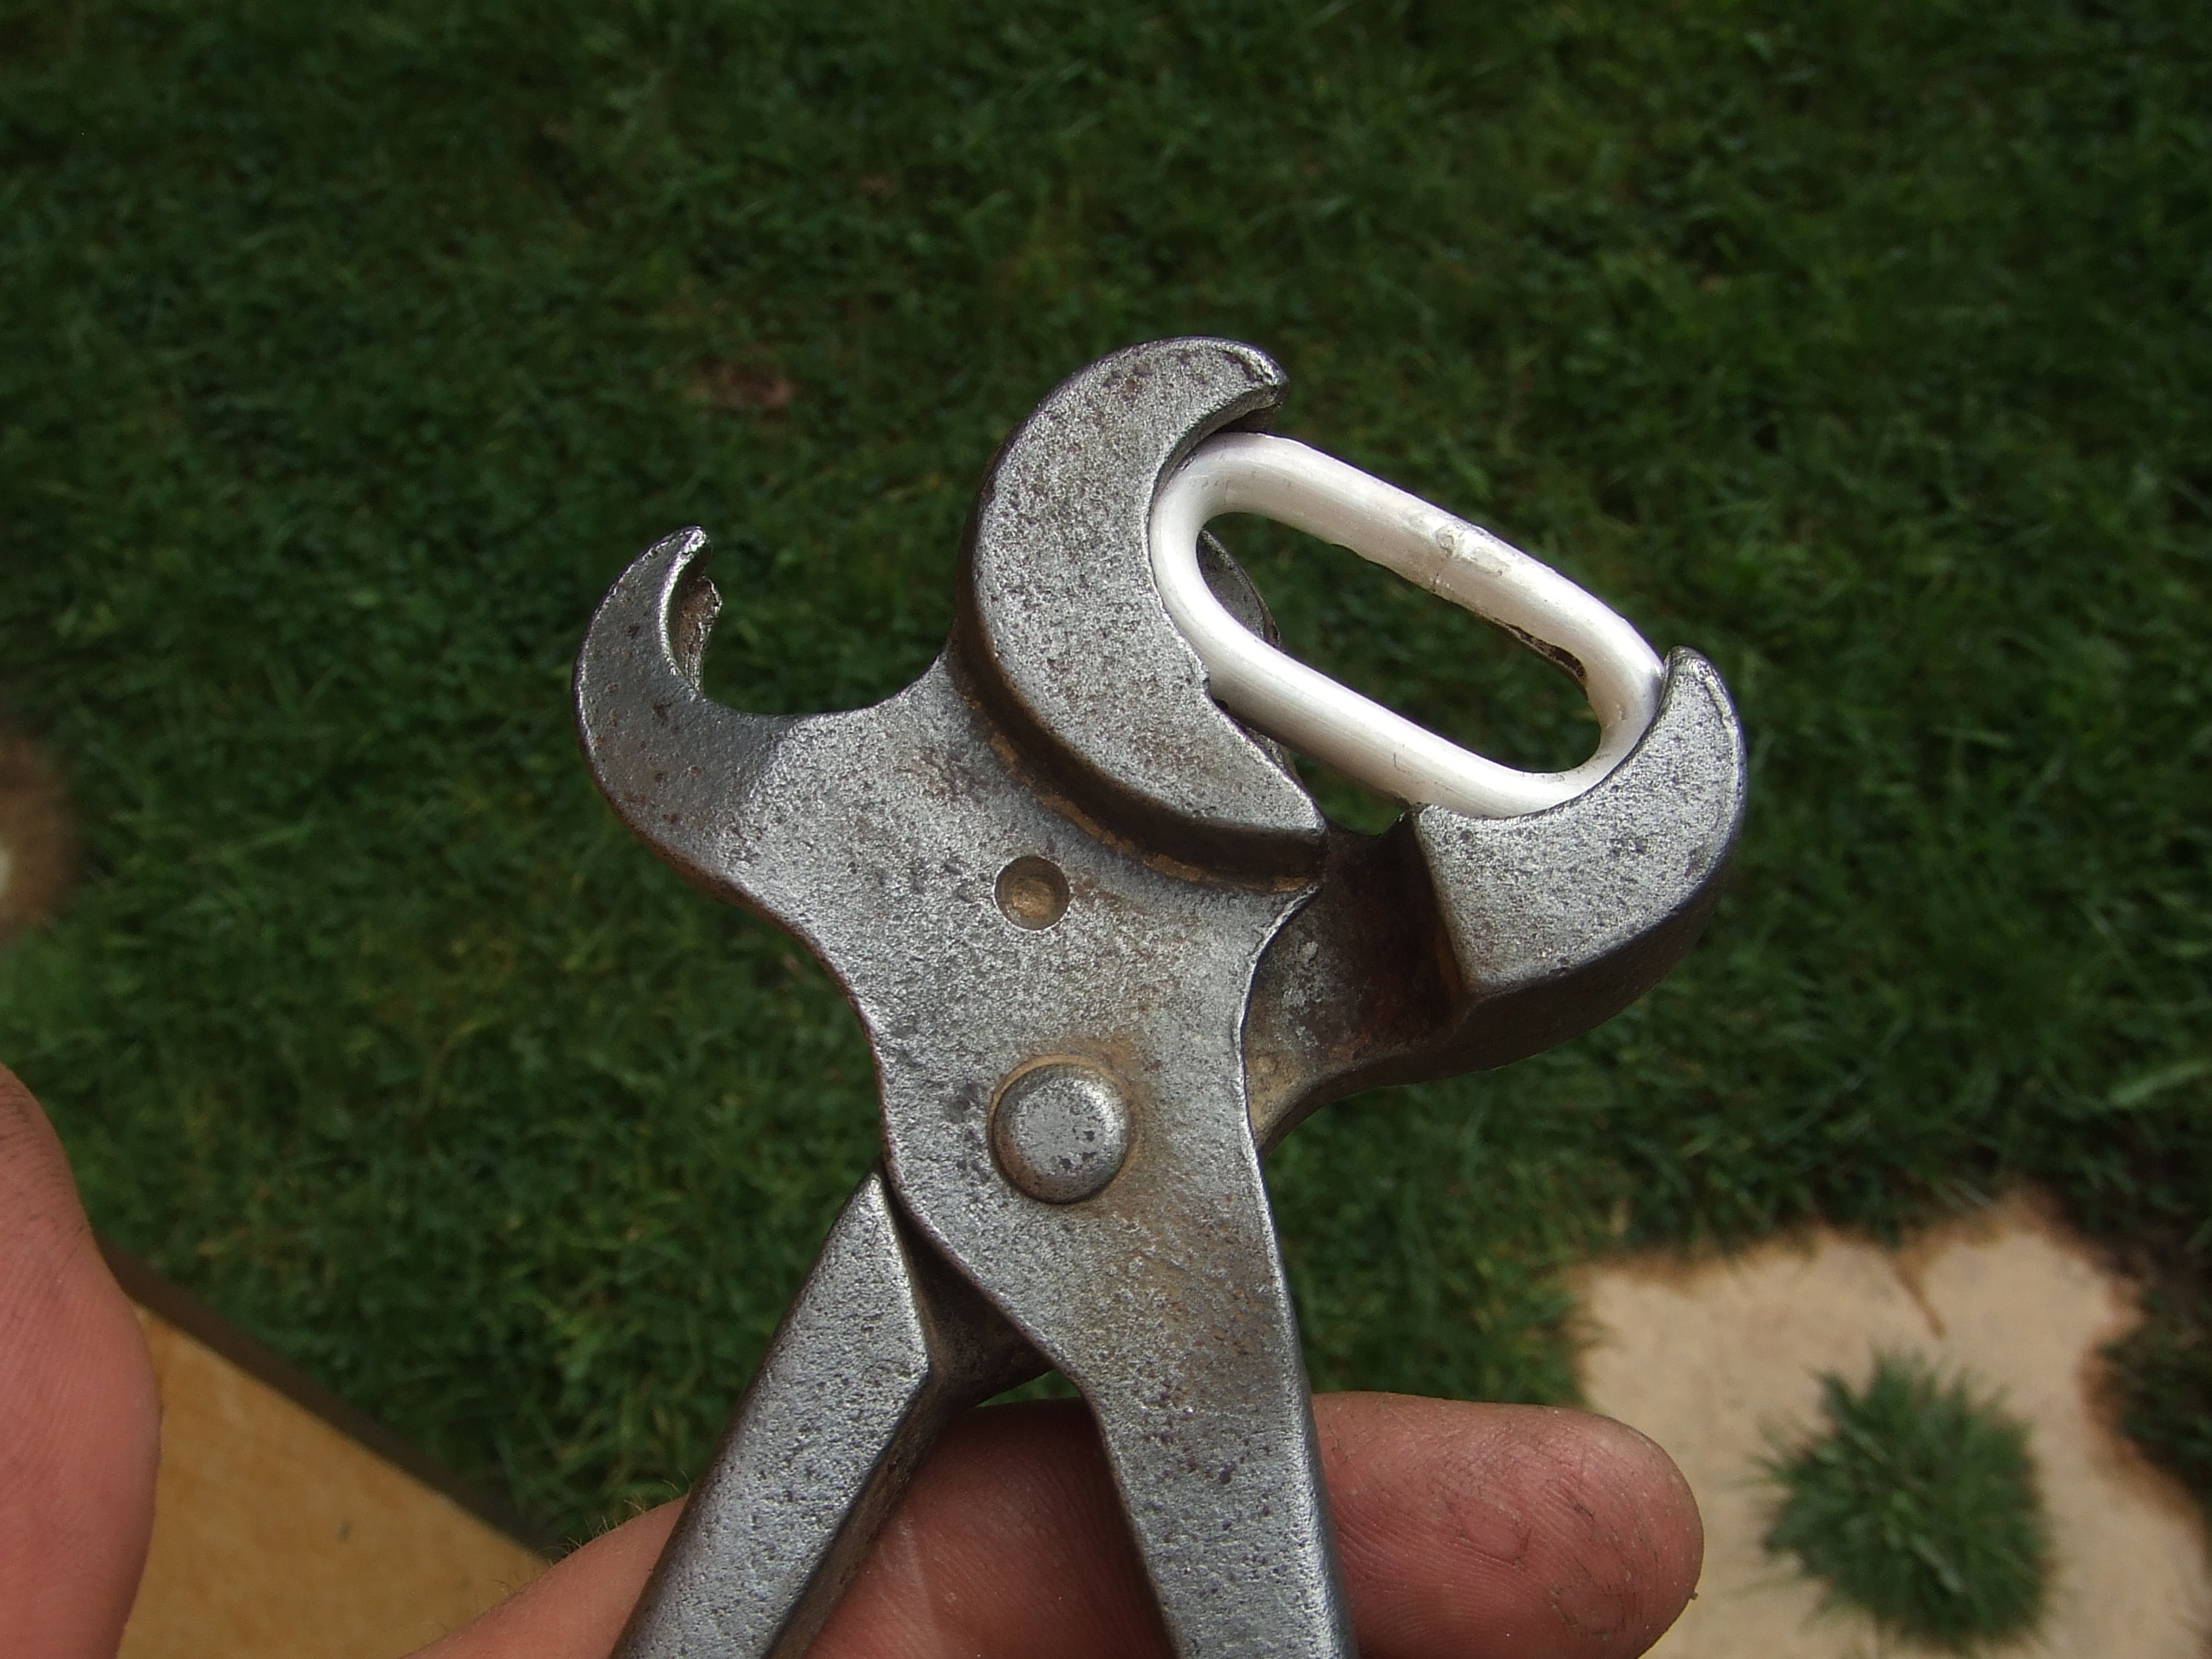
I use common garden Propane. The second picture shows my additional step down regulator. If you choose to have a, do everything set up, like mine, best you invest in one of these. Great for toning down when using the smaller nozzles with a simple tap, as you can see. I can’t speak for countries other than the U/K. The Propane I use comes in a red bottle of various sizes. Its very reasonably priced, if you do a lot of annealing then you have the option of a 47KG bottle that will last along time. I have the smallest bottle in the workshop, and a couple of larger ones for annealing larger work under my carport, I have another handle and hose, just needing to swap the nozzles, you can see the spanner in the 3rd picture.

I understand that Butane is calorifically higher, hotter, more bang for your buck. I have not felt the need to try it, besides I would need to purchase a new regulator if I did. If you must mix. Sievert, and other handles are available that will allow you to add air if you wish. This will make a very much hotter flame, I guess you could hook it up to a compressor if you wished to keep cost to a minimum. If anyone uses such a set up, I, we indeed, would be very interested to learn of your experiences with it. Butane is sold in blue containers with similar sizes, though I don’t think you can get the giant 47KG ones as you can with Propane. Again I am ready to stand corrected should anyone enlighten.

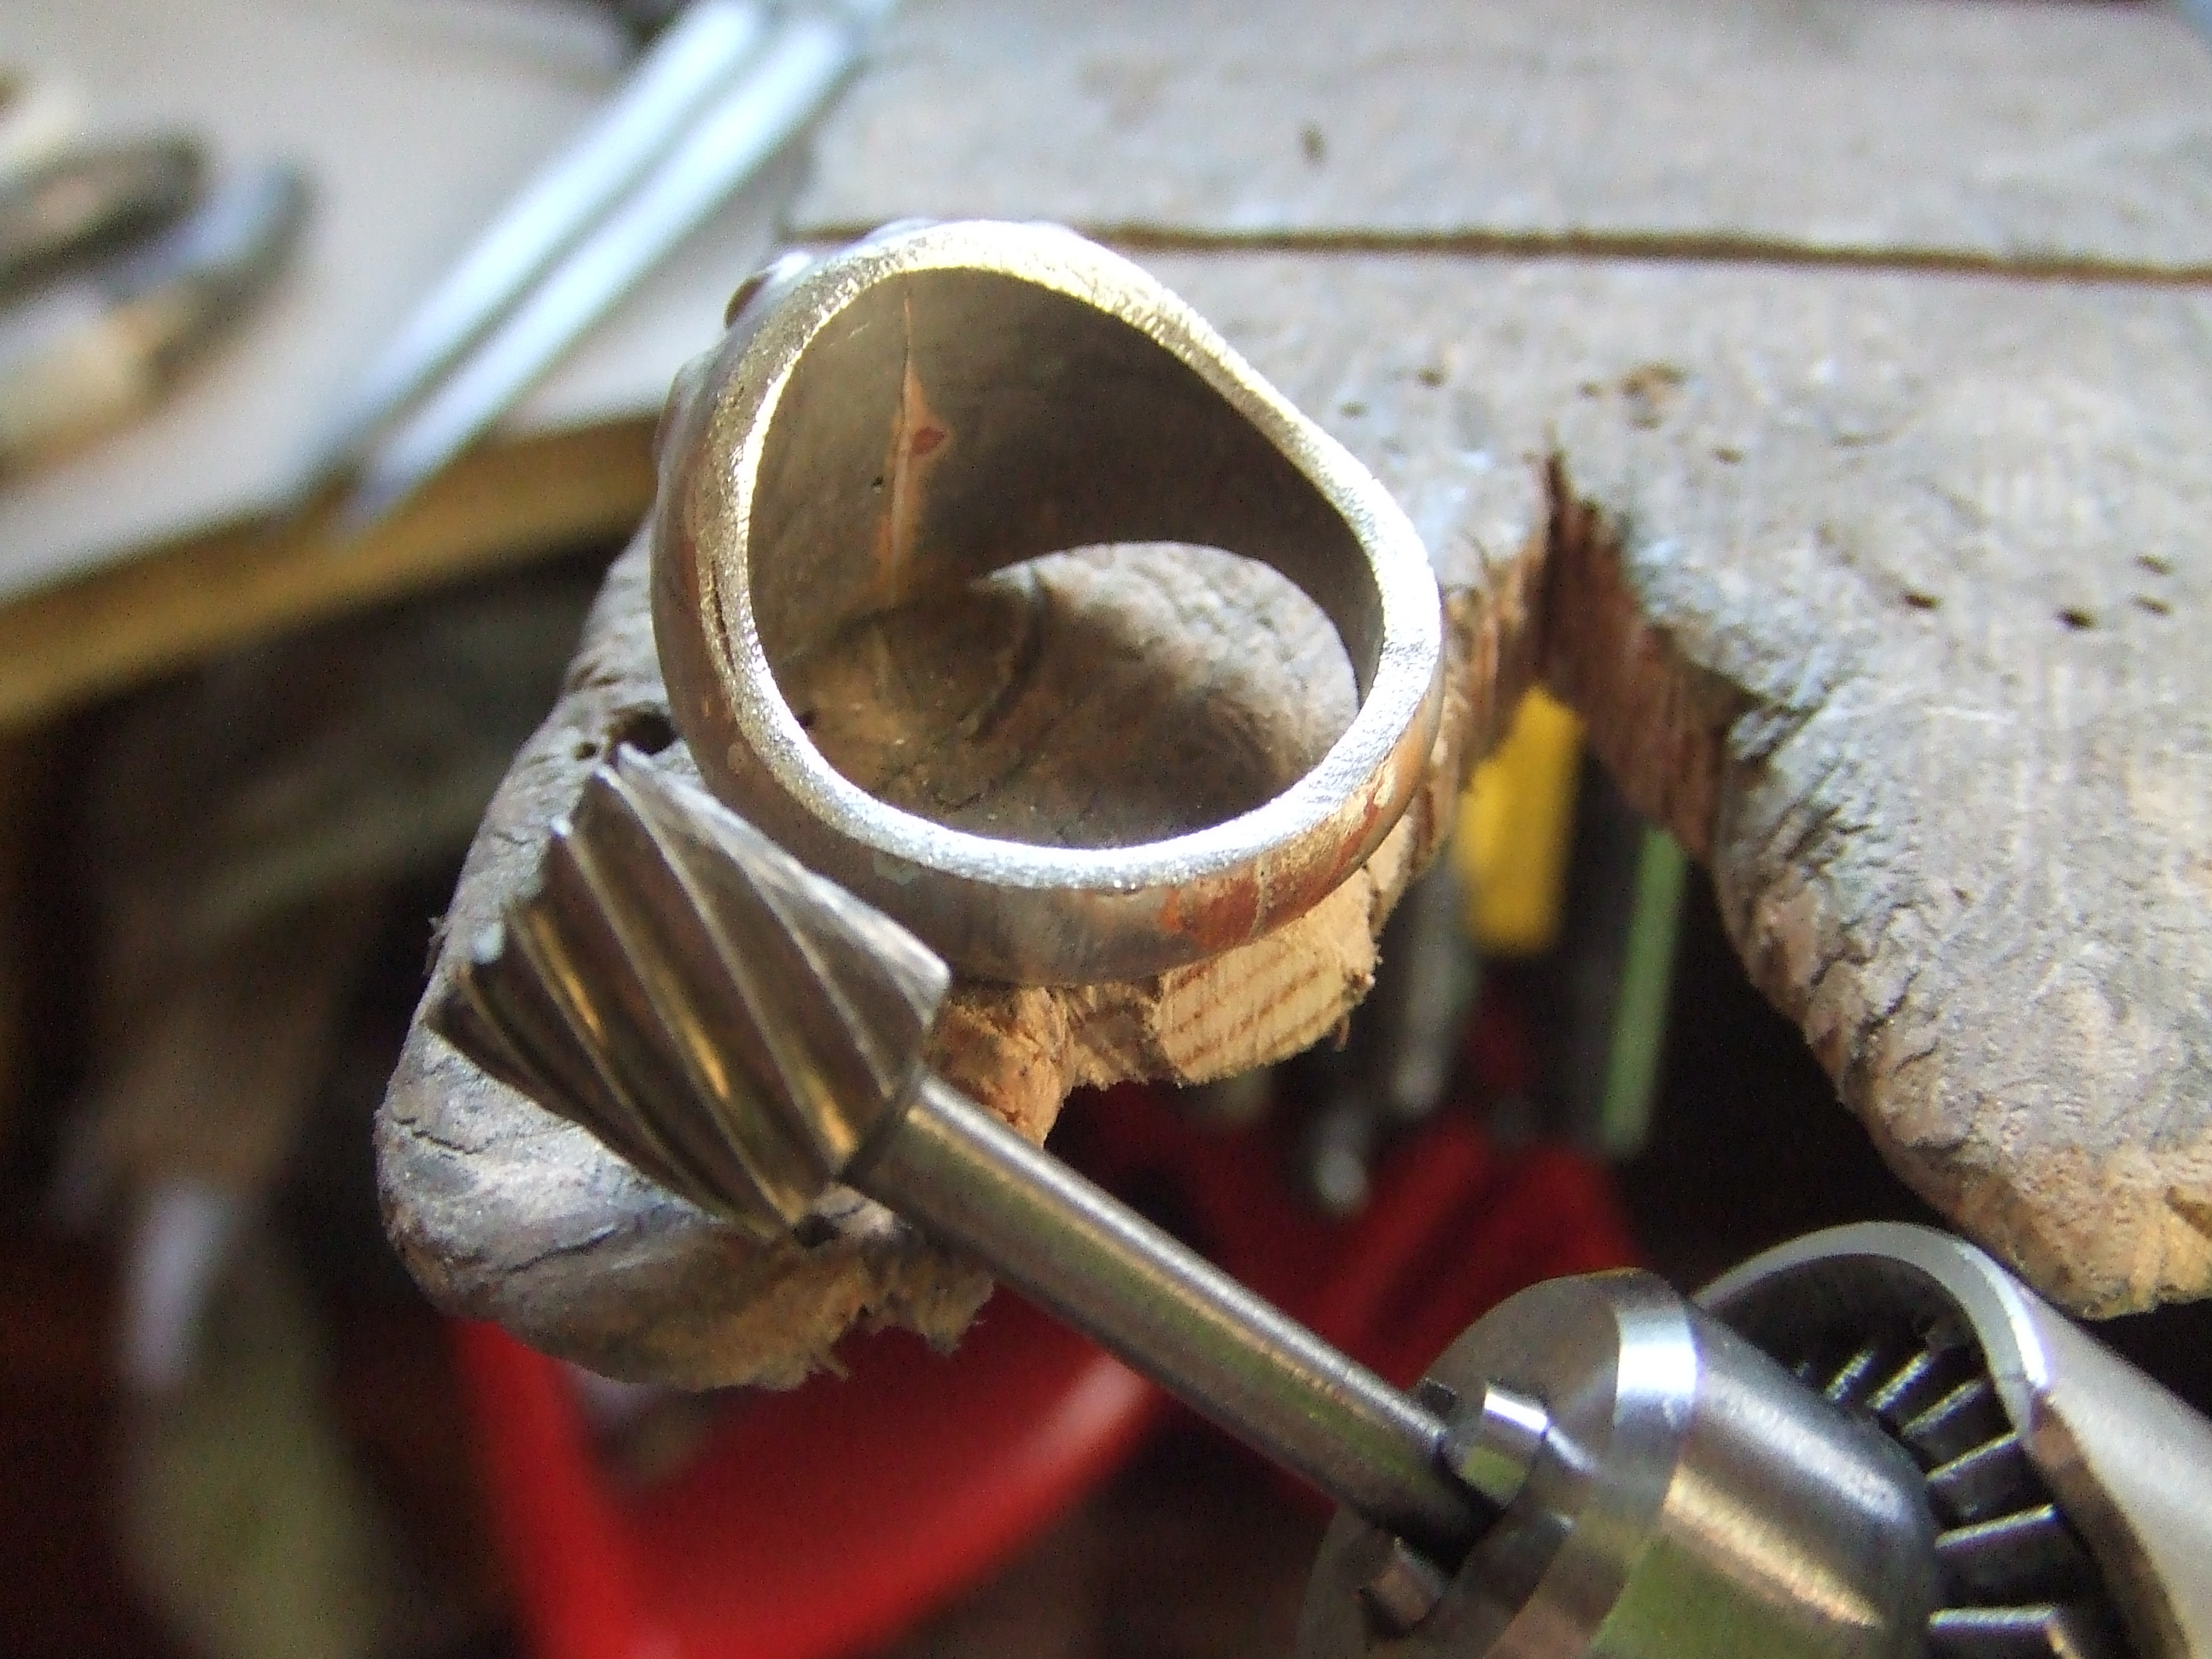
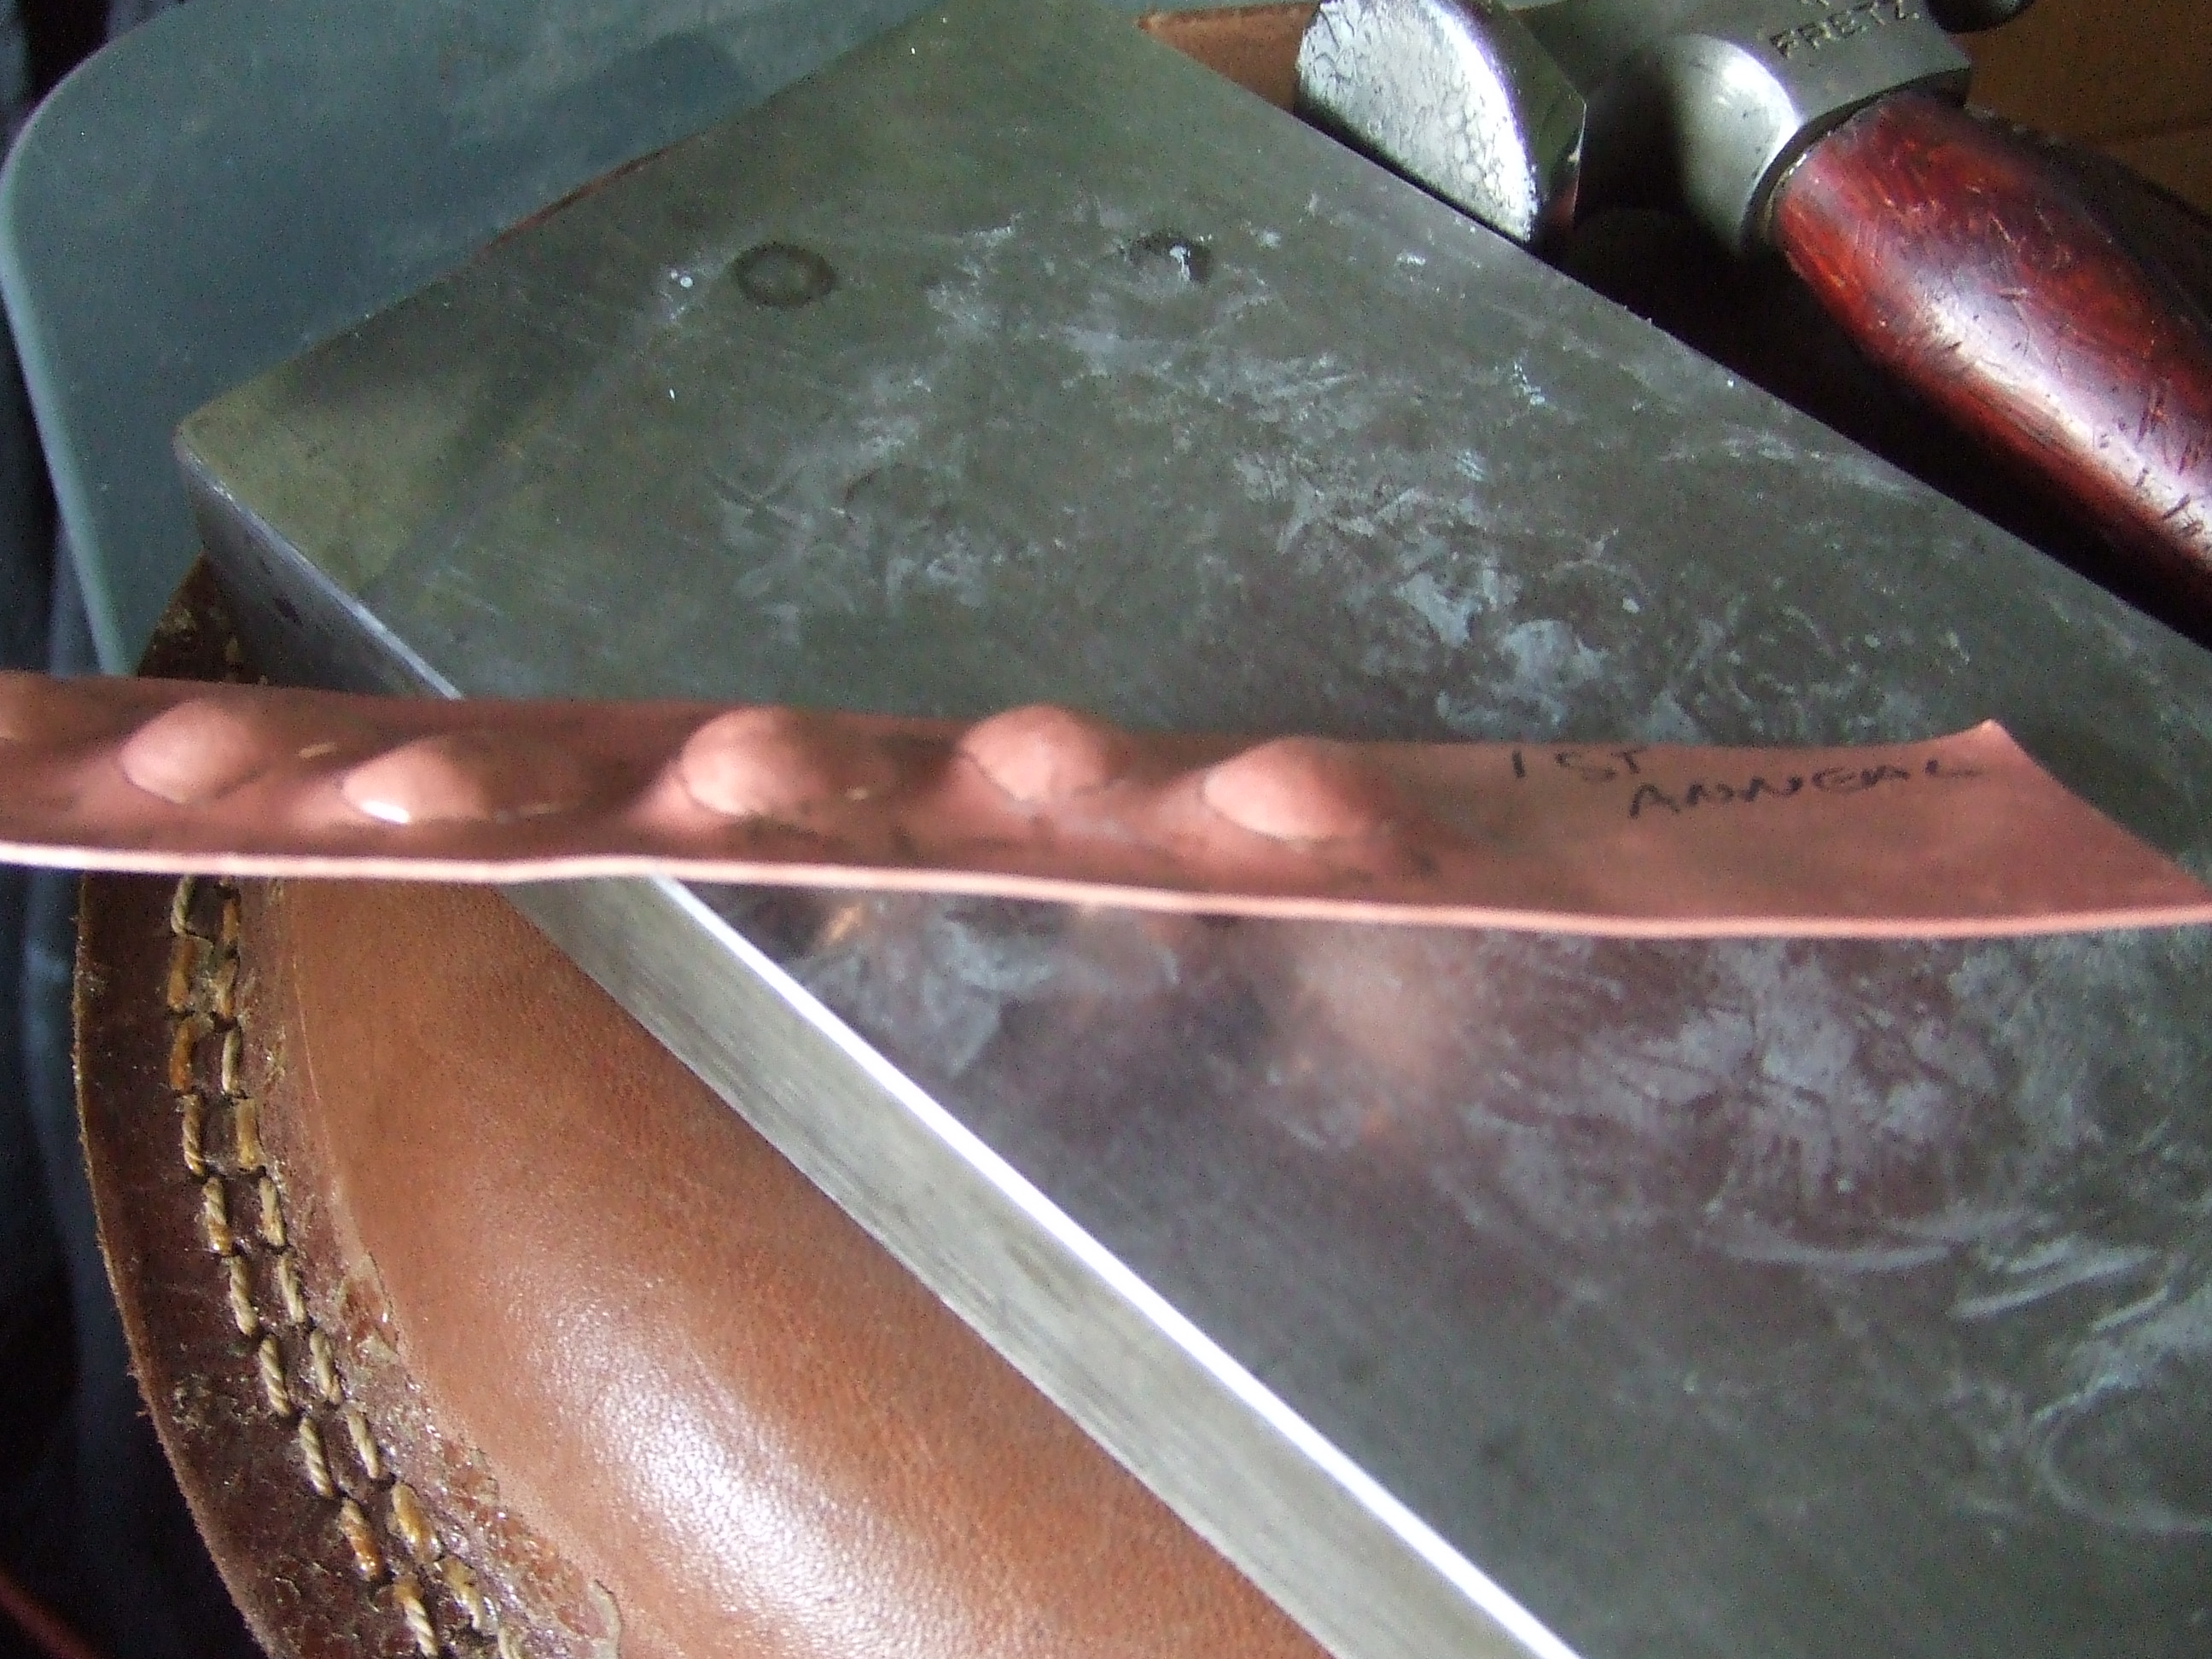
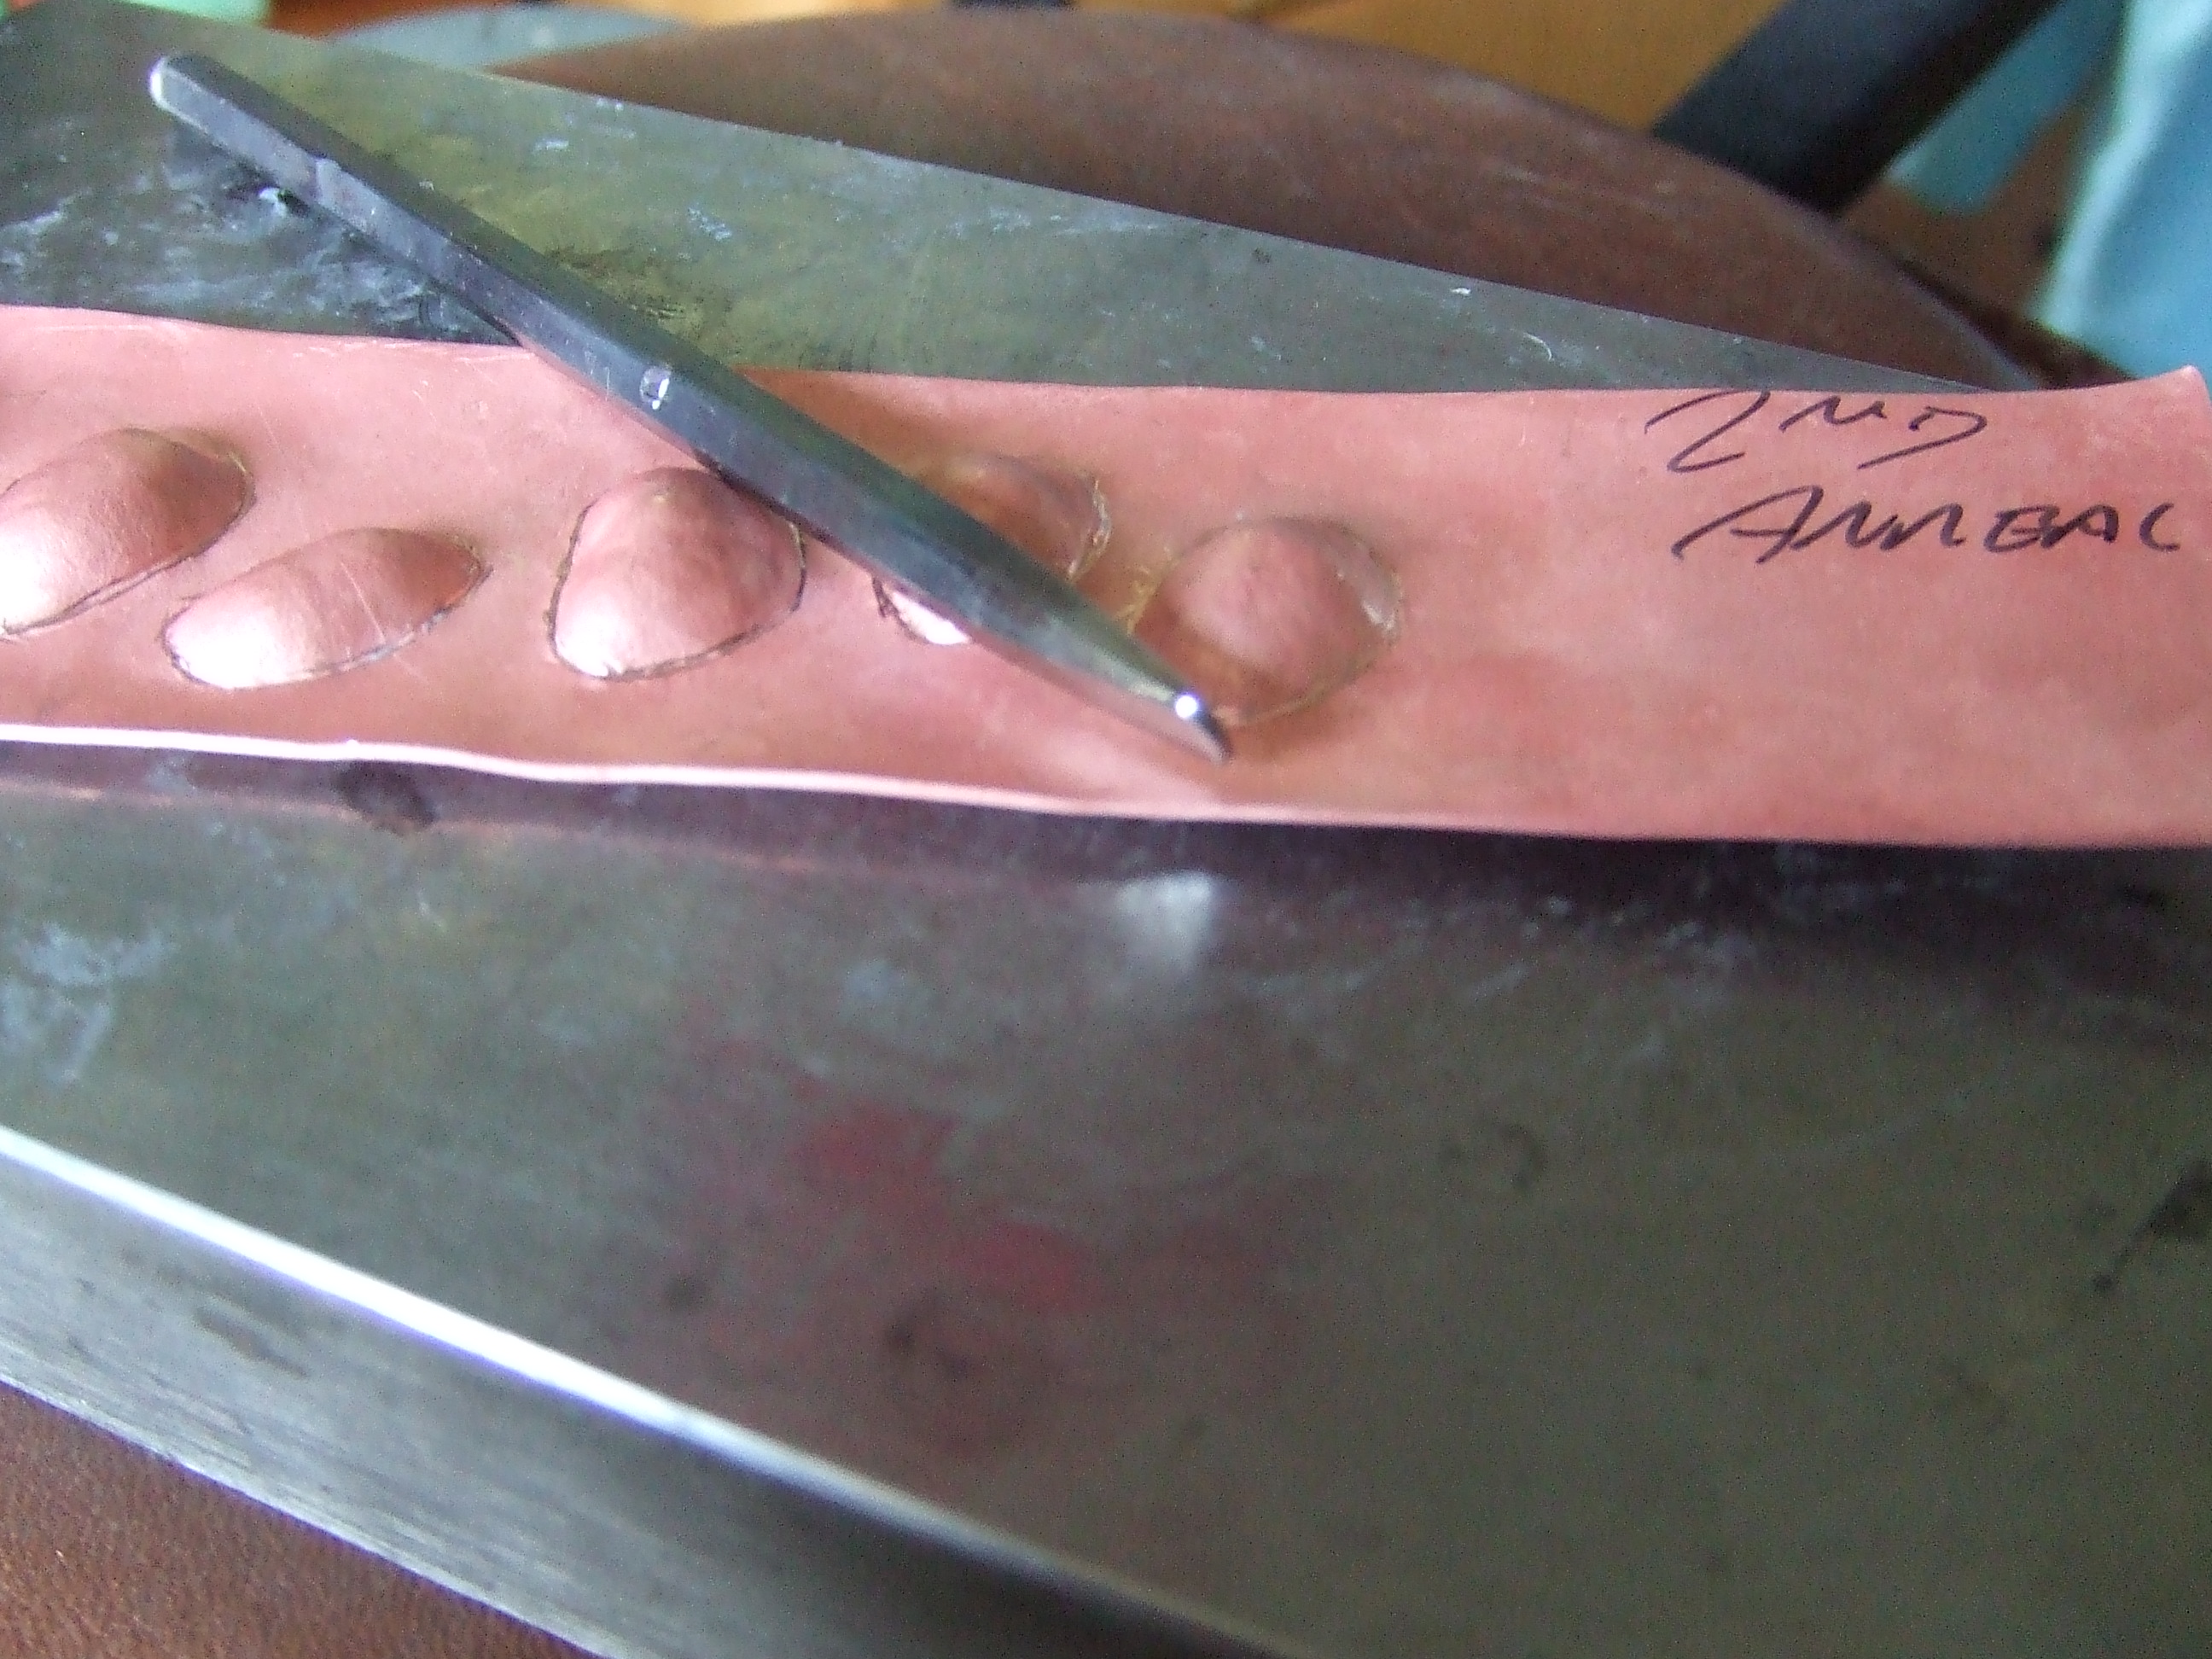
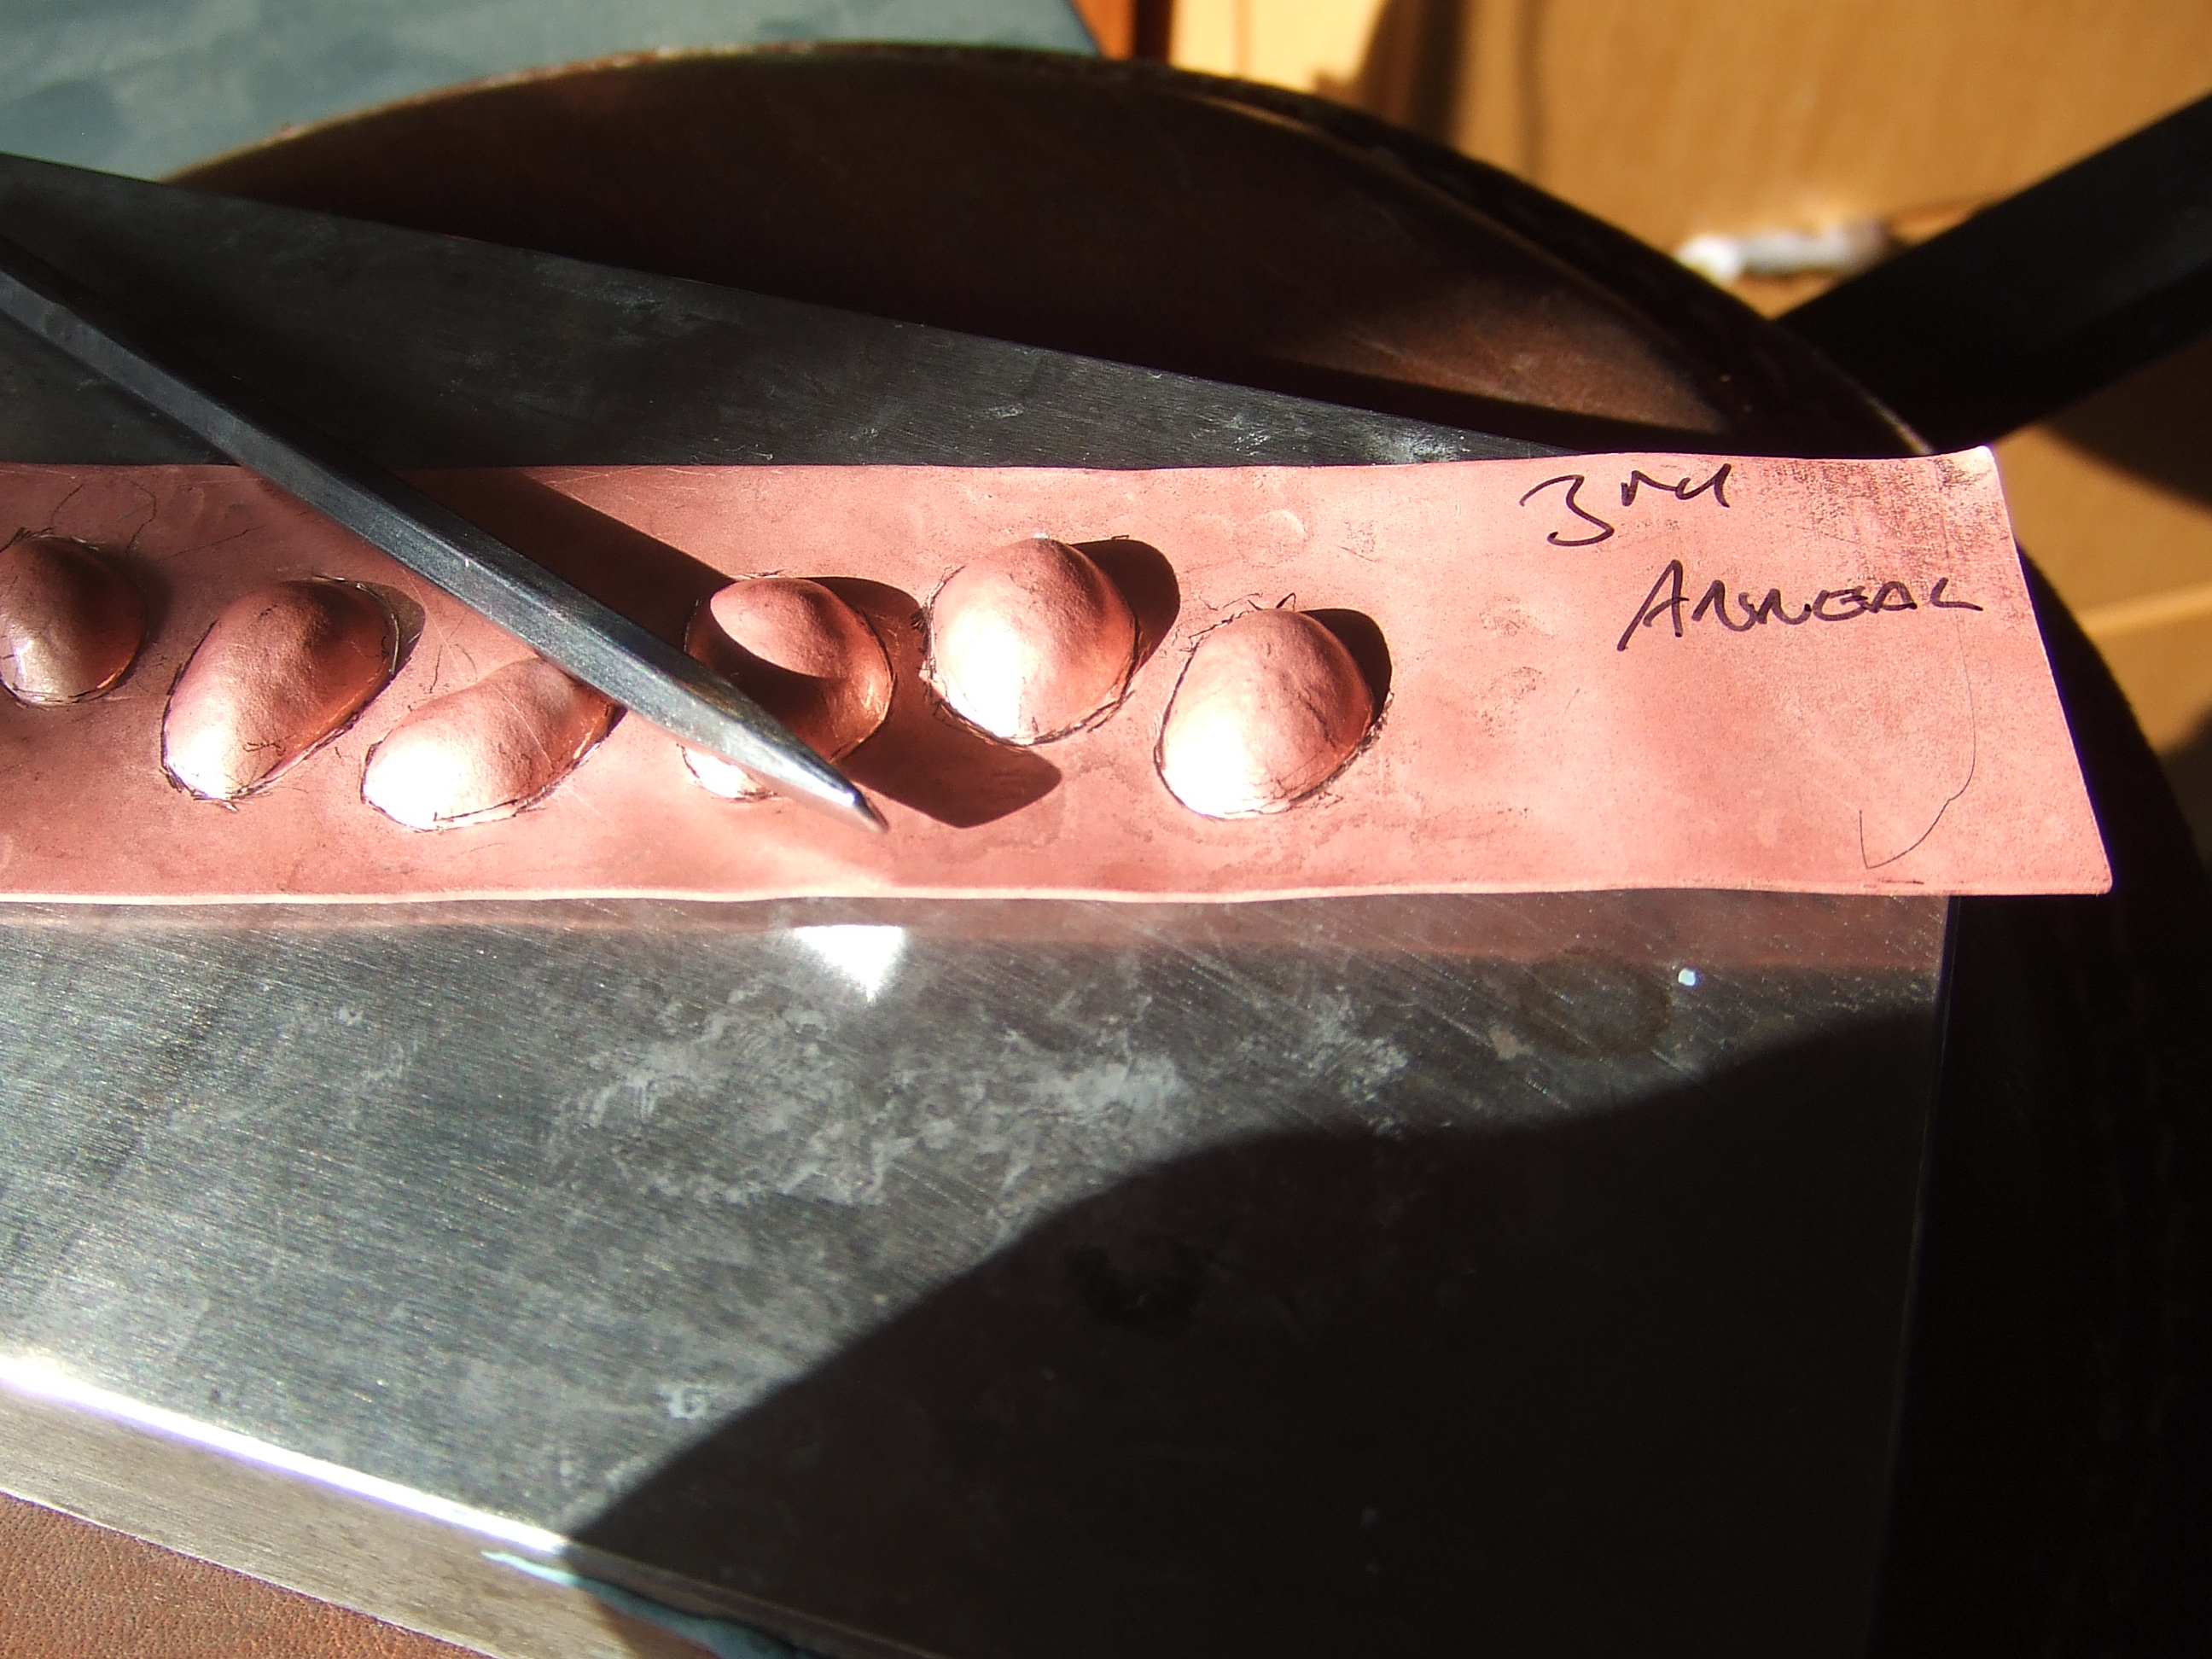
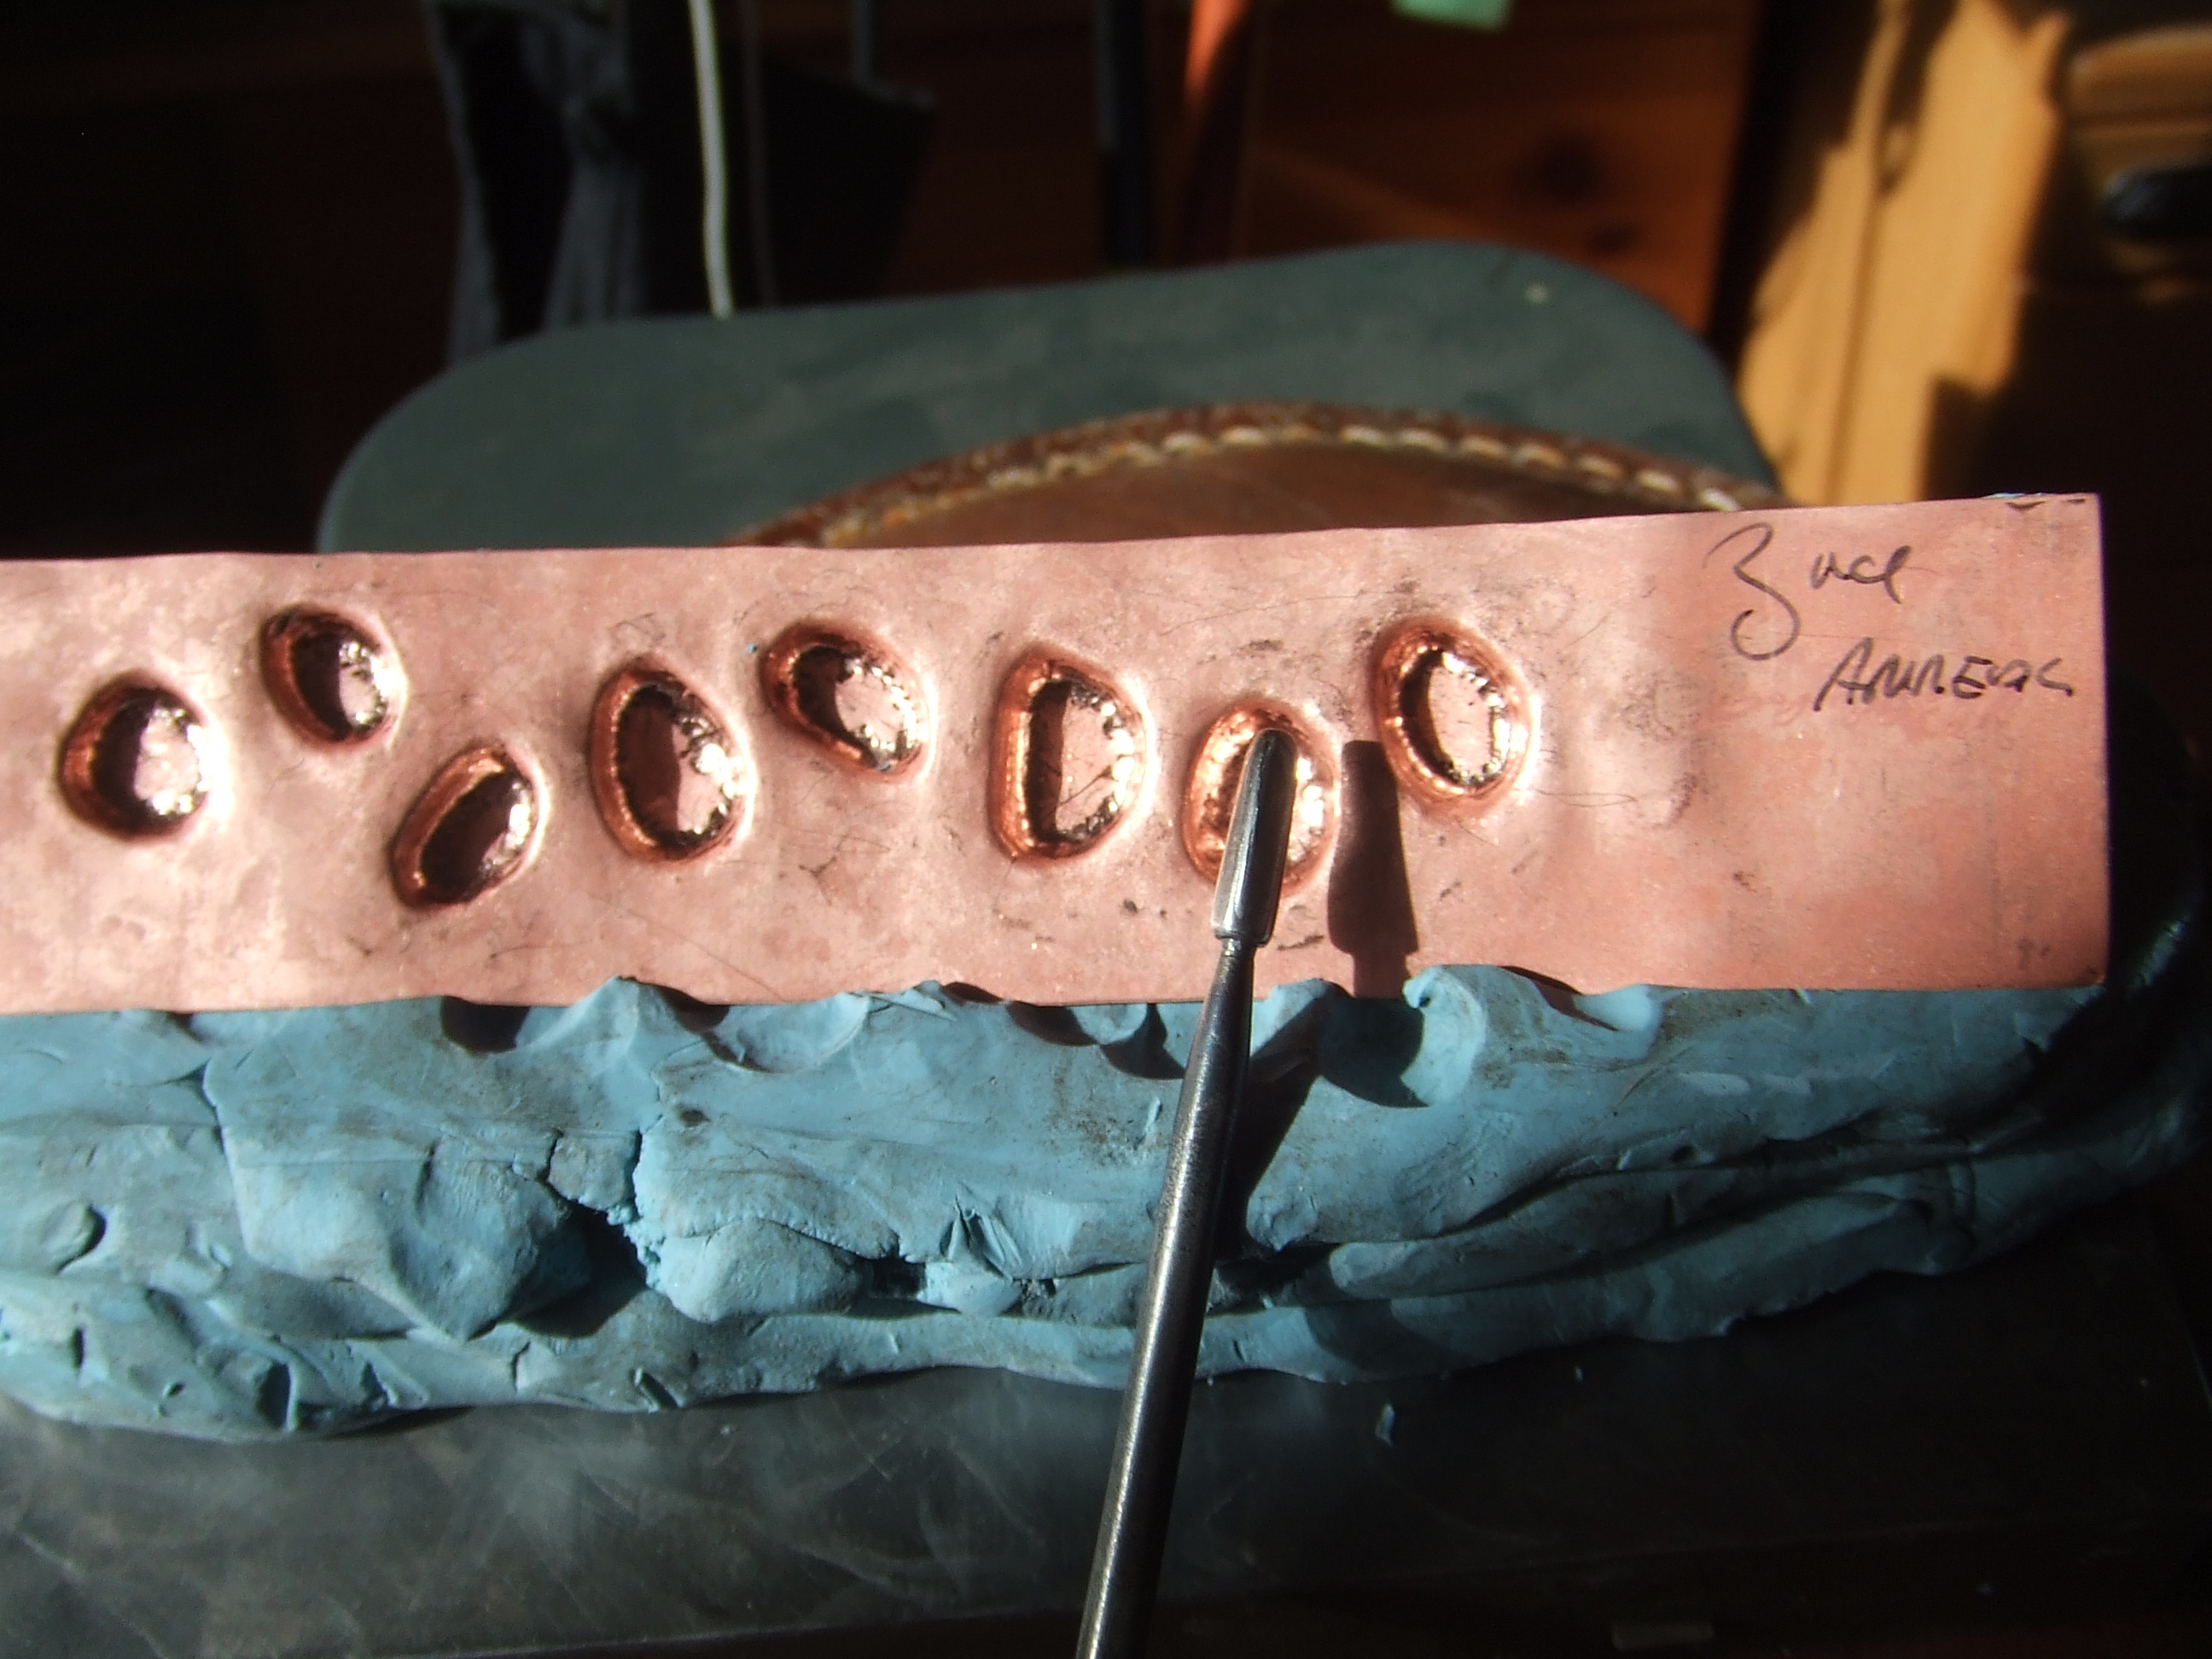
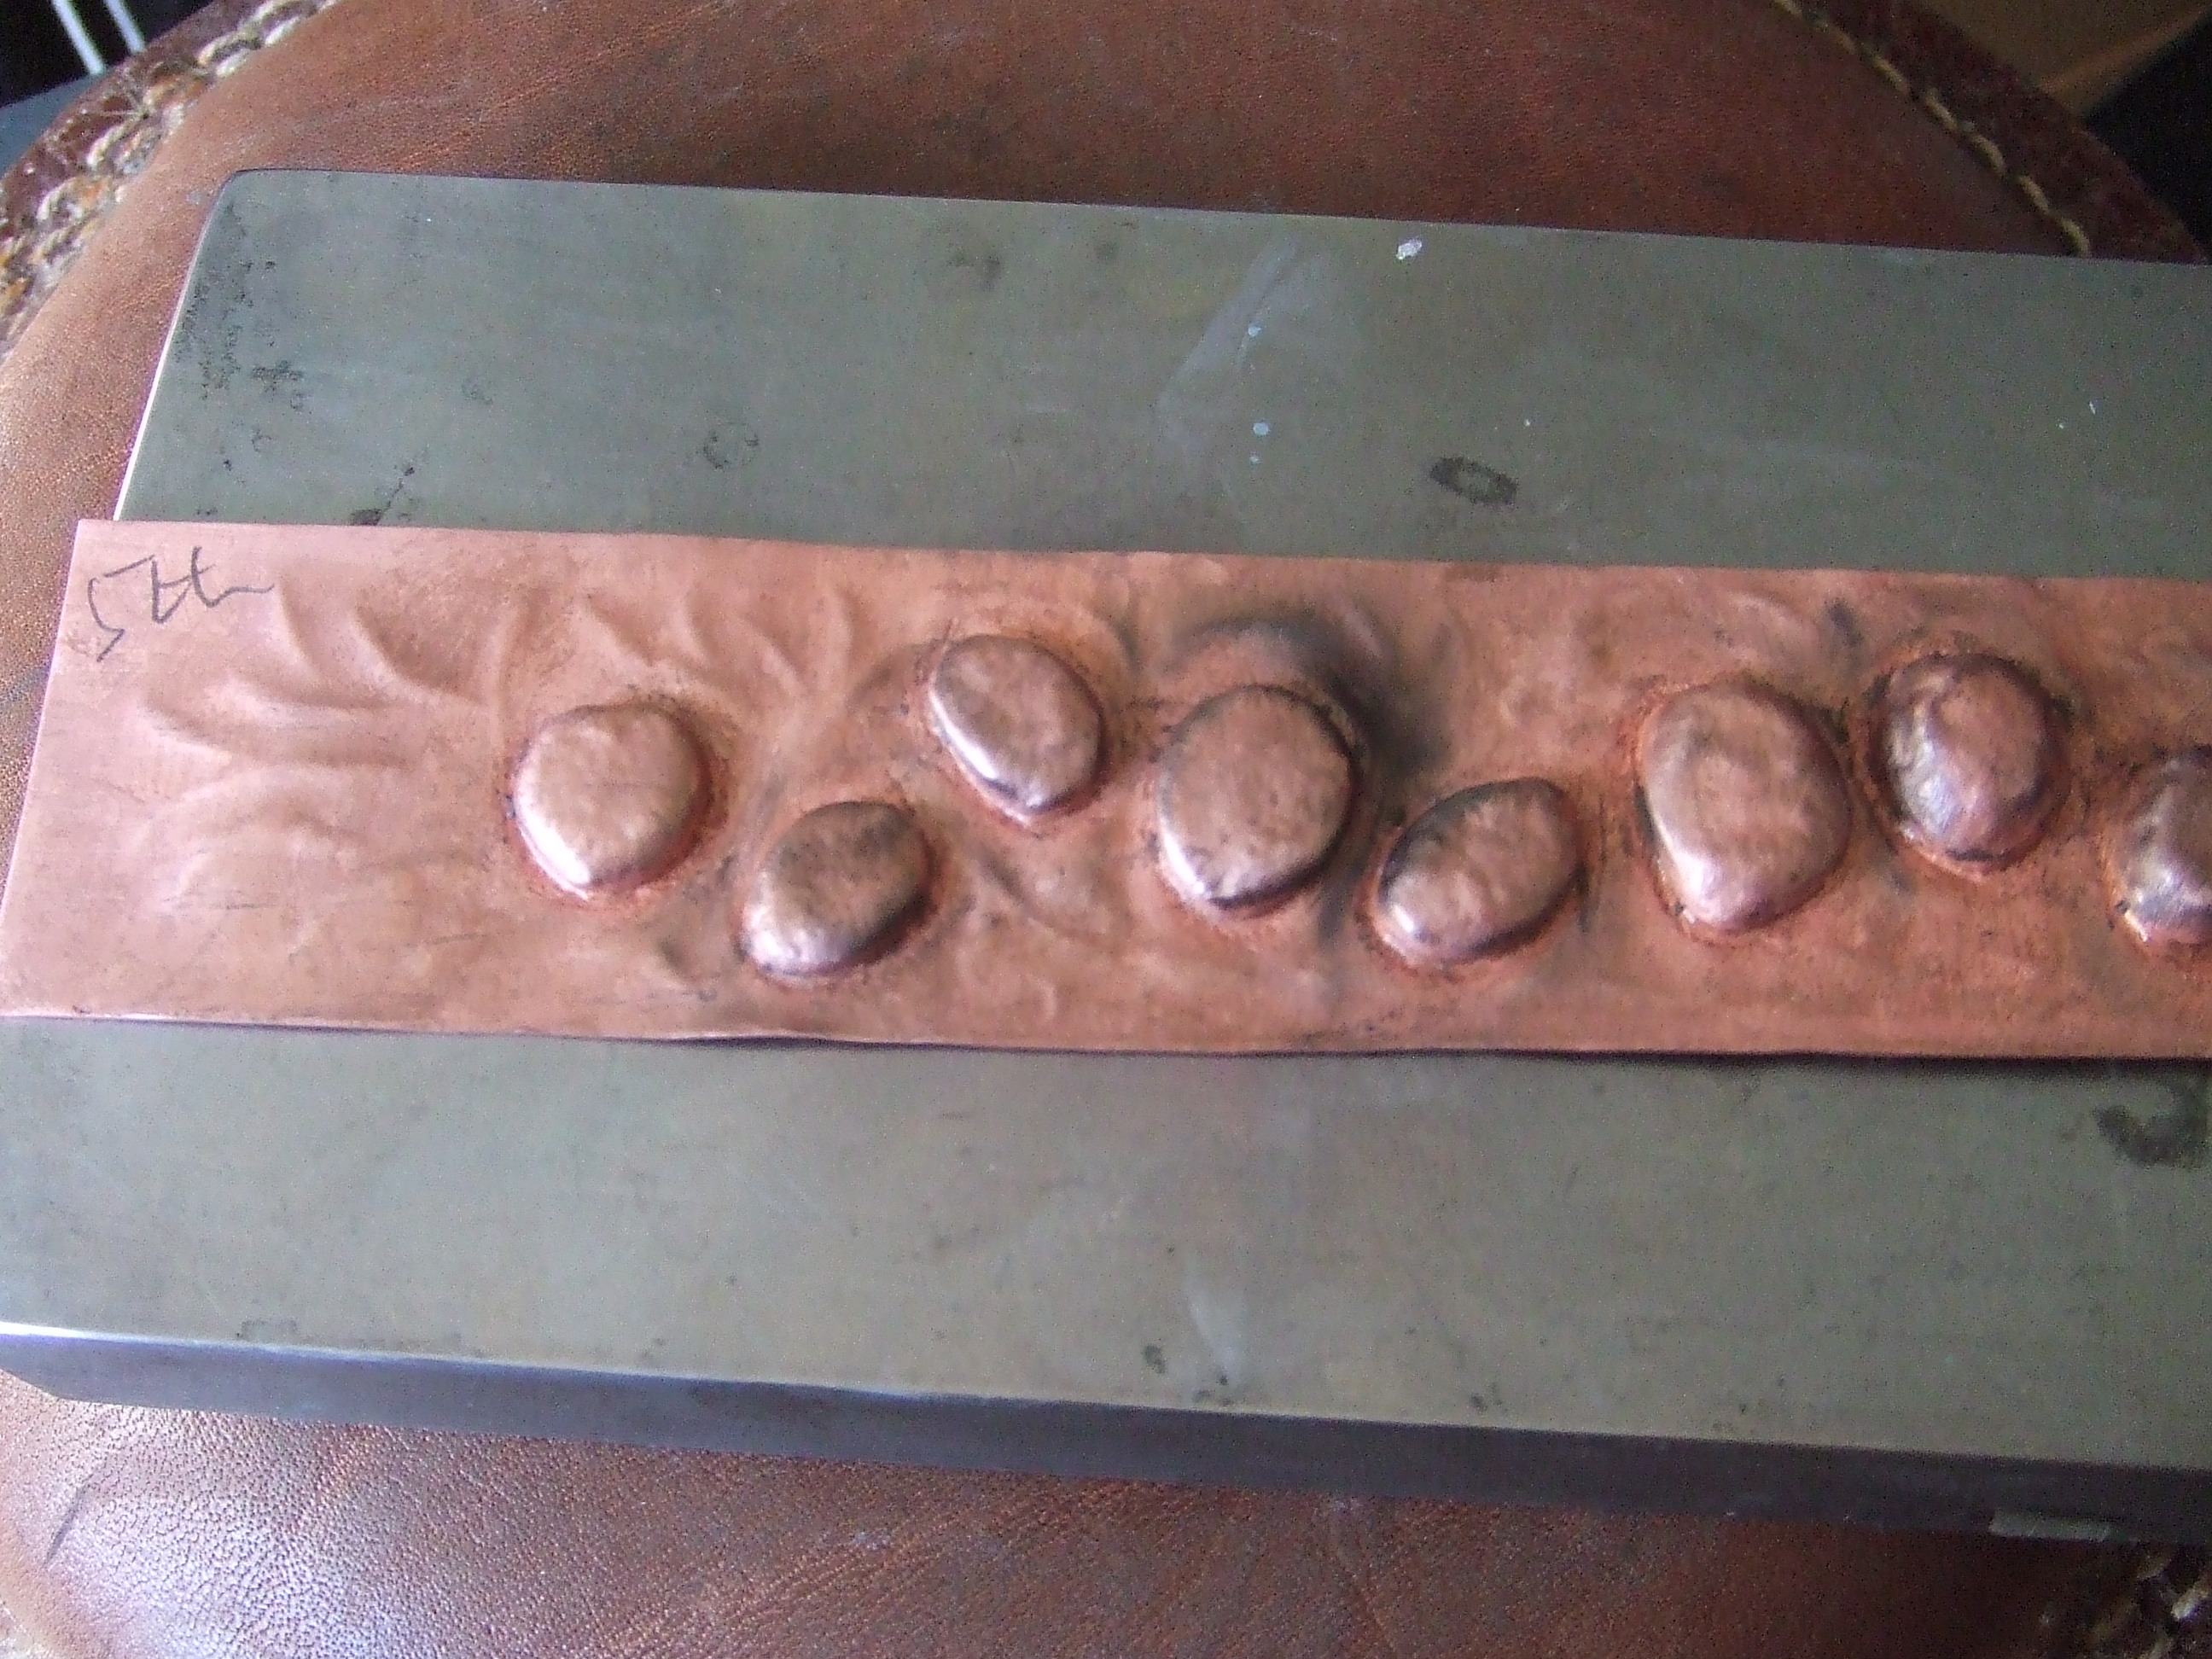
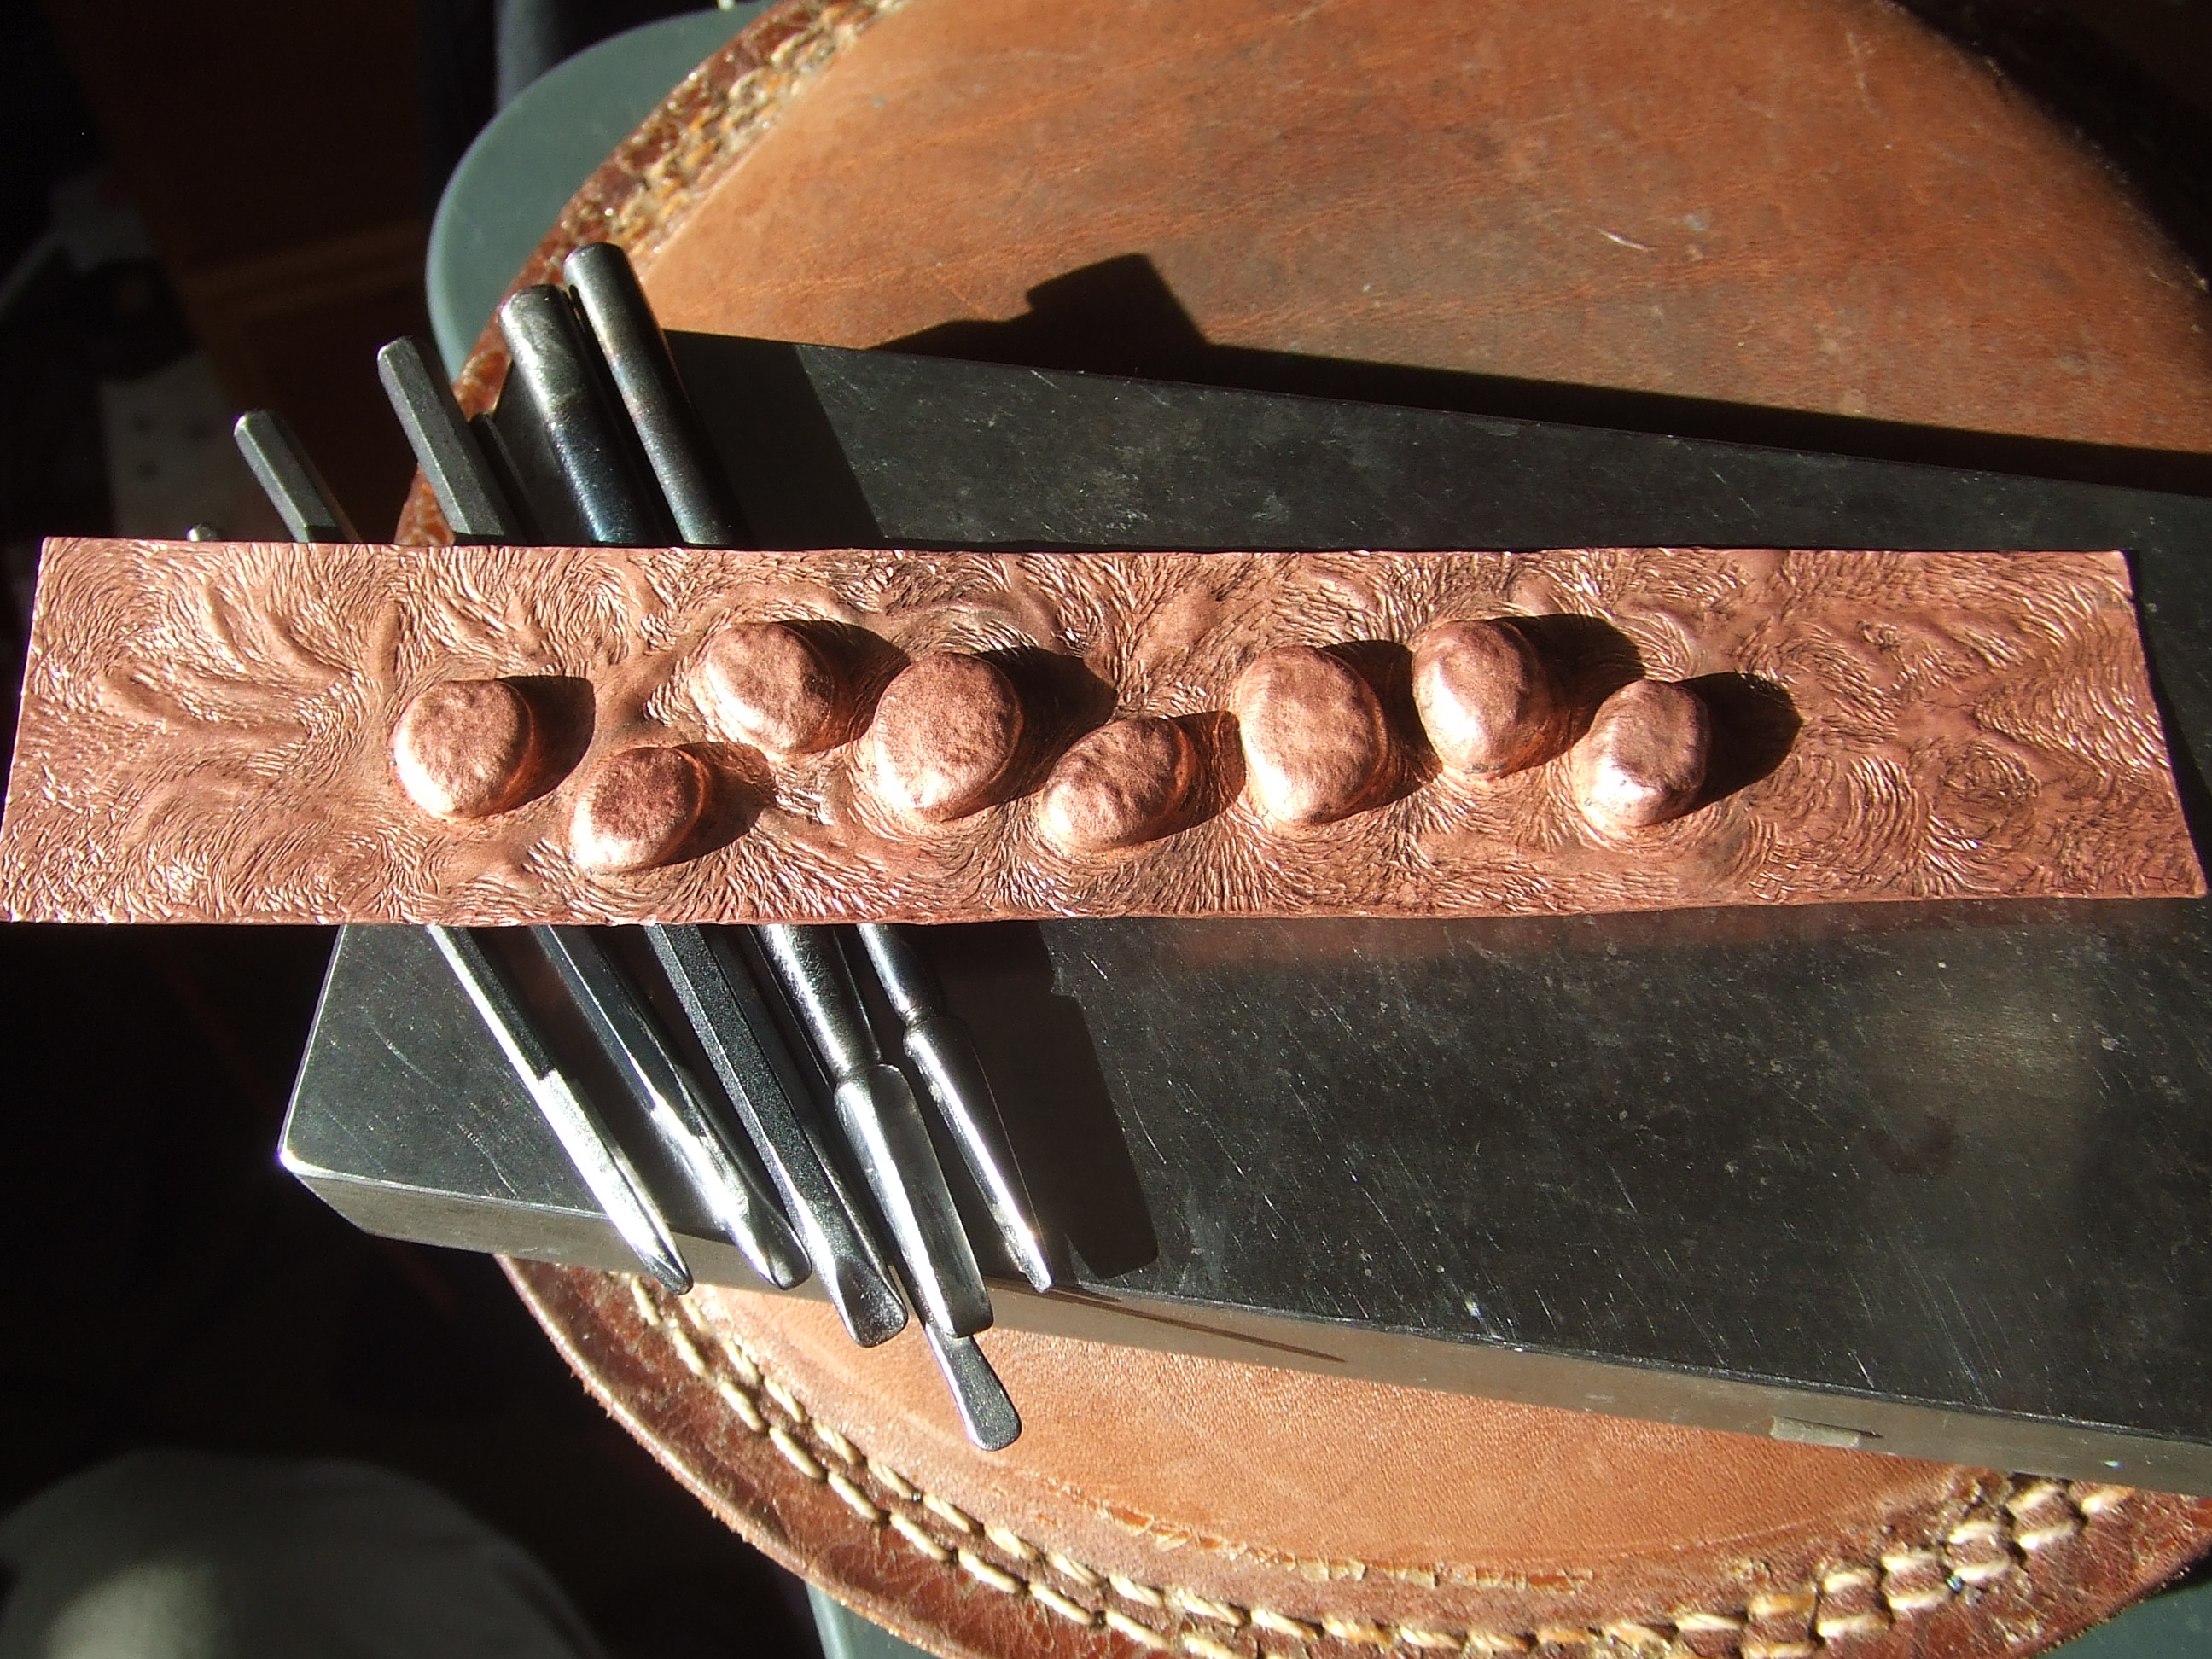
I have been asked to make a necklace with forged to undulating round/ovalish shapes. The rub is, the chap wants it to be really weighty and asked for 5mm wire to start!!! I managed to talk him out of 6mm which was what he contemplated. These links are to be forged once turned into rings, soldered and shaped. Have you tried to make small rings with 5mm sterling silver wire! Man alive, it is tough to work into bends that small, getting the ends to meet for soldering is also a nightmare as it is soooo hard. The other conspiring difficulty is, the 83mm lengths to start with are a bugger to hold whilst you try to form them around a mandrel. The vibration is enough to rattle a chaps fillings, also keeping it still, trying not to hammer fingers, preventing it taking an aerial journey across the workshop was also challenging.

After fighting with the first one, bruised fingers and all, I decided to try something else, I share it with you here in the hope you may find the following tips helpful as they can be used on all sizes of wire if you wish.

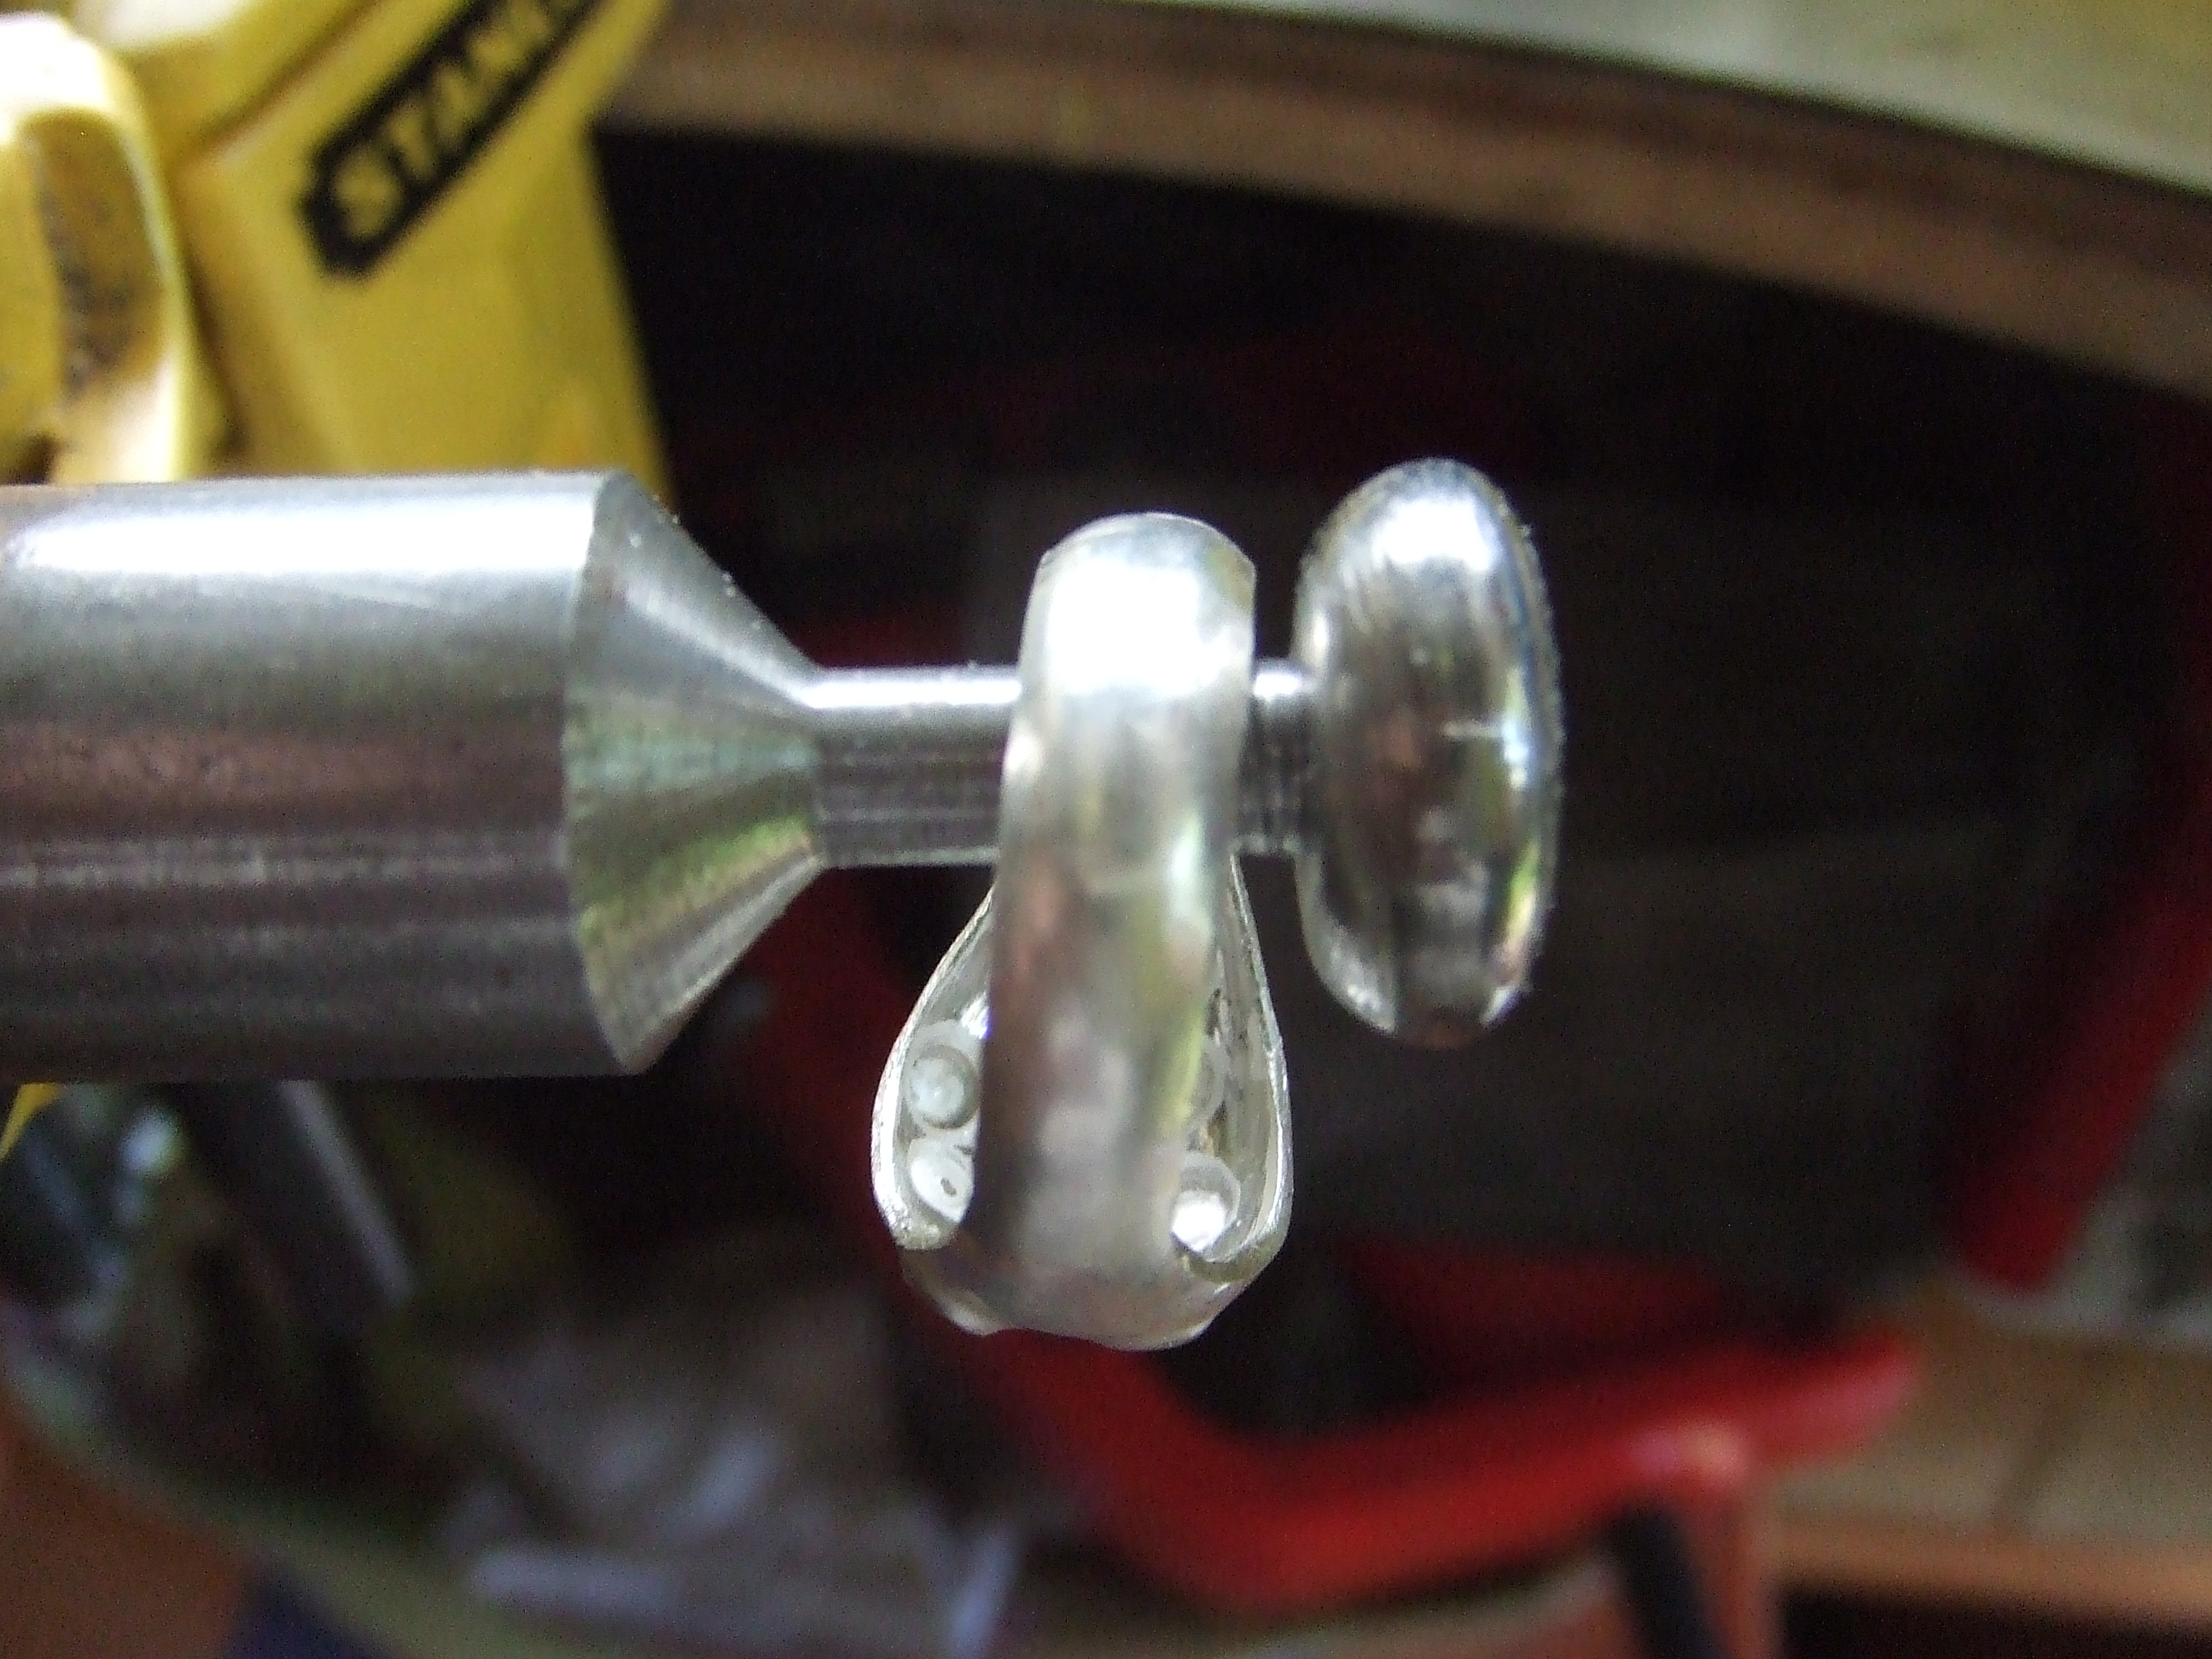
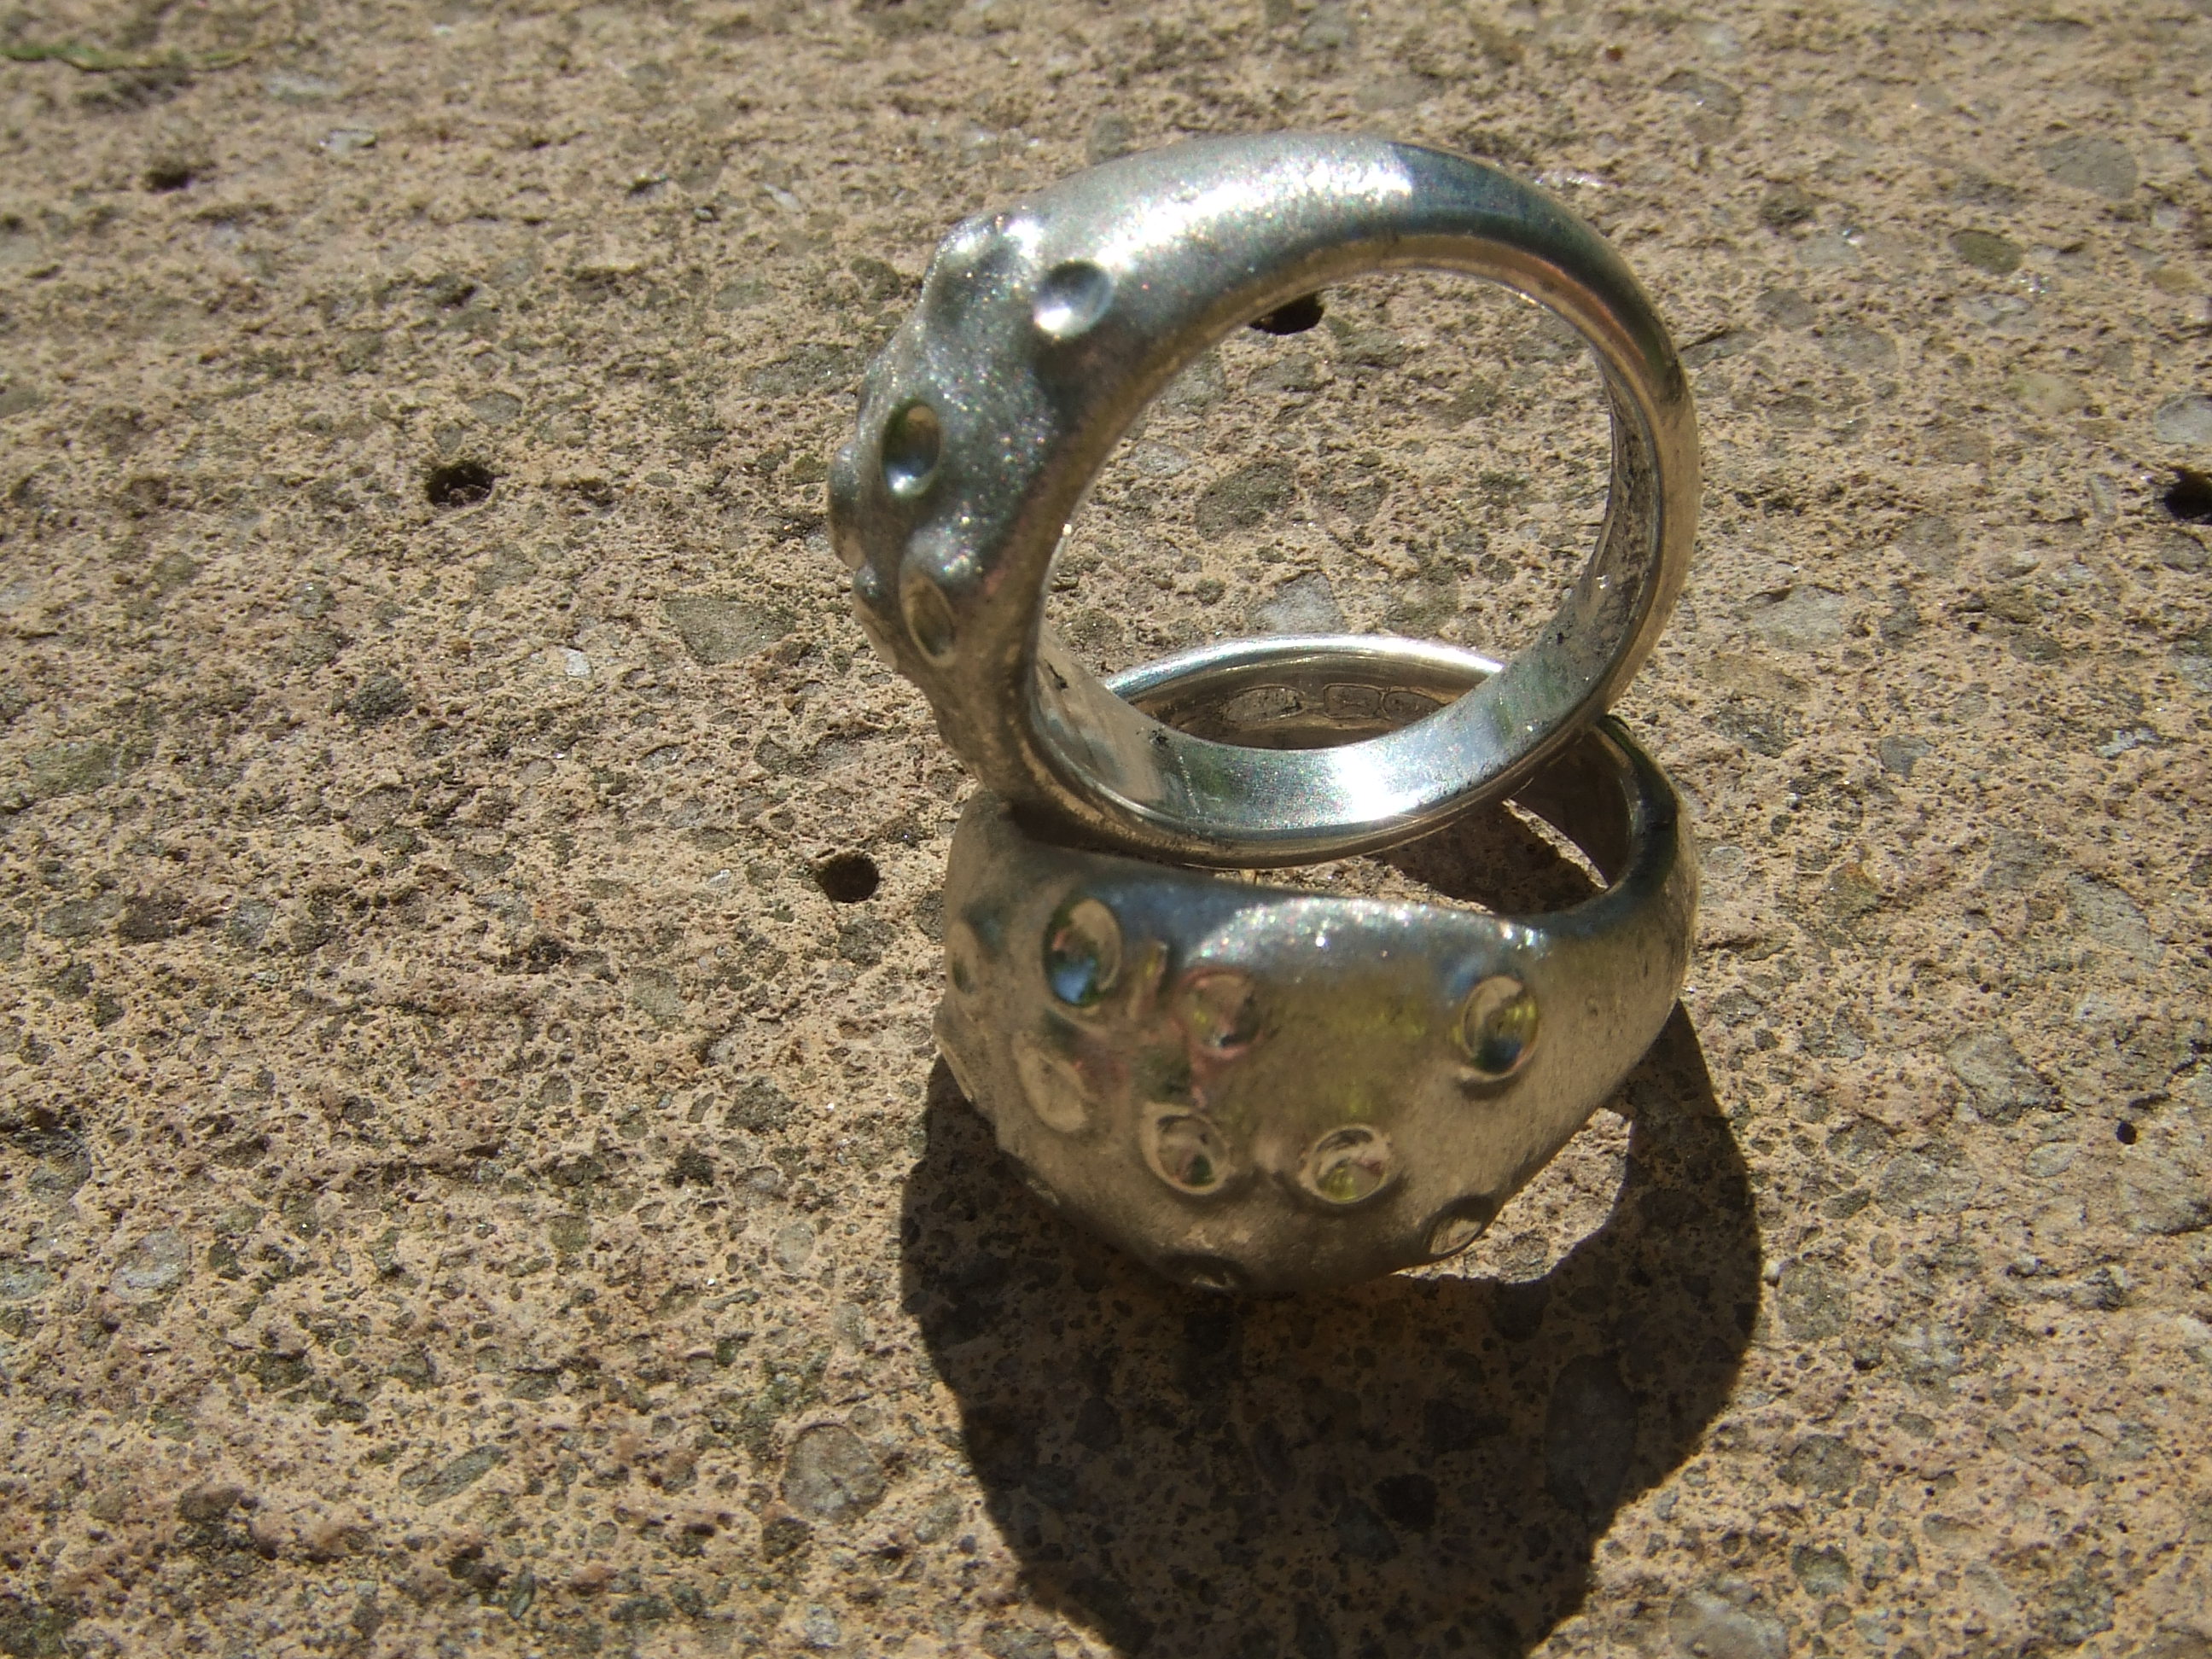
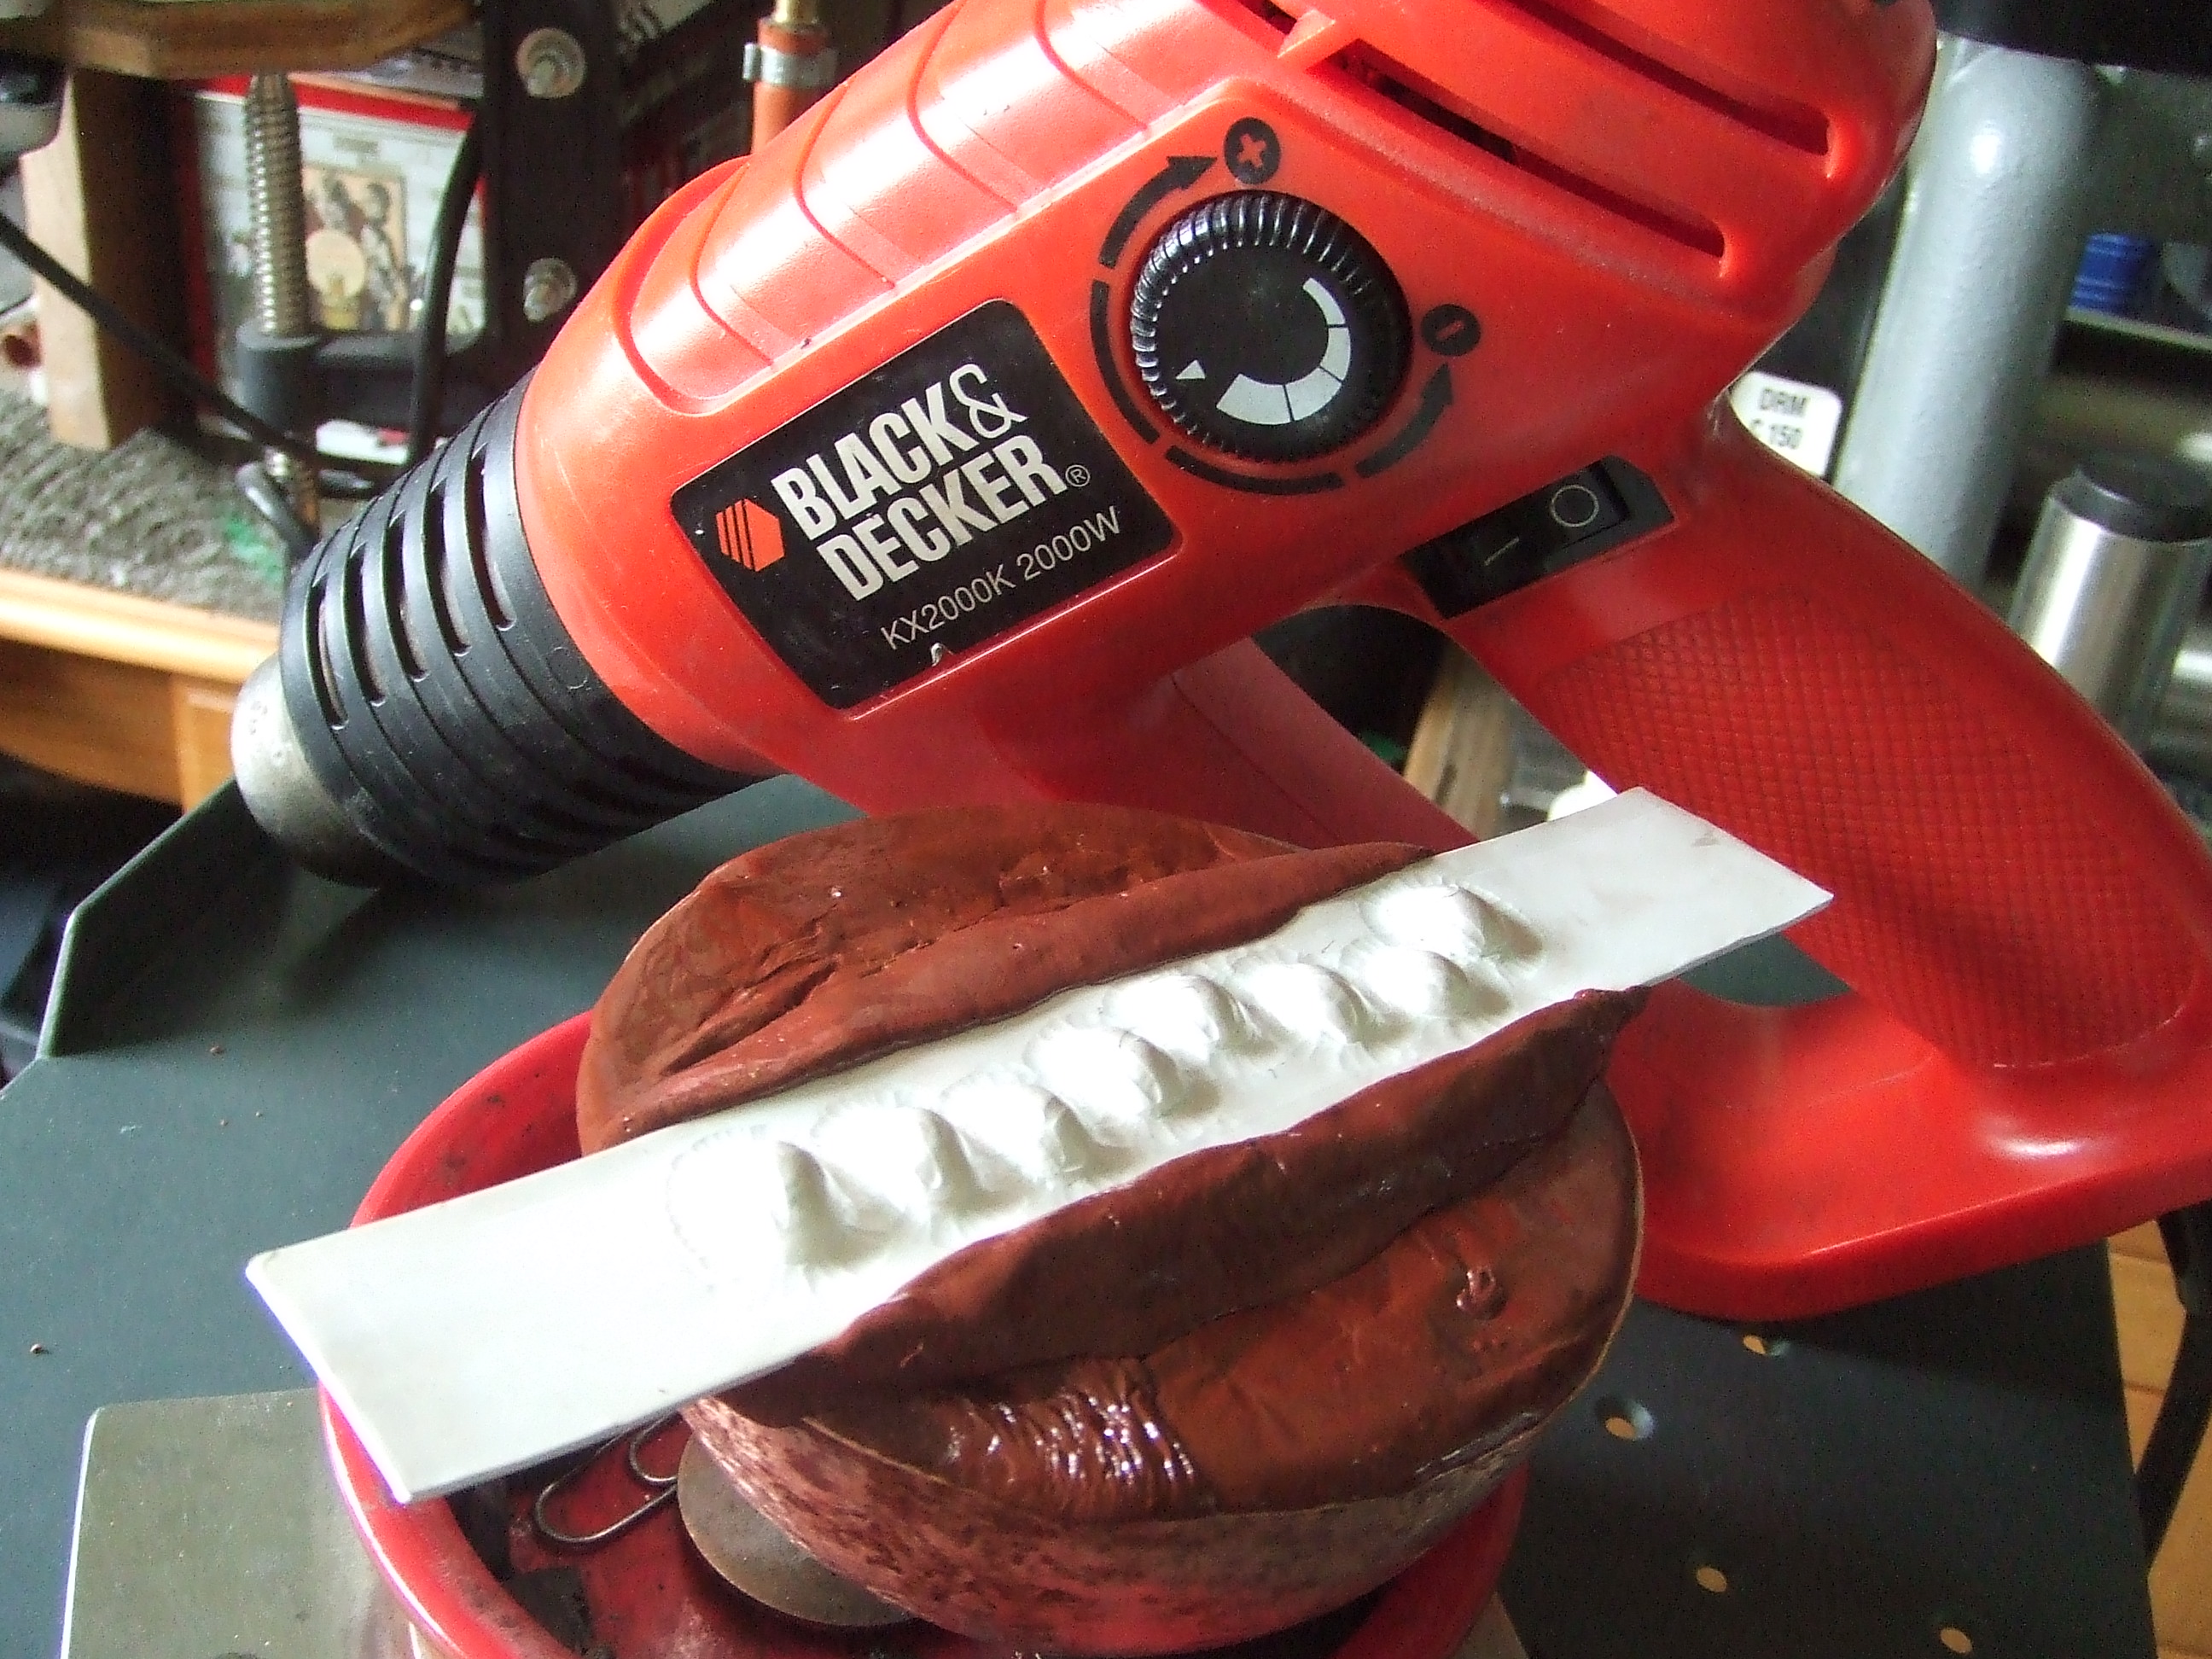
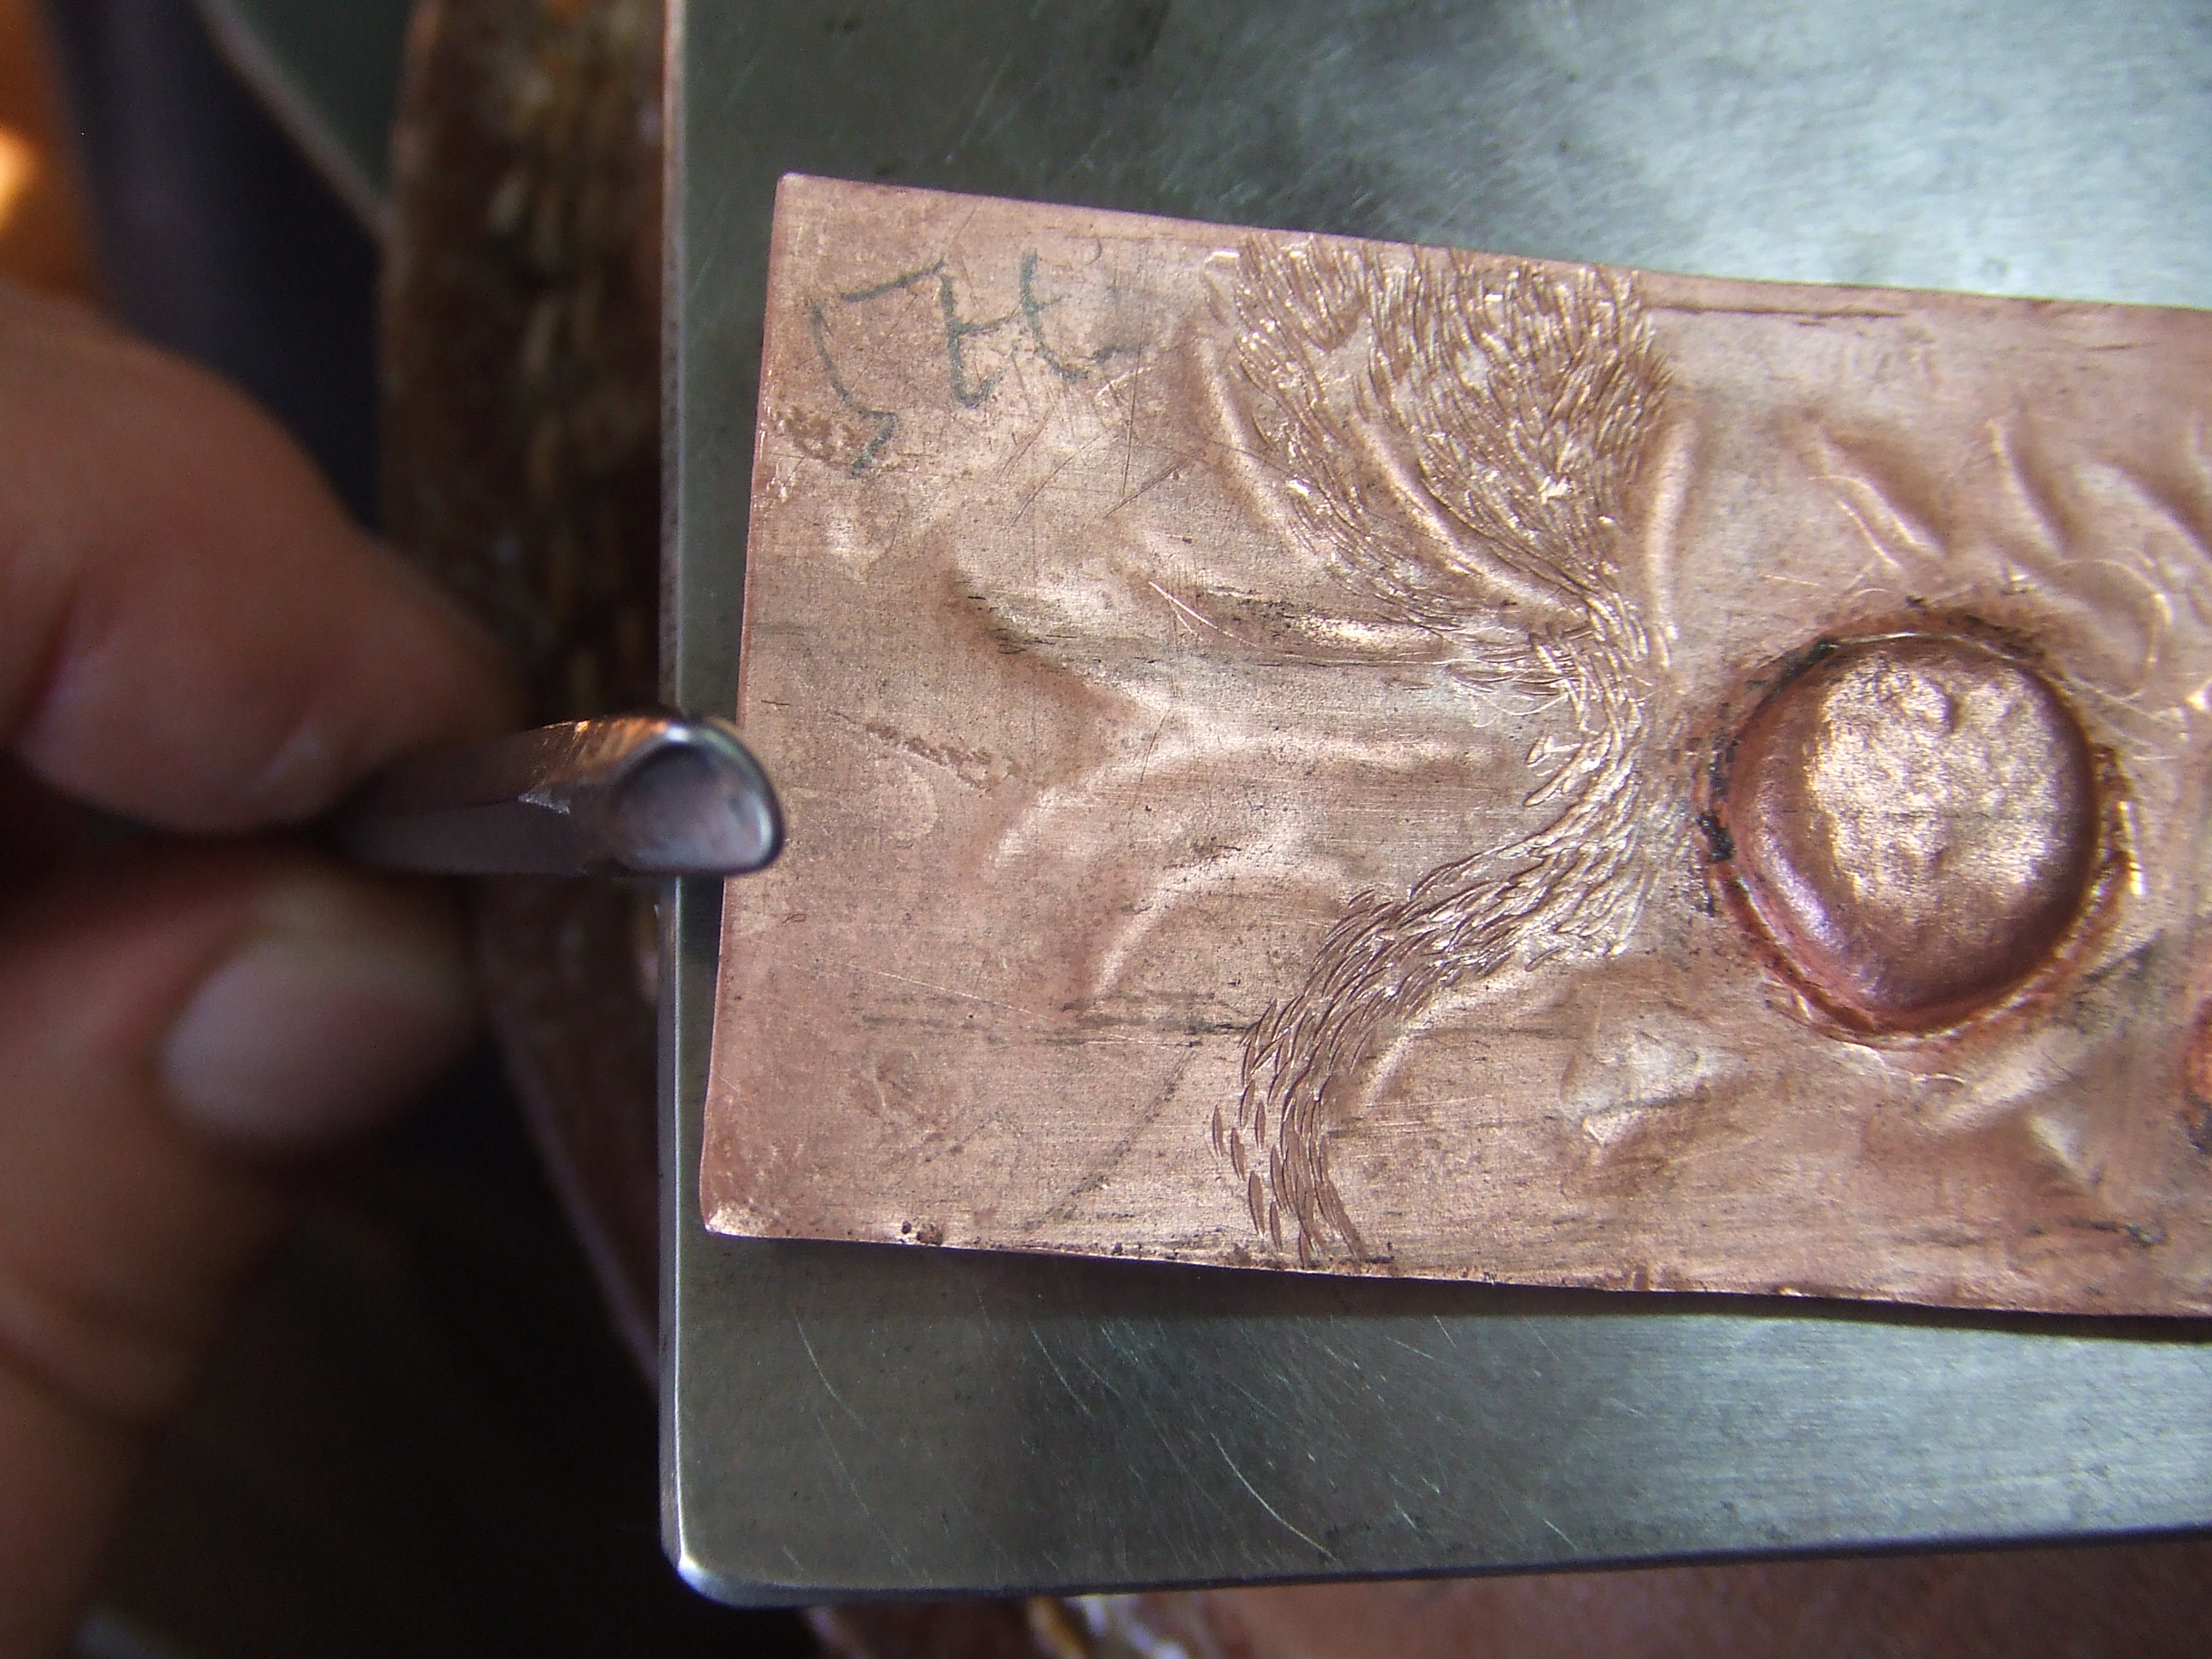
I bent each end approximately 45 degrees and then put them in the contraption you see in picture 4. I only thought to photograph it afterwards, so the link you see is complete.

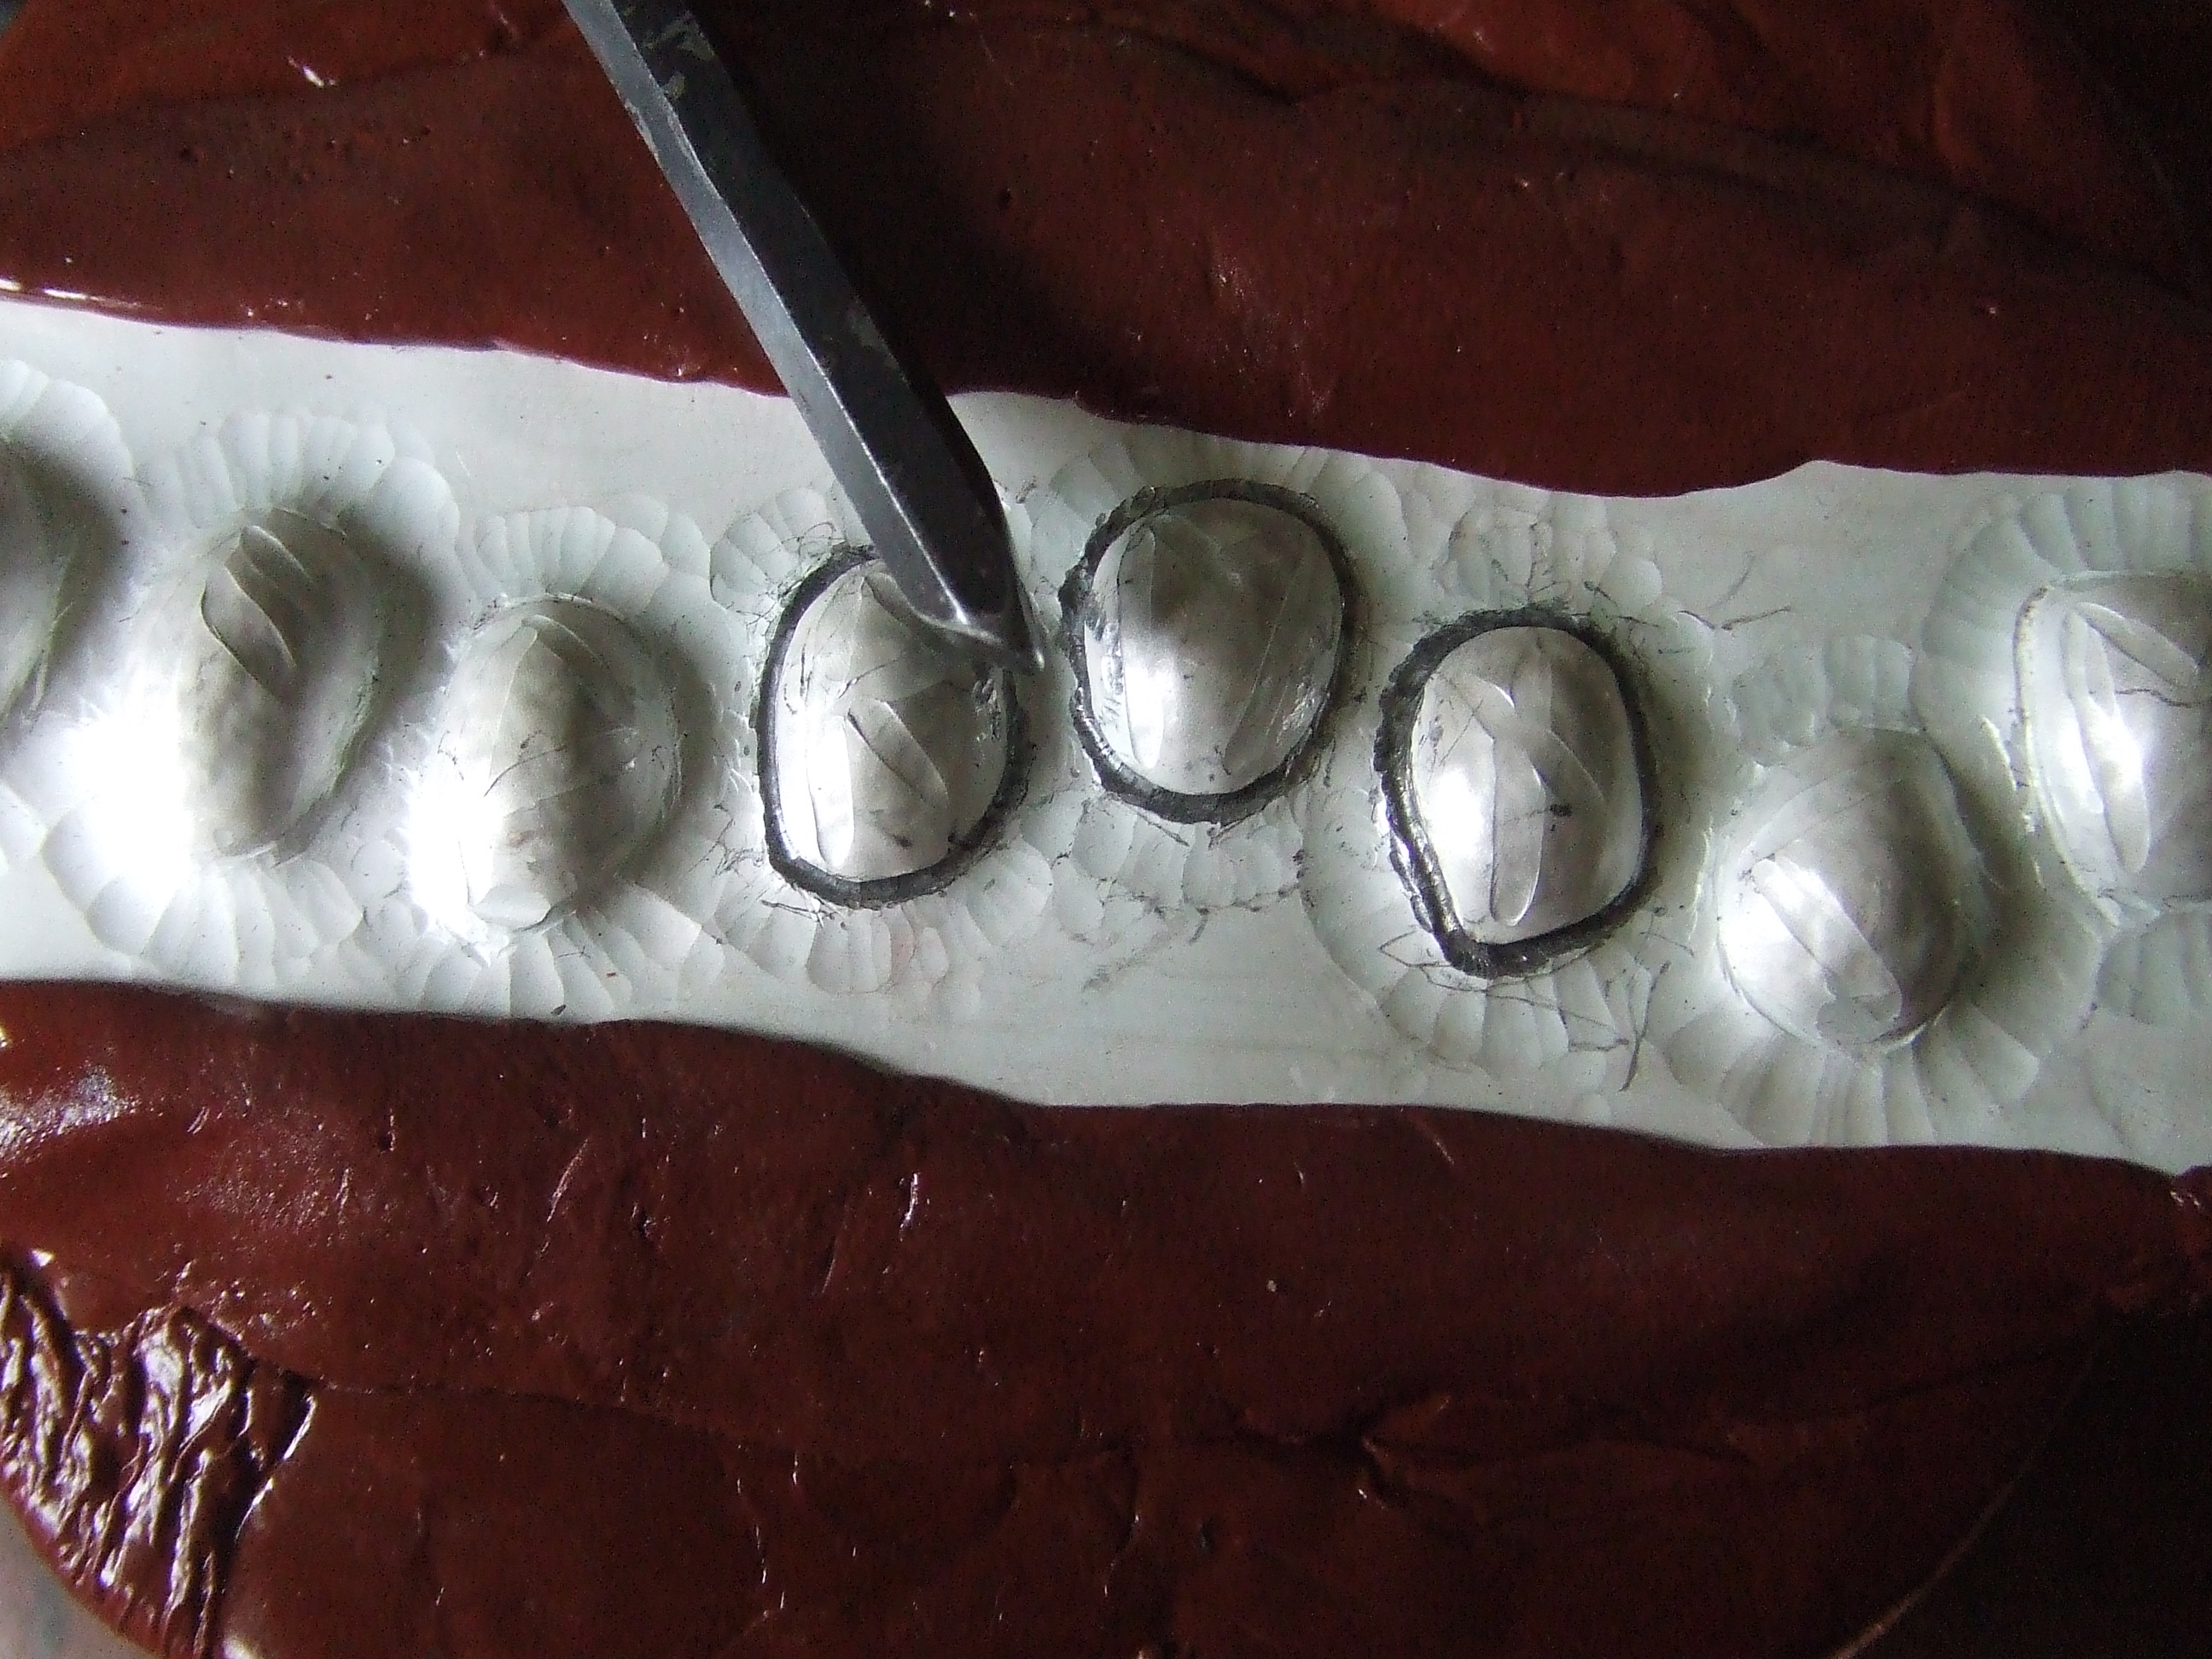
These ‘pliers’ were purchased on Ebay a while ago after I came across them in one of my second hand tool hunts. They are old pig ringing pliers. Used to attach nose rings into pigs. As you see, you have the option of two sizes. I was not strong enough to form them with my hands, resting one handle on a rubber block and tapping the other closed with a leather mallet. Fantastic and painless result, as shown. Ring forming pliers are nothing new, look on any jewellery supply site. However these are quite a bit larger than the ‘proper’ jobs. Also, who wants pig pliers, cost conscious farmers thats who. Not ‘oh its for working precious metal therefore its and arm and a leg please’ of the tool suppliers. Look up a set for yourself. These are aluminium, thats a bonus as they will be far less likely to mark your material, a danger with steel ones. Also, should you so wish, you could mirror polish them and use them for making production runs of perfect, unmarked larger jump rings ready for soldering.

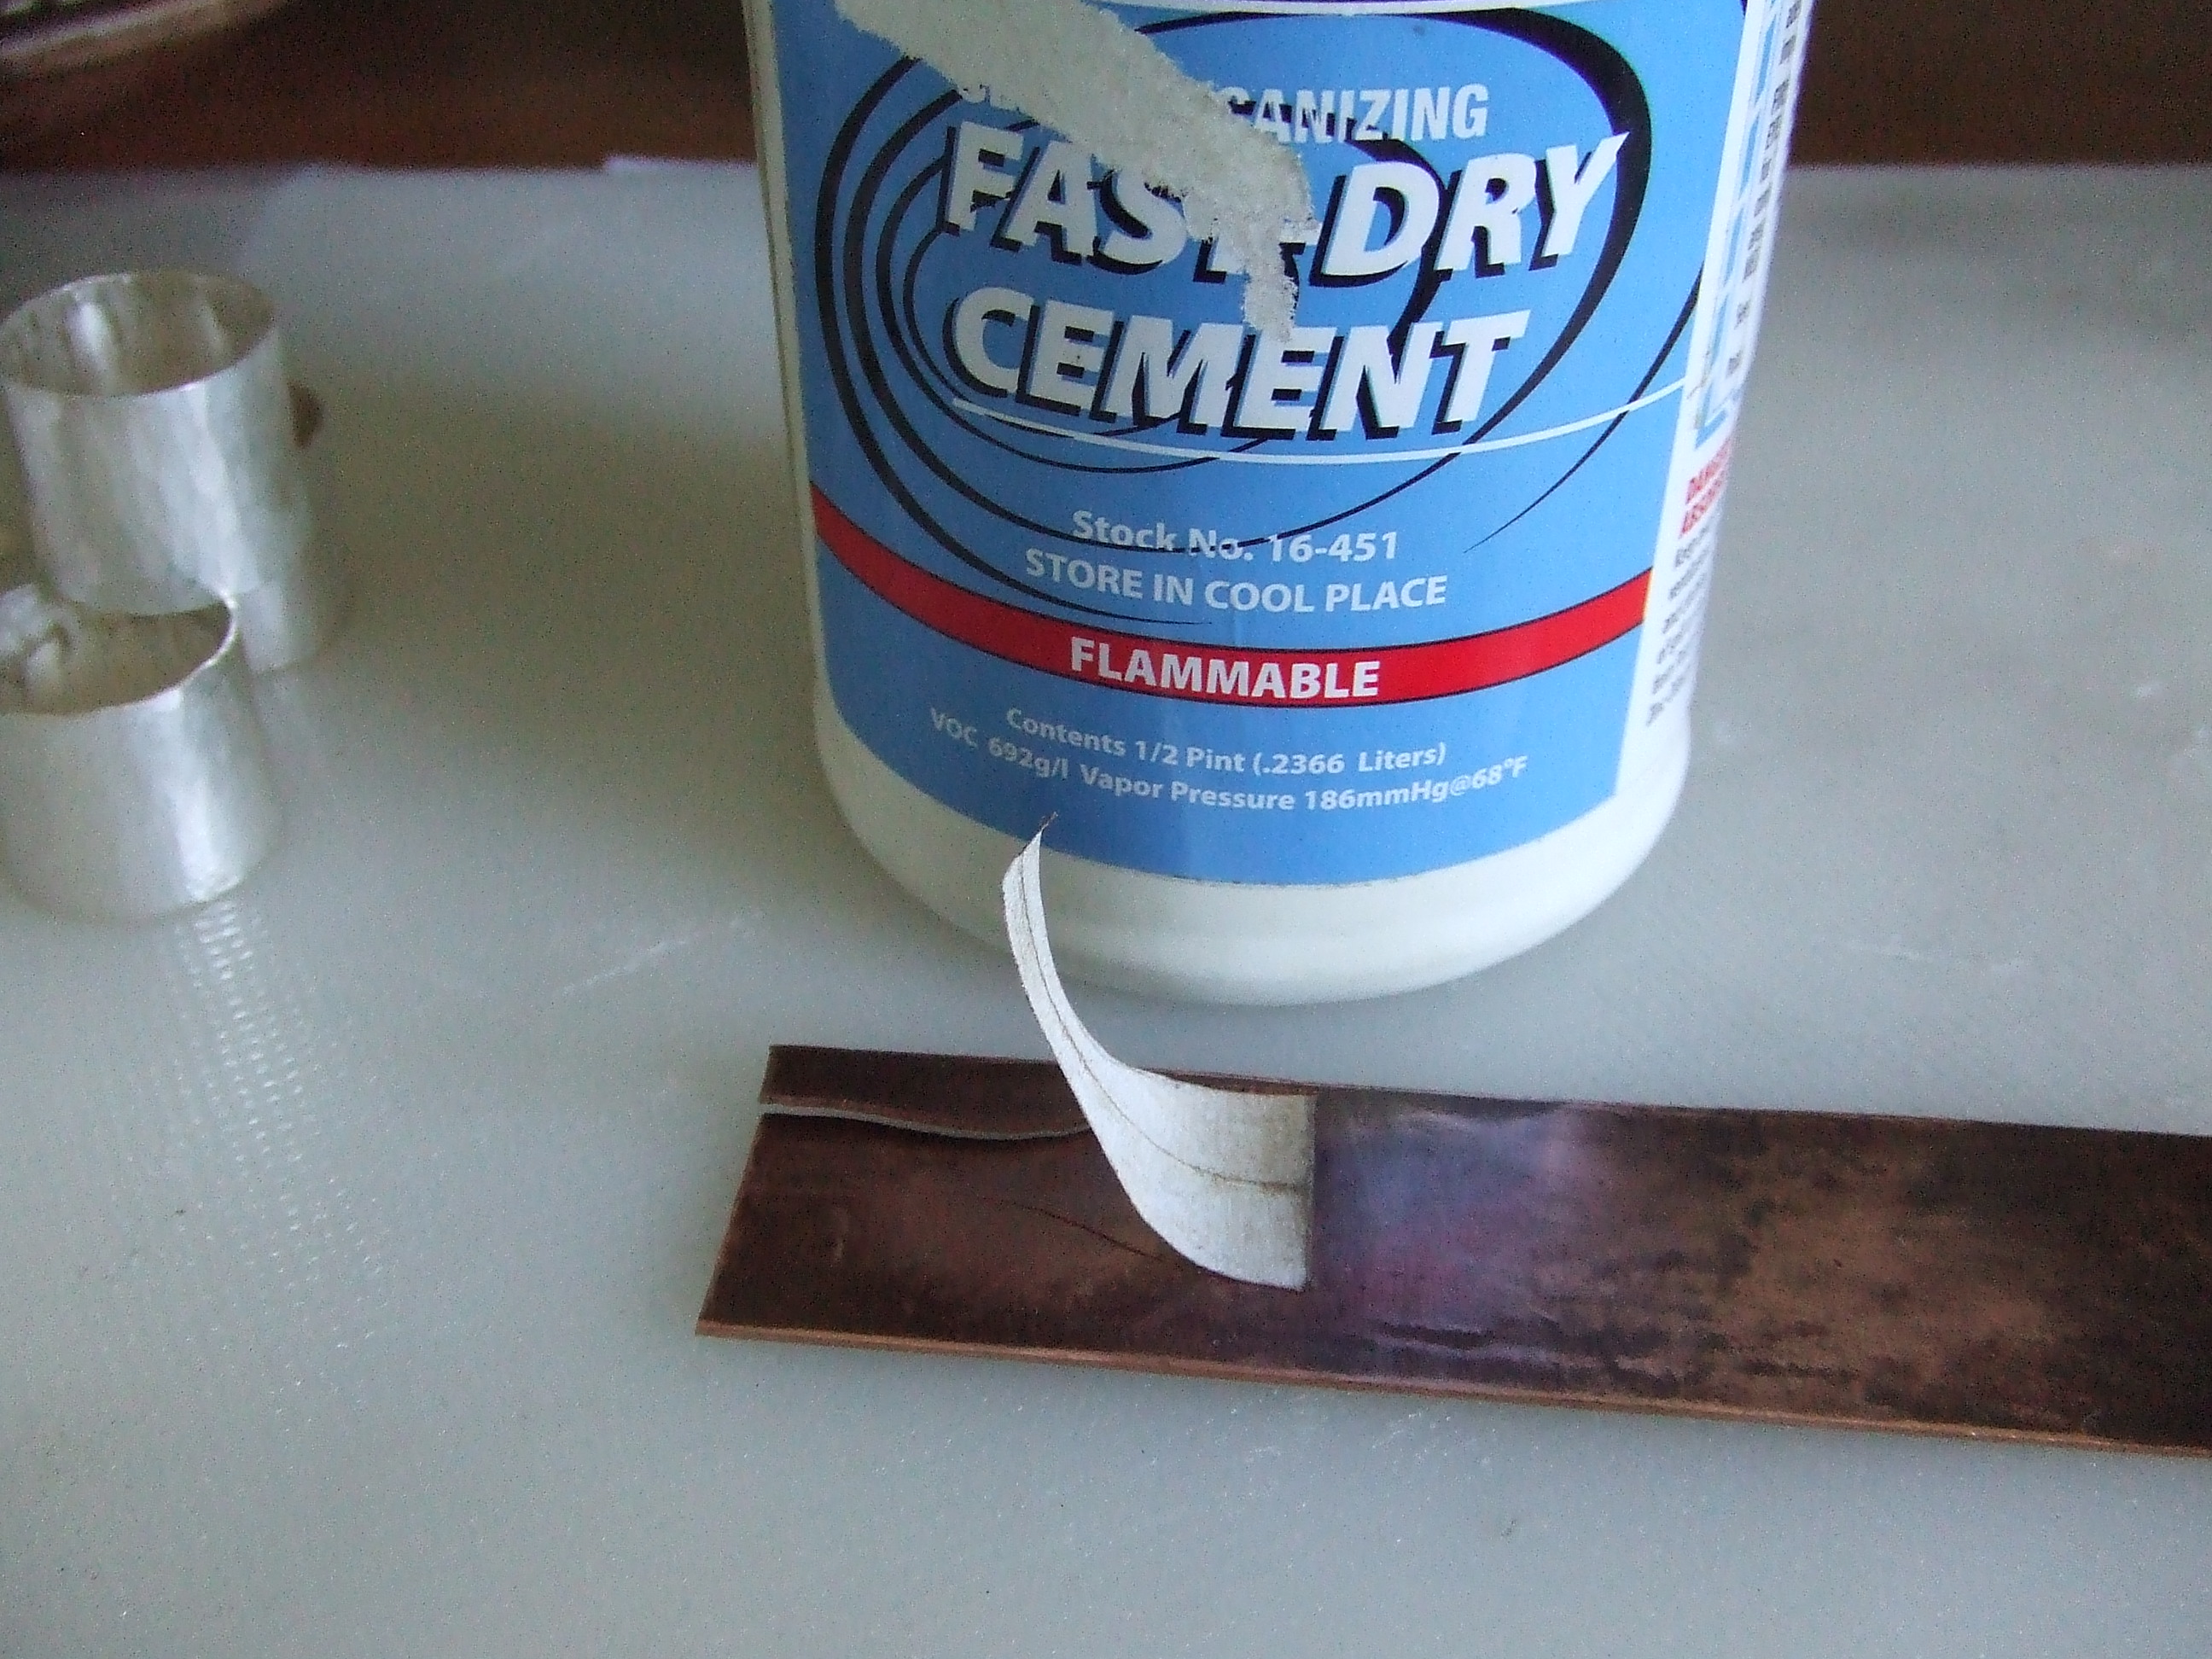
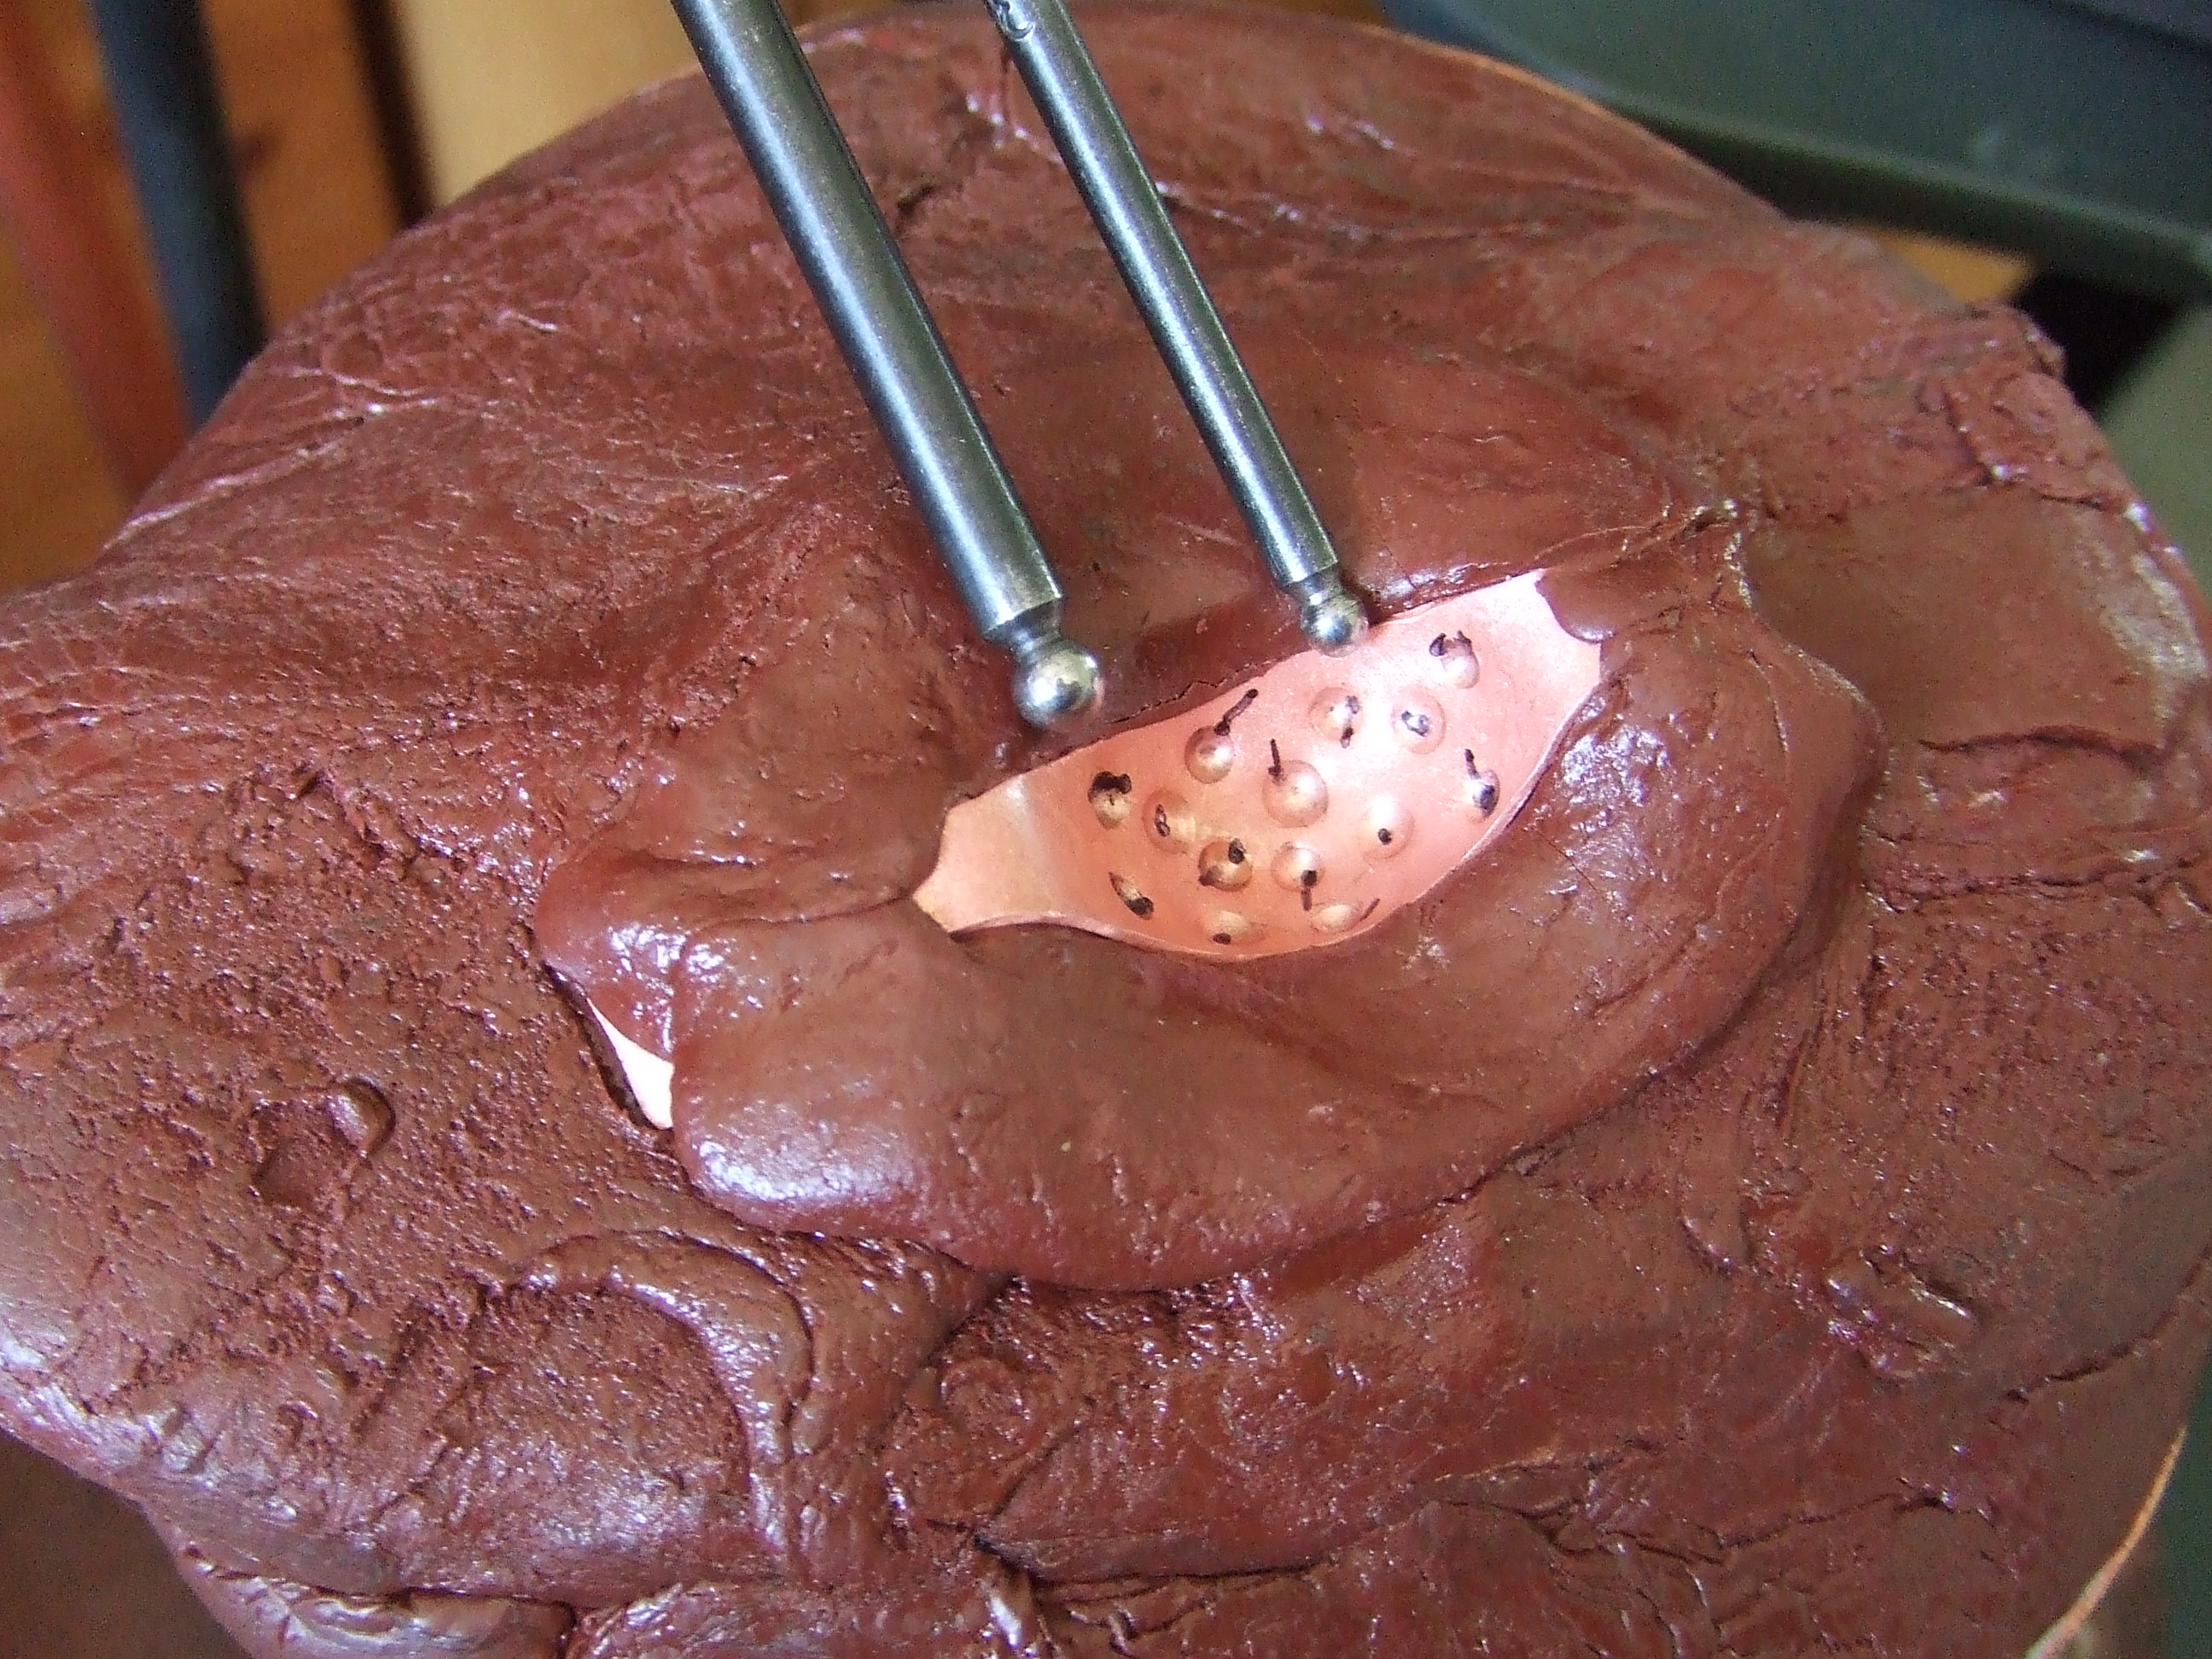
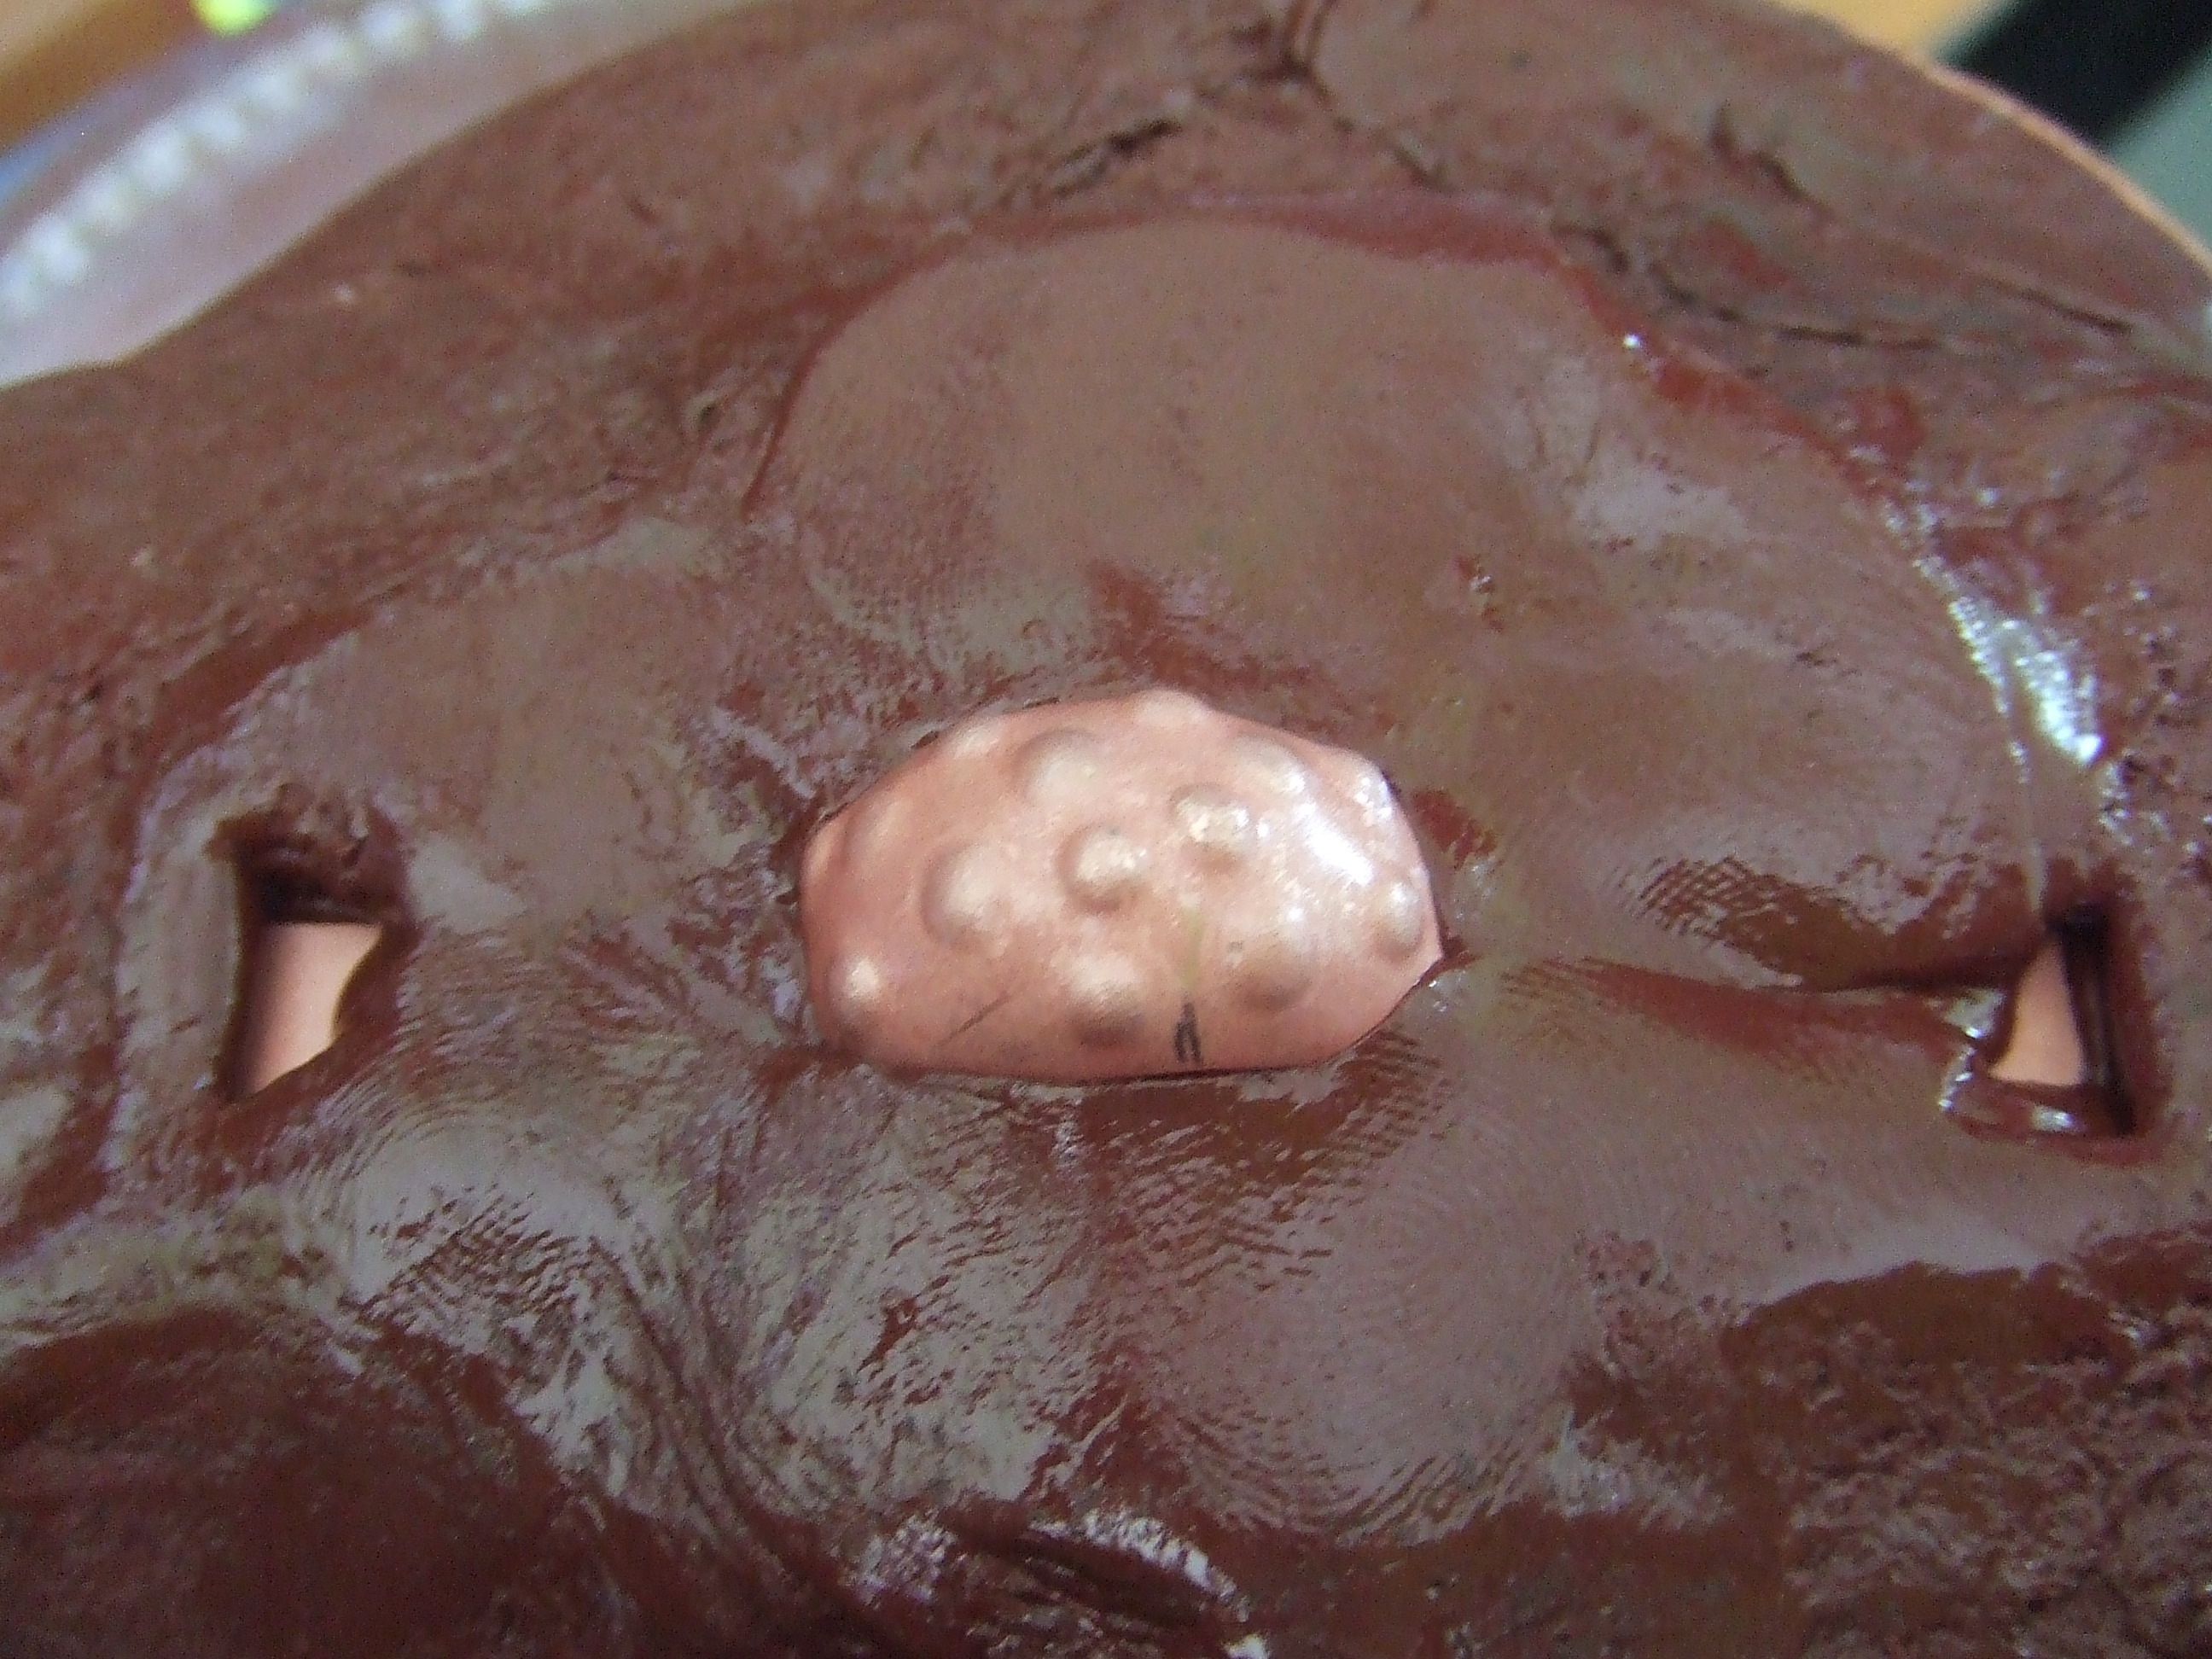
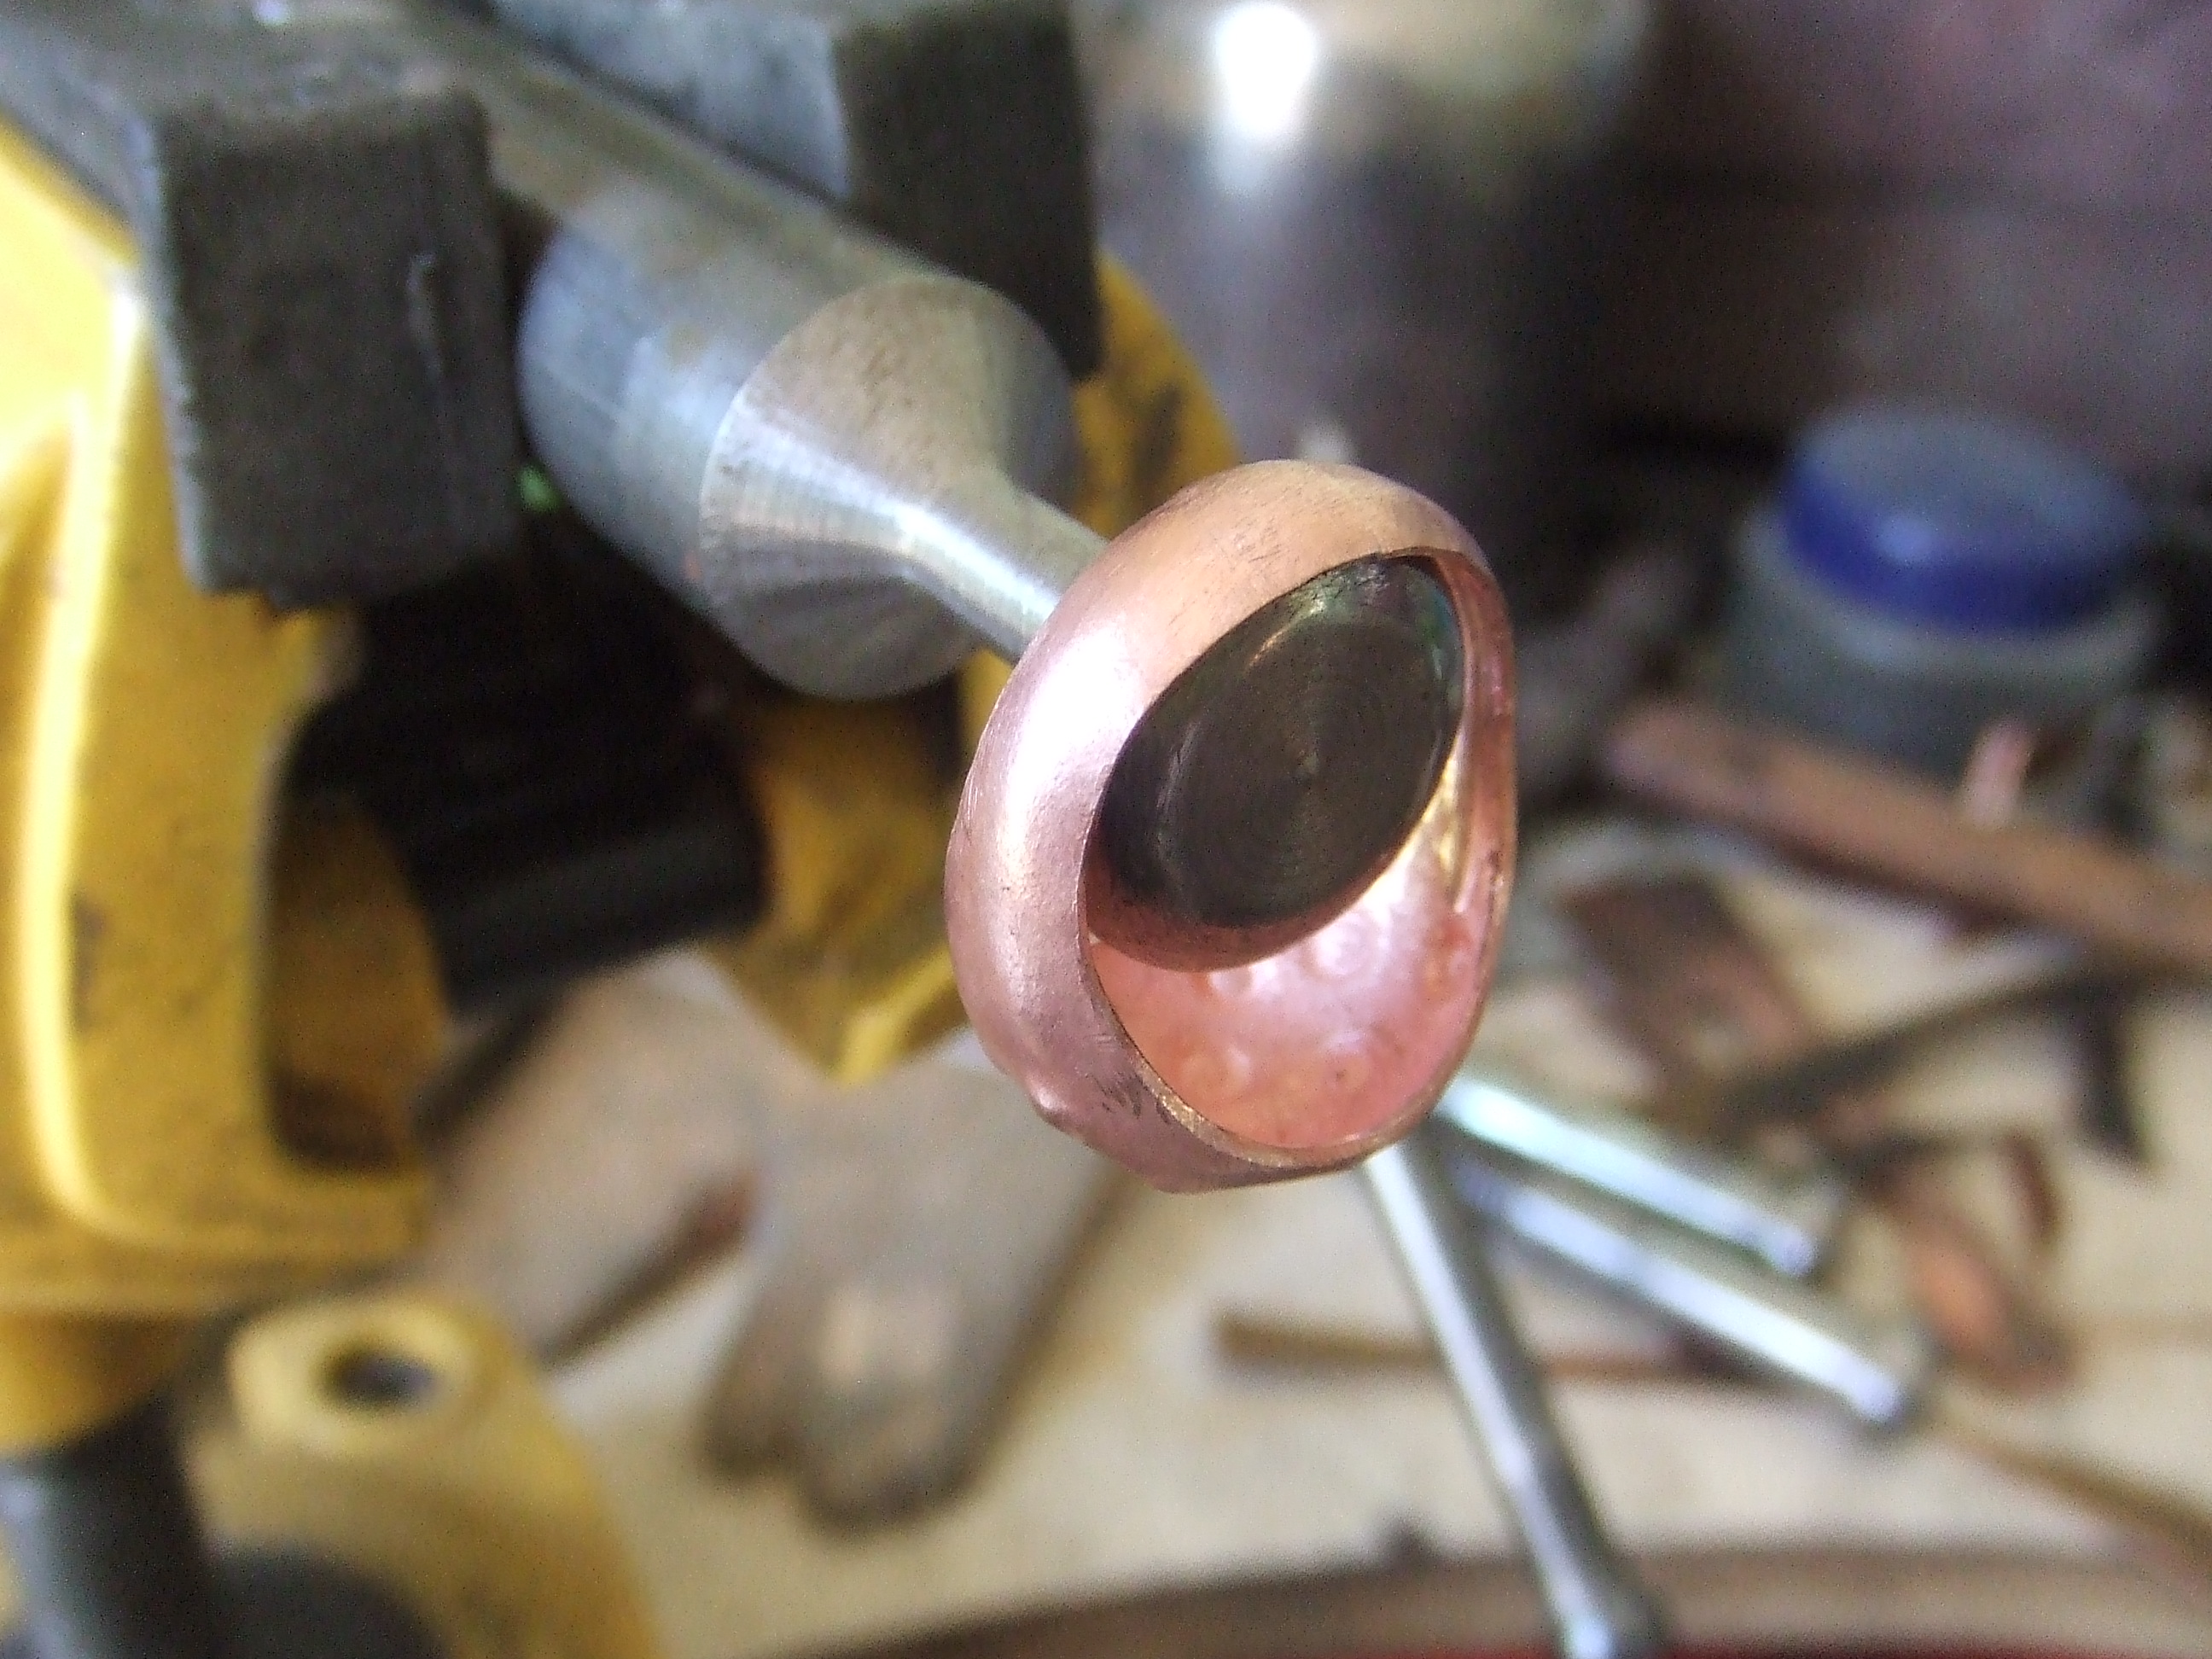
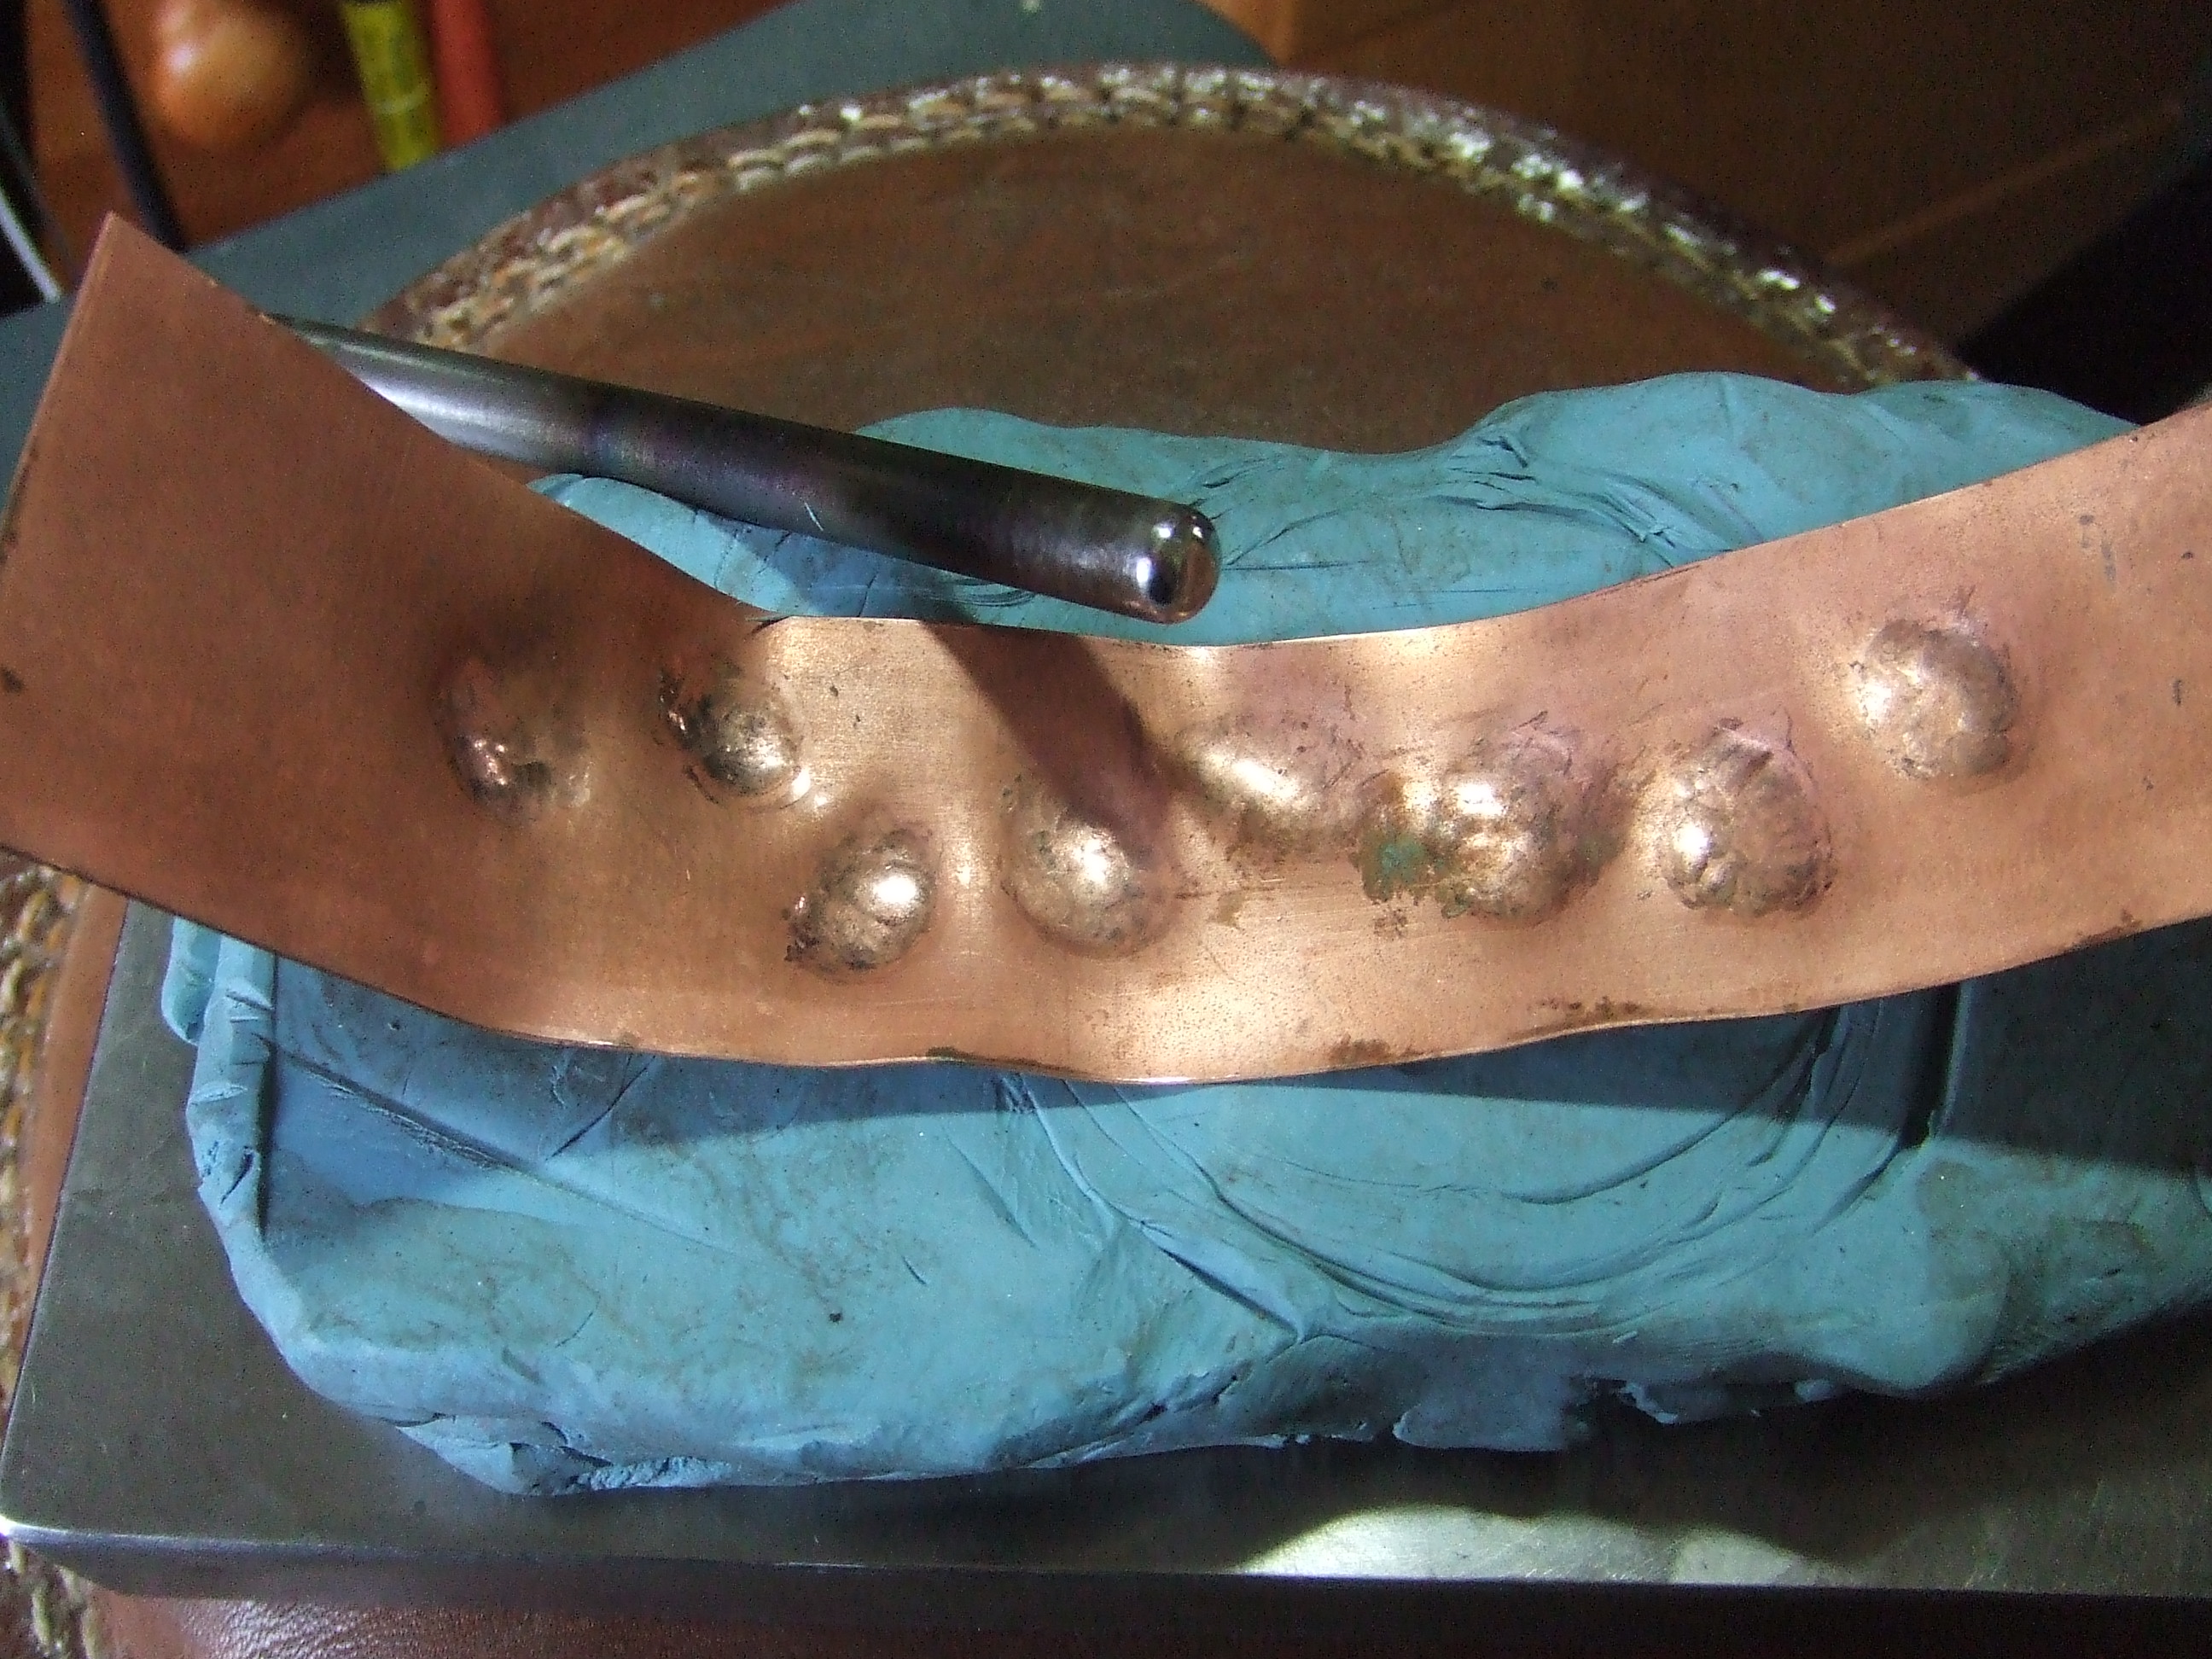
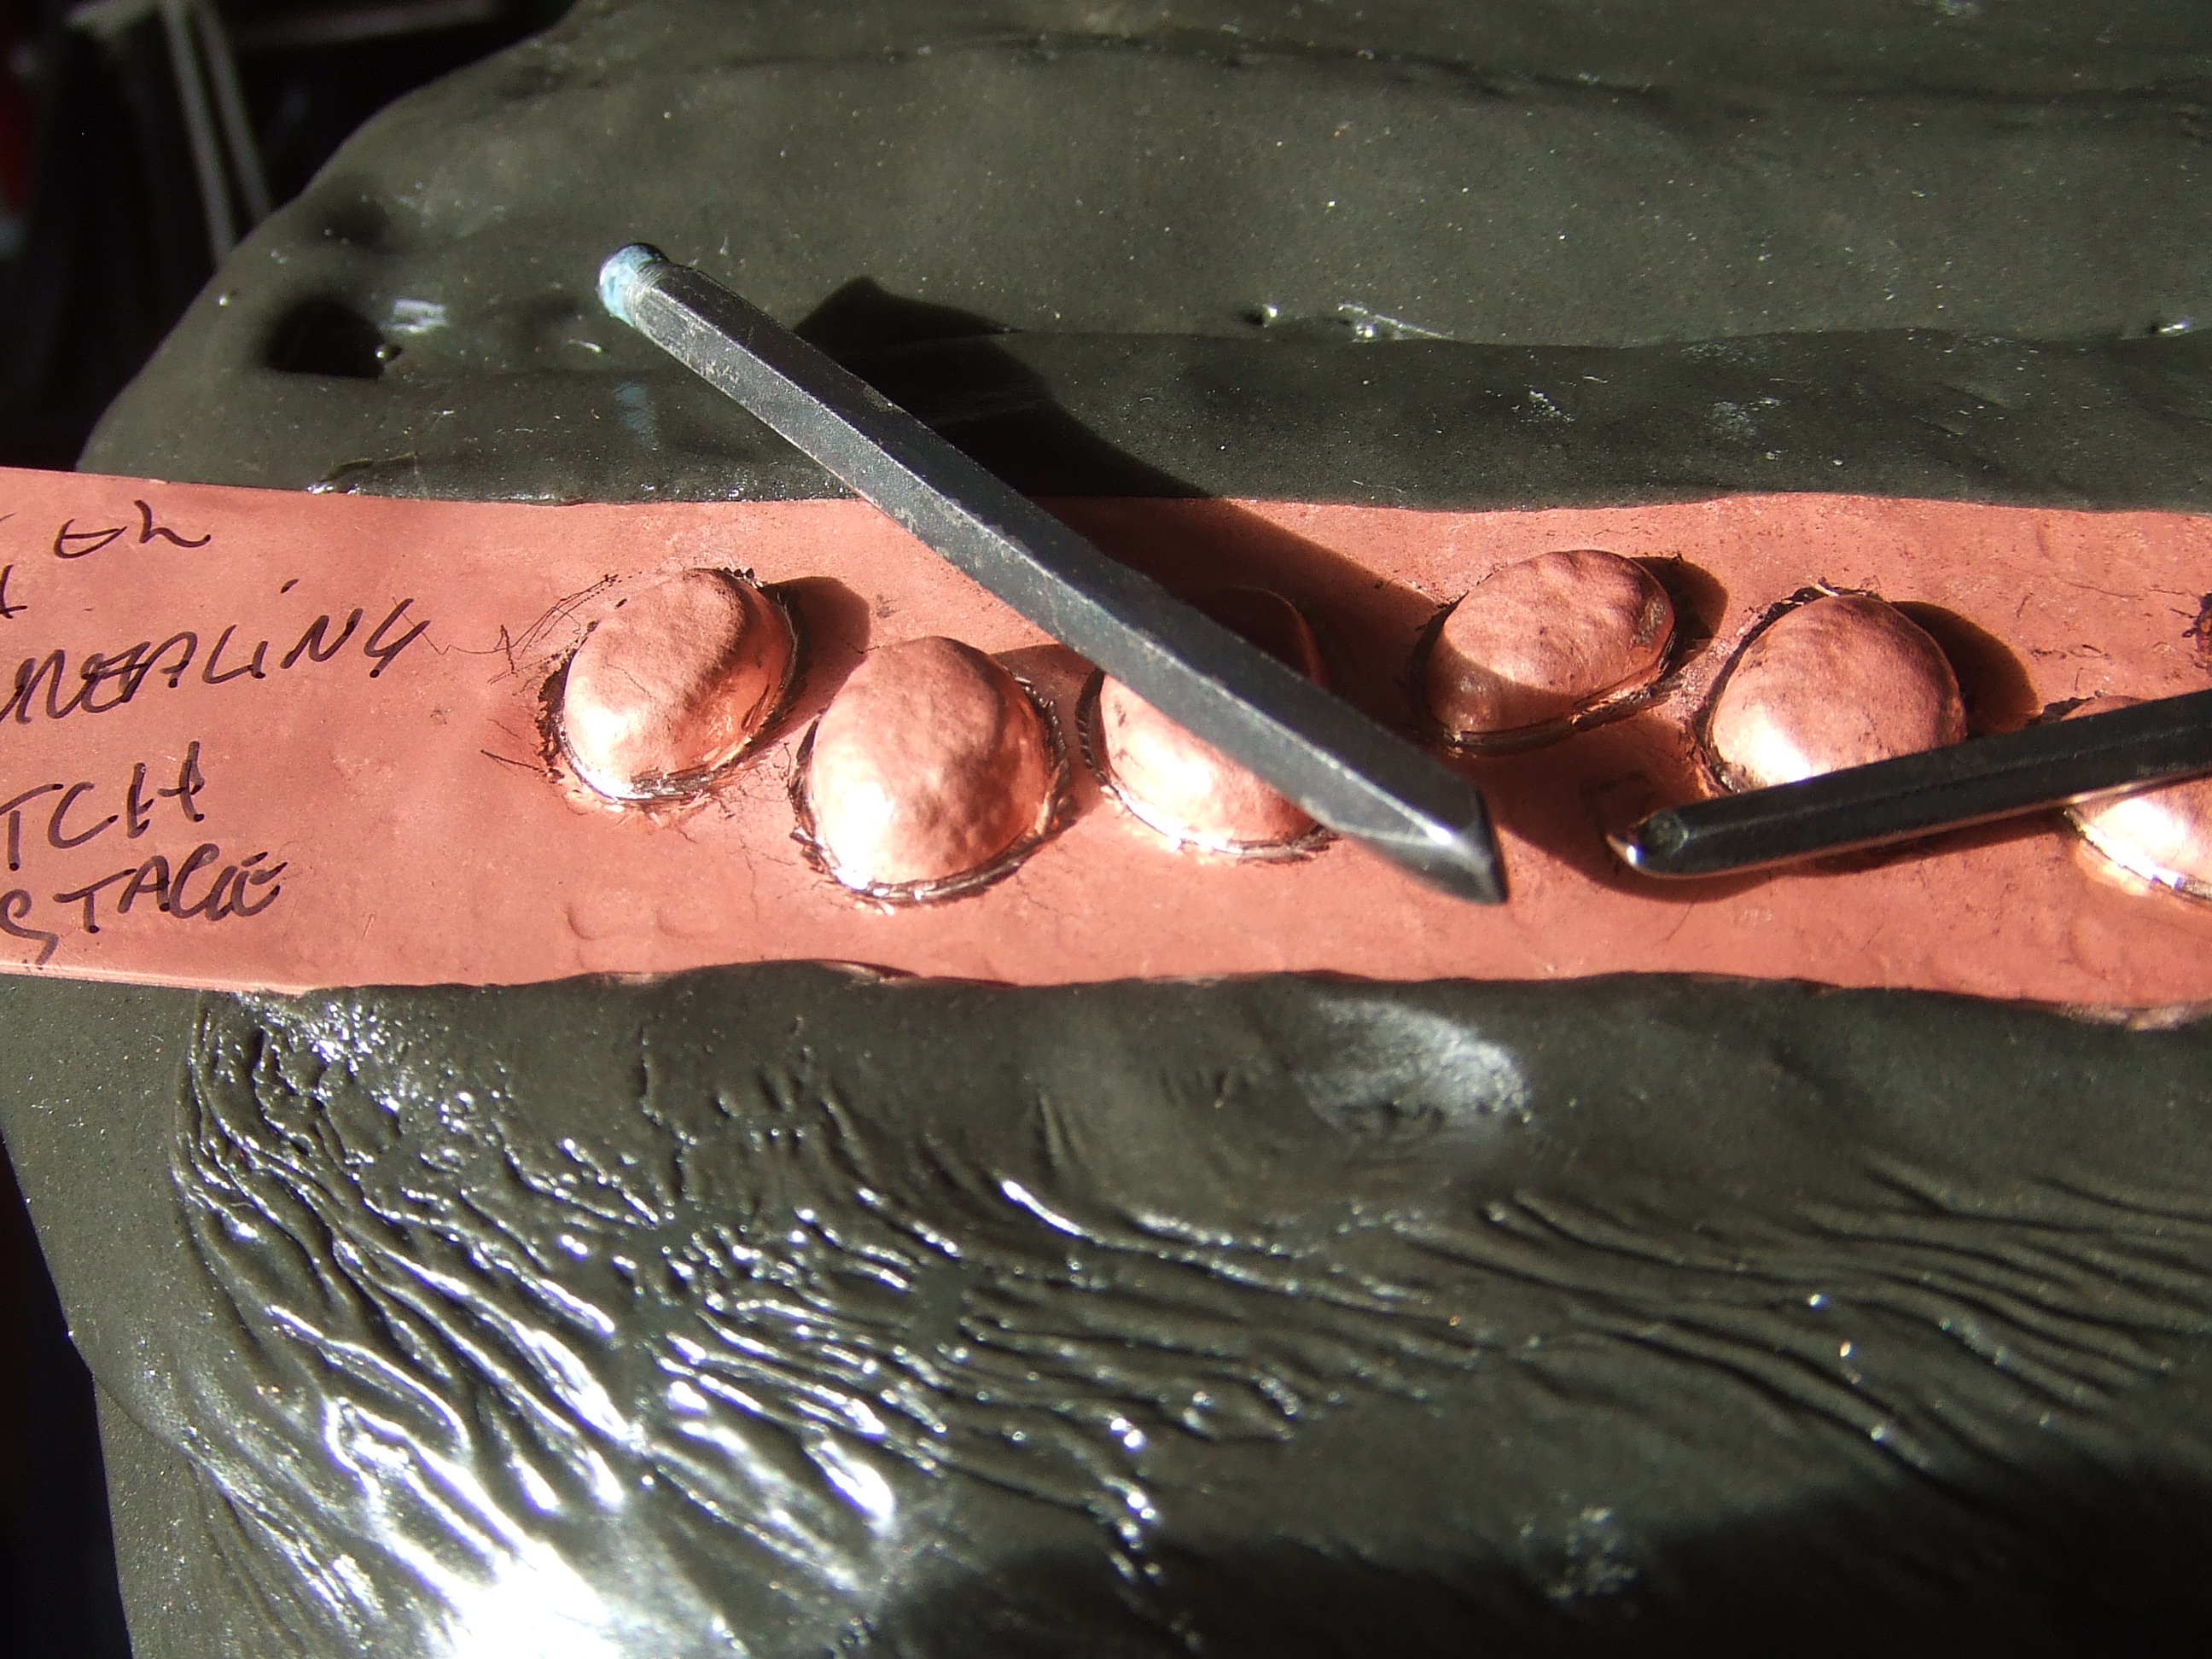
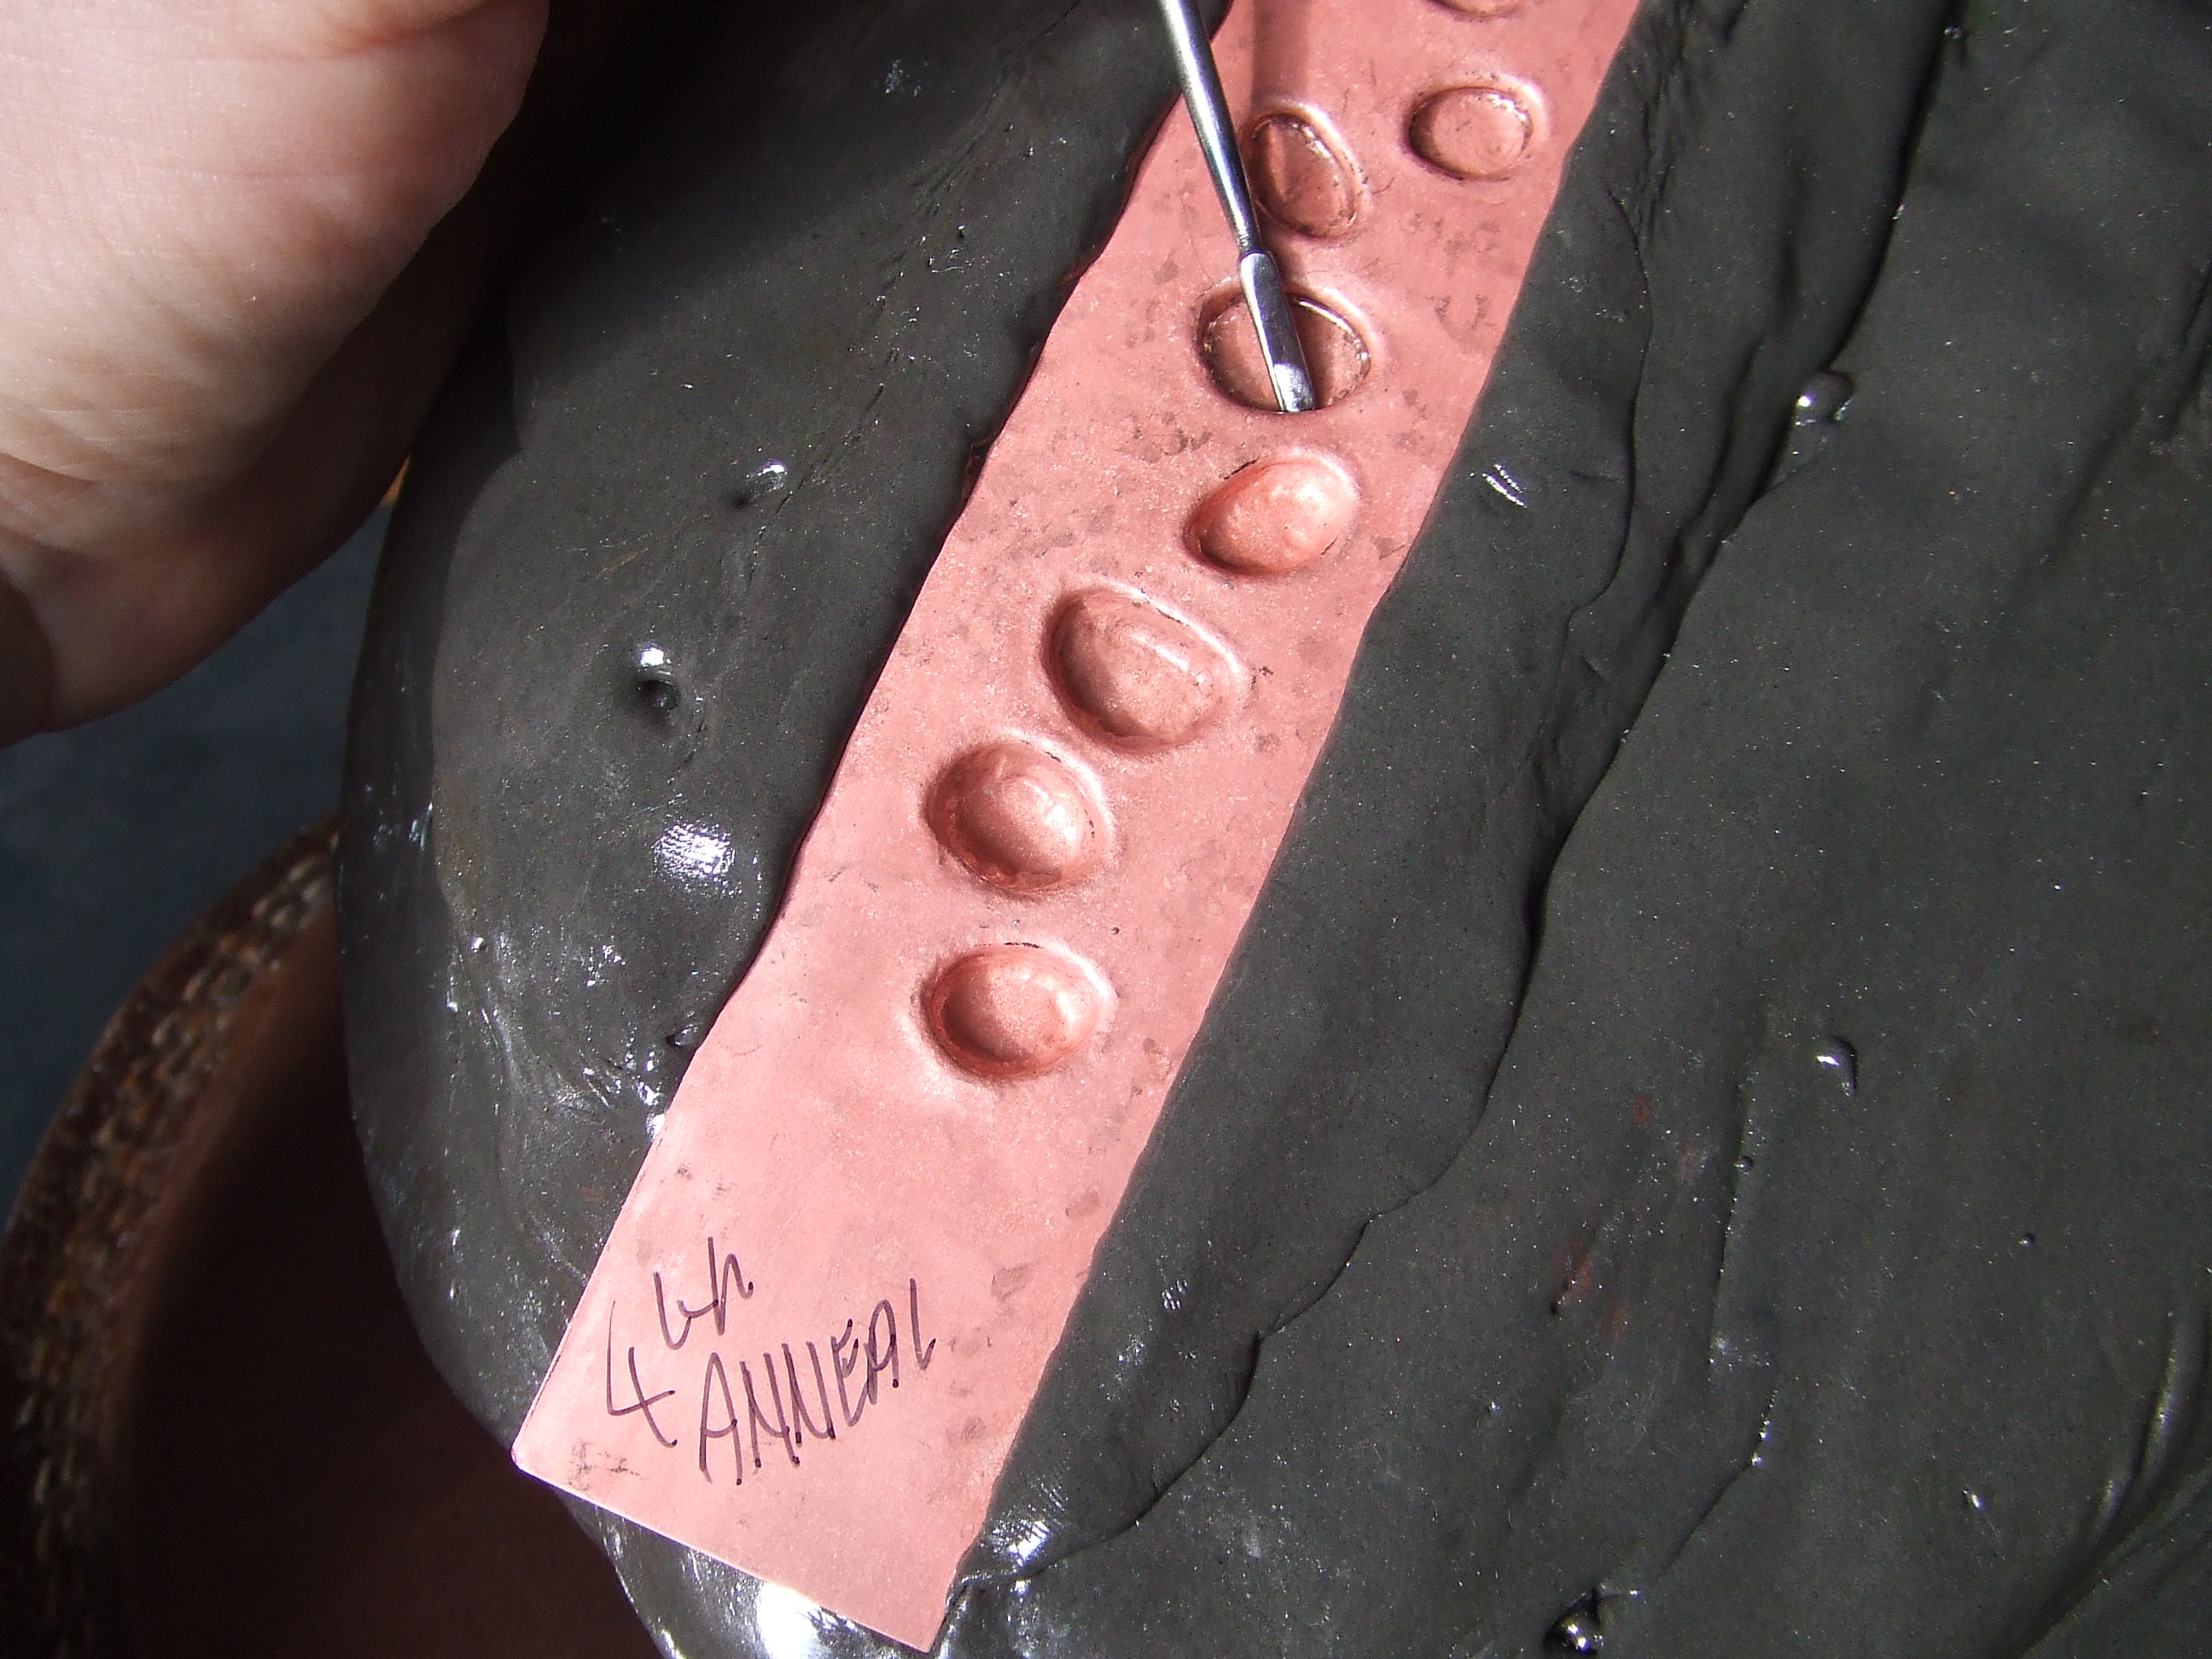
Soldering is where the next challenge presented. The spring in heavy gauge wire is considerable. After getting the ends as close as possible it was still a gnats doo dah too large for soldering. Anneal the link to give some softness after getting it almost to meet then onto the next beauty I managed to think of. I tried to use binding wire. No way could I get enough tension, after trying I was also worried that if I could, this would bite into the link, scarring the silver.

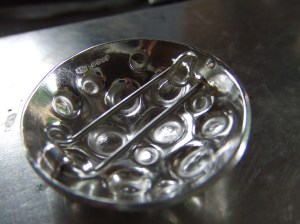
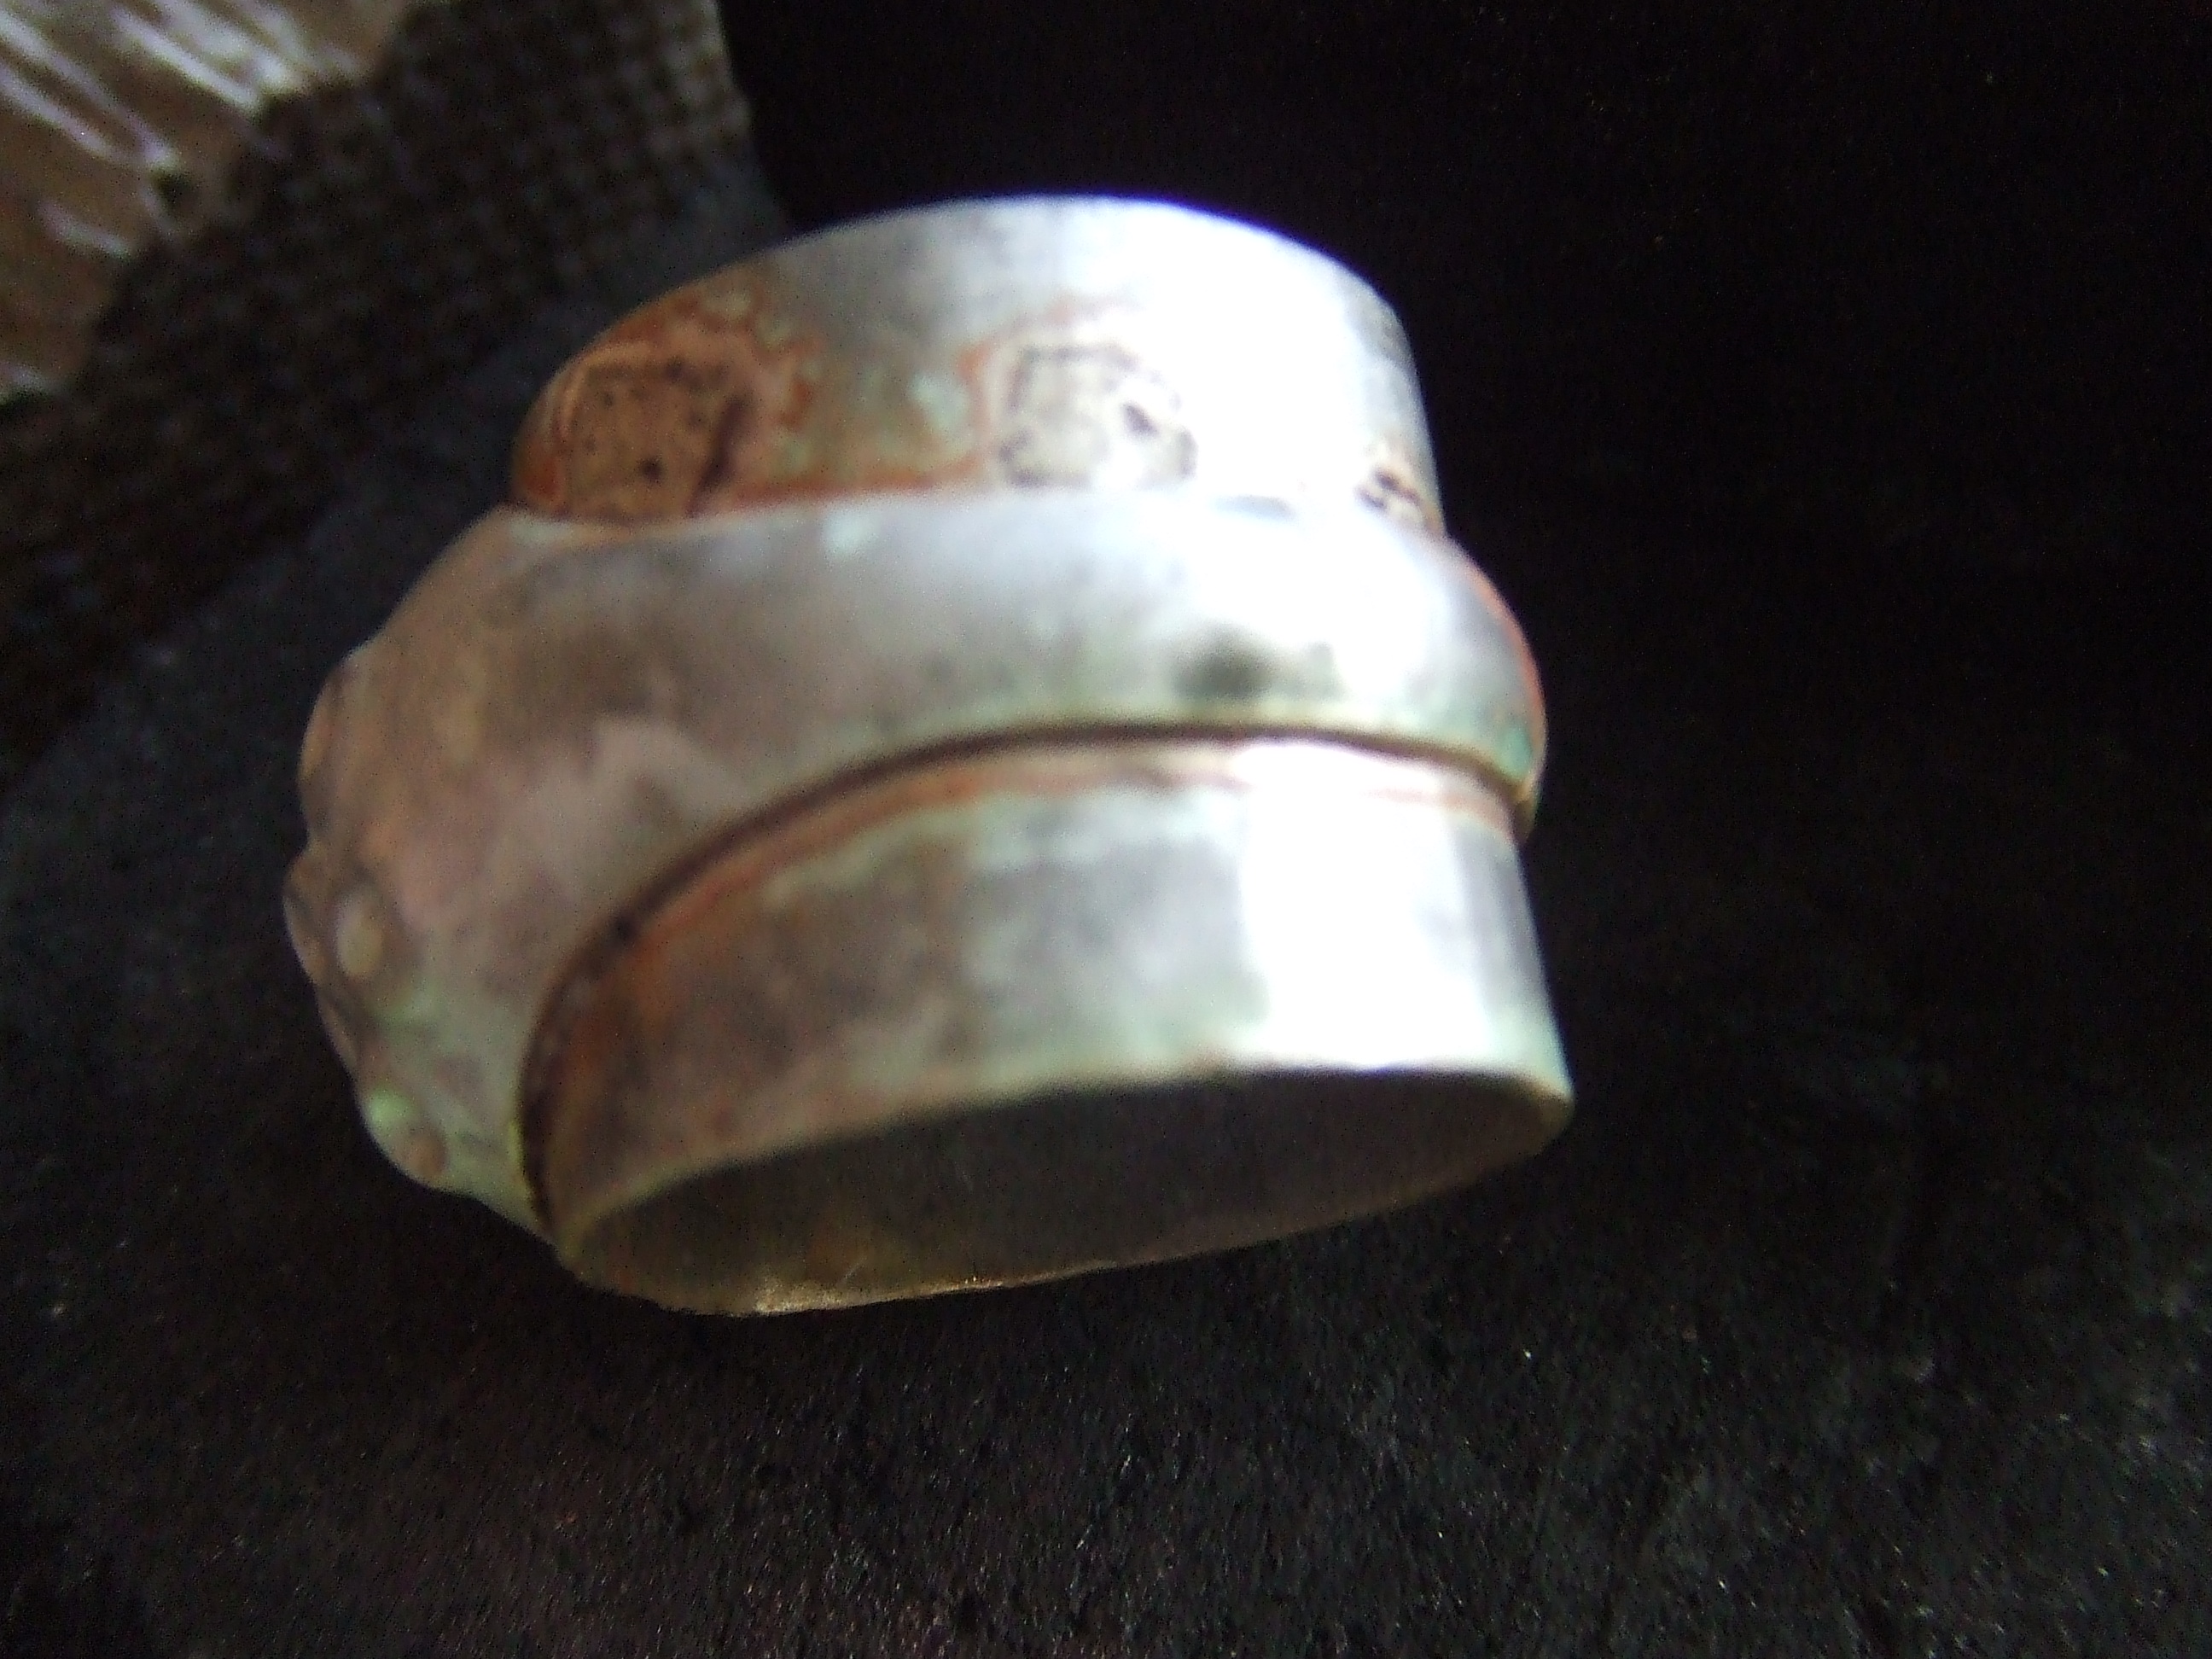
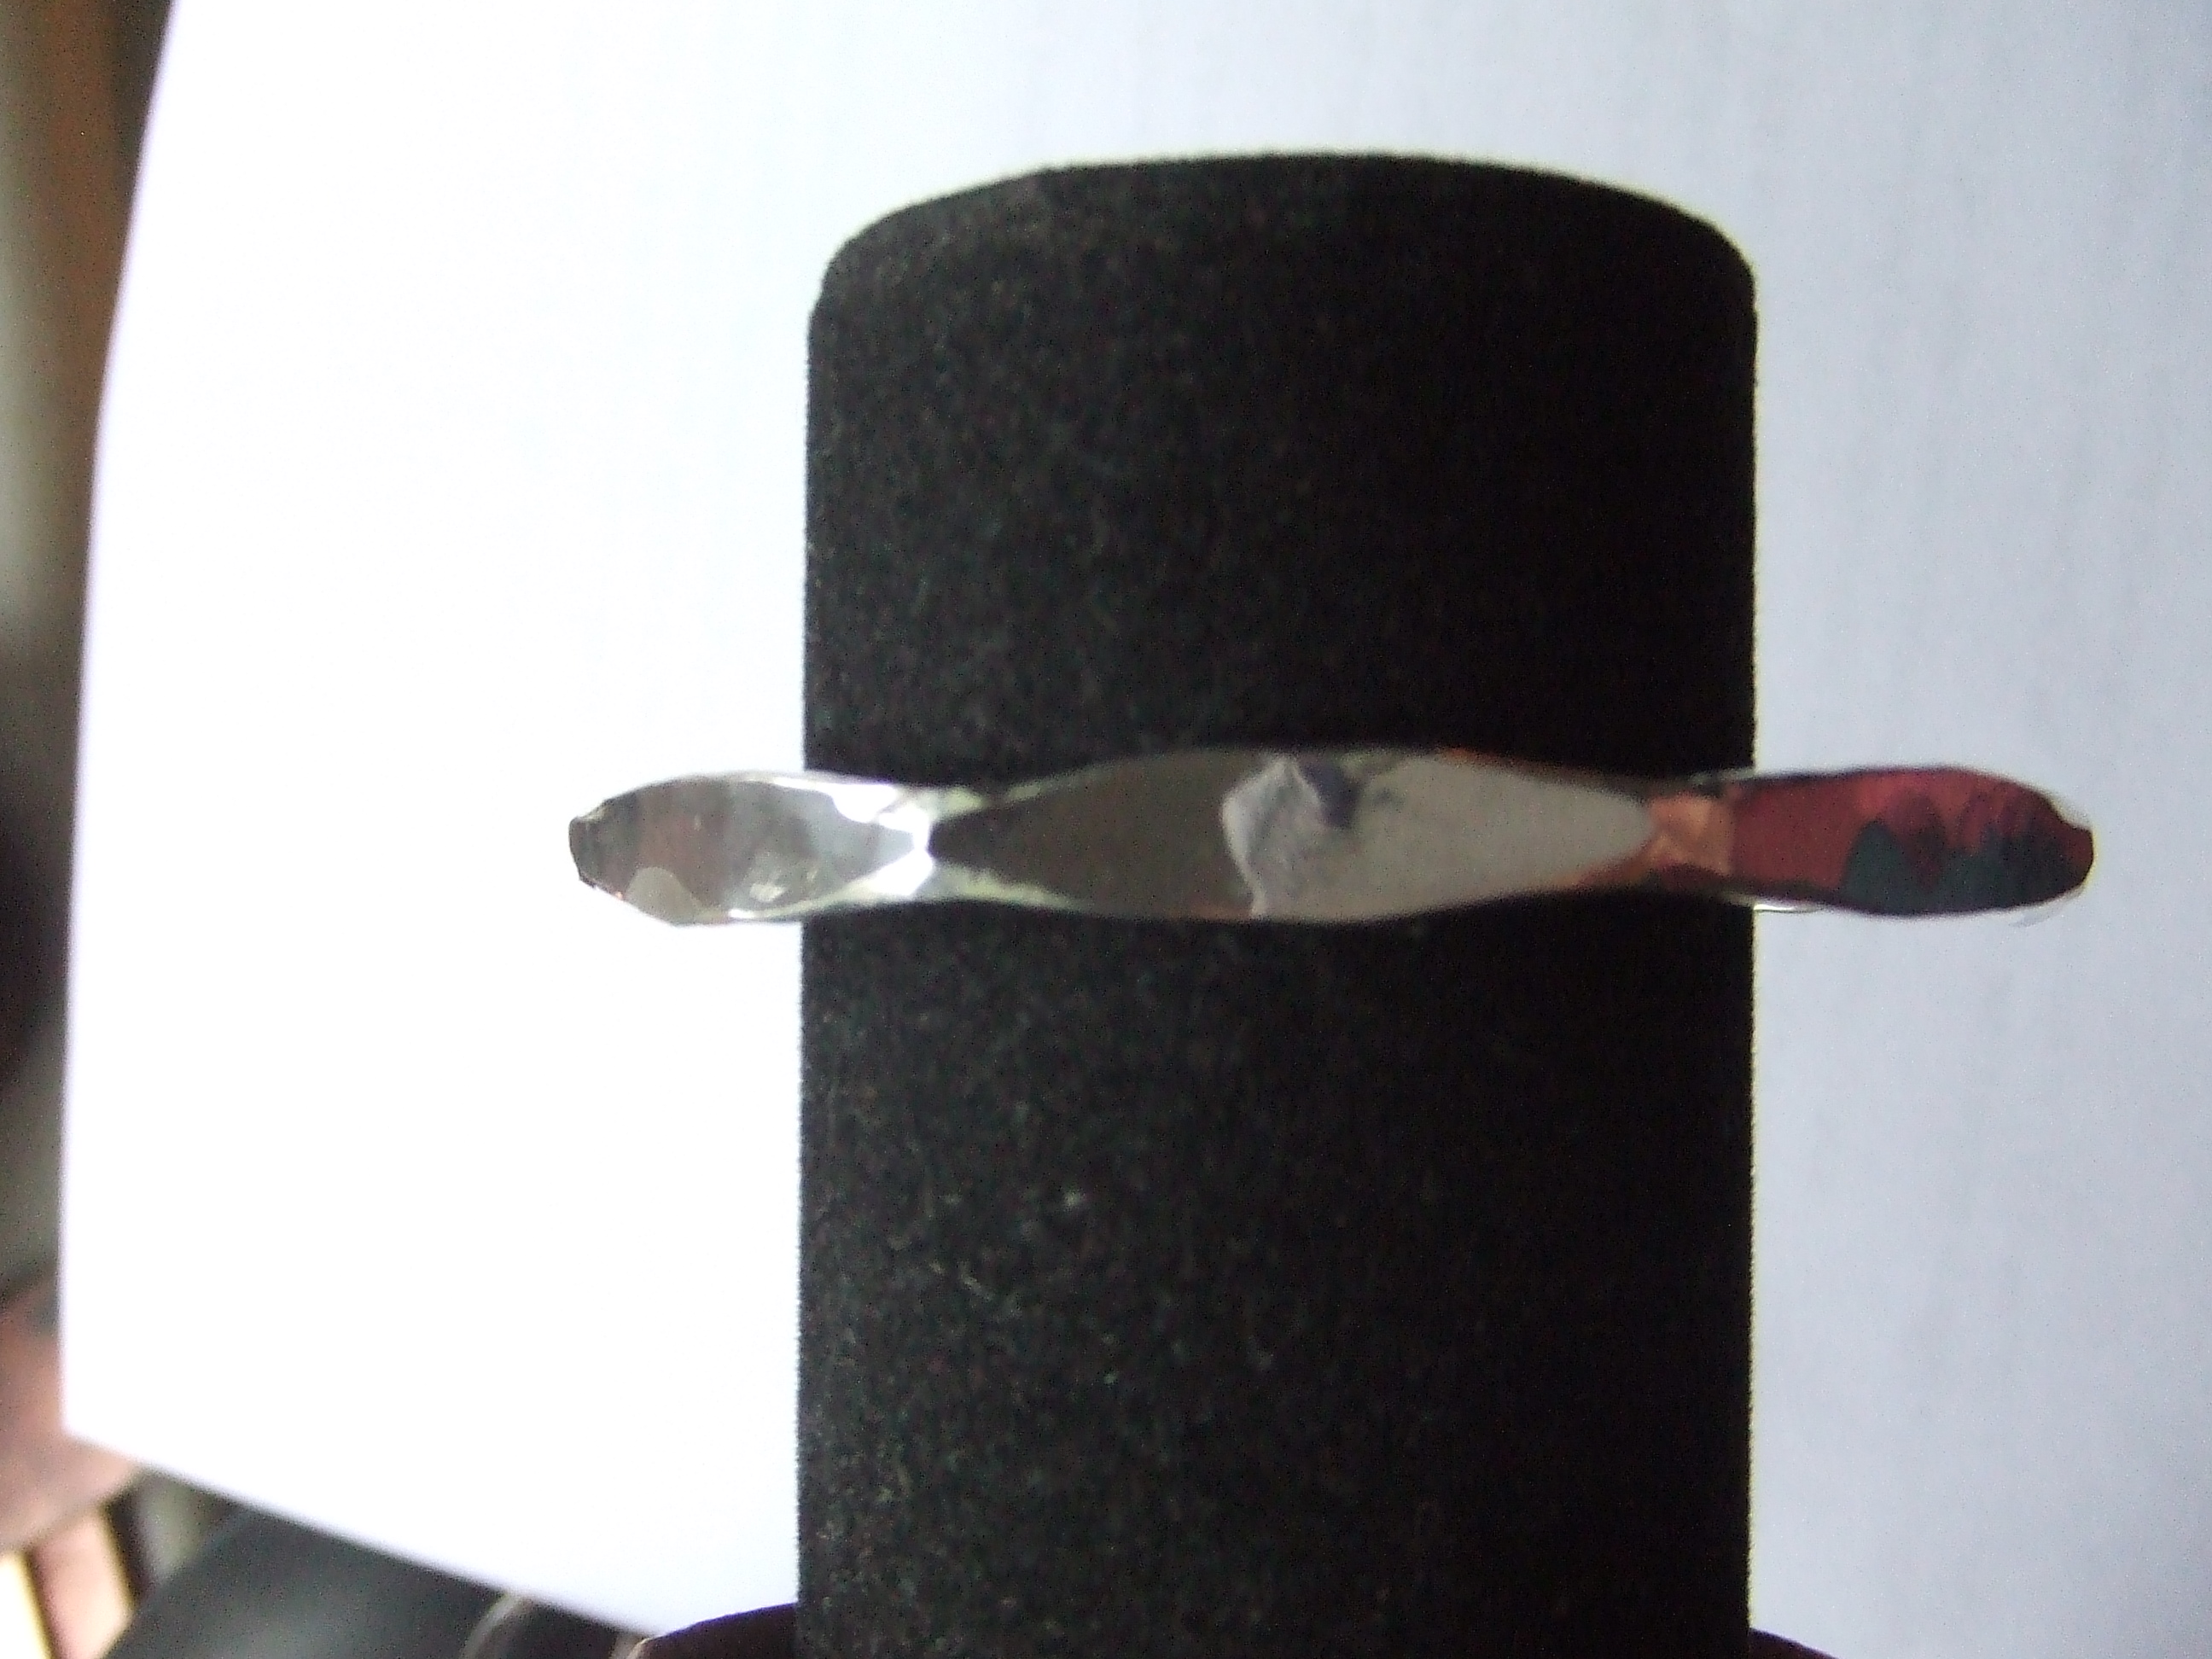
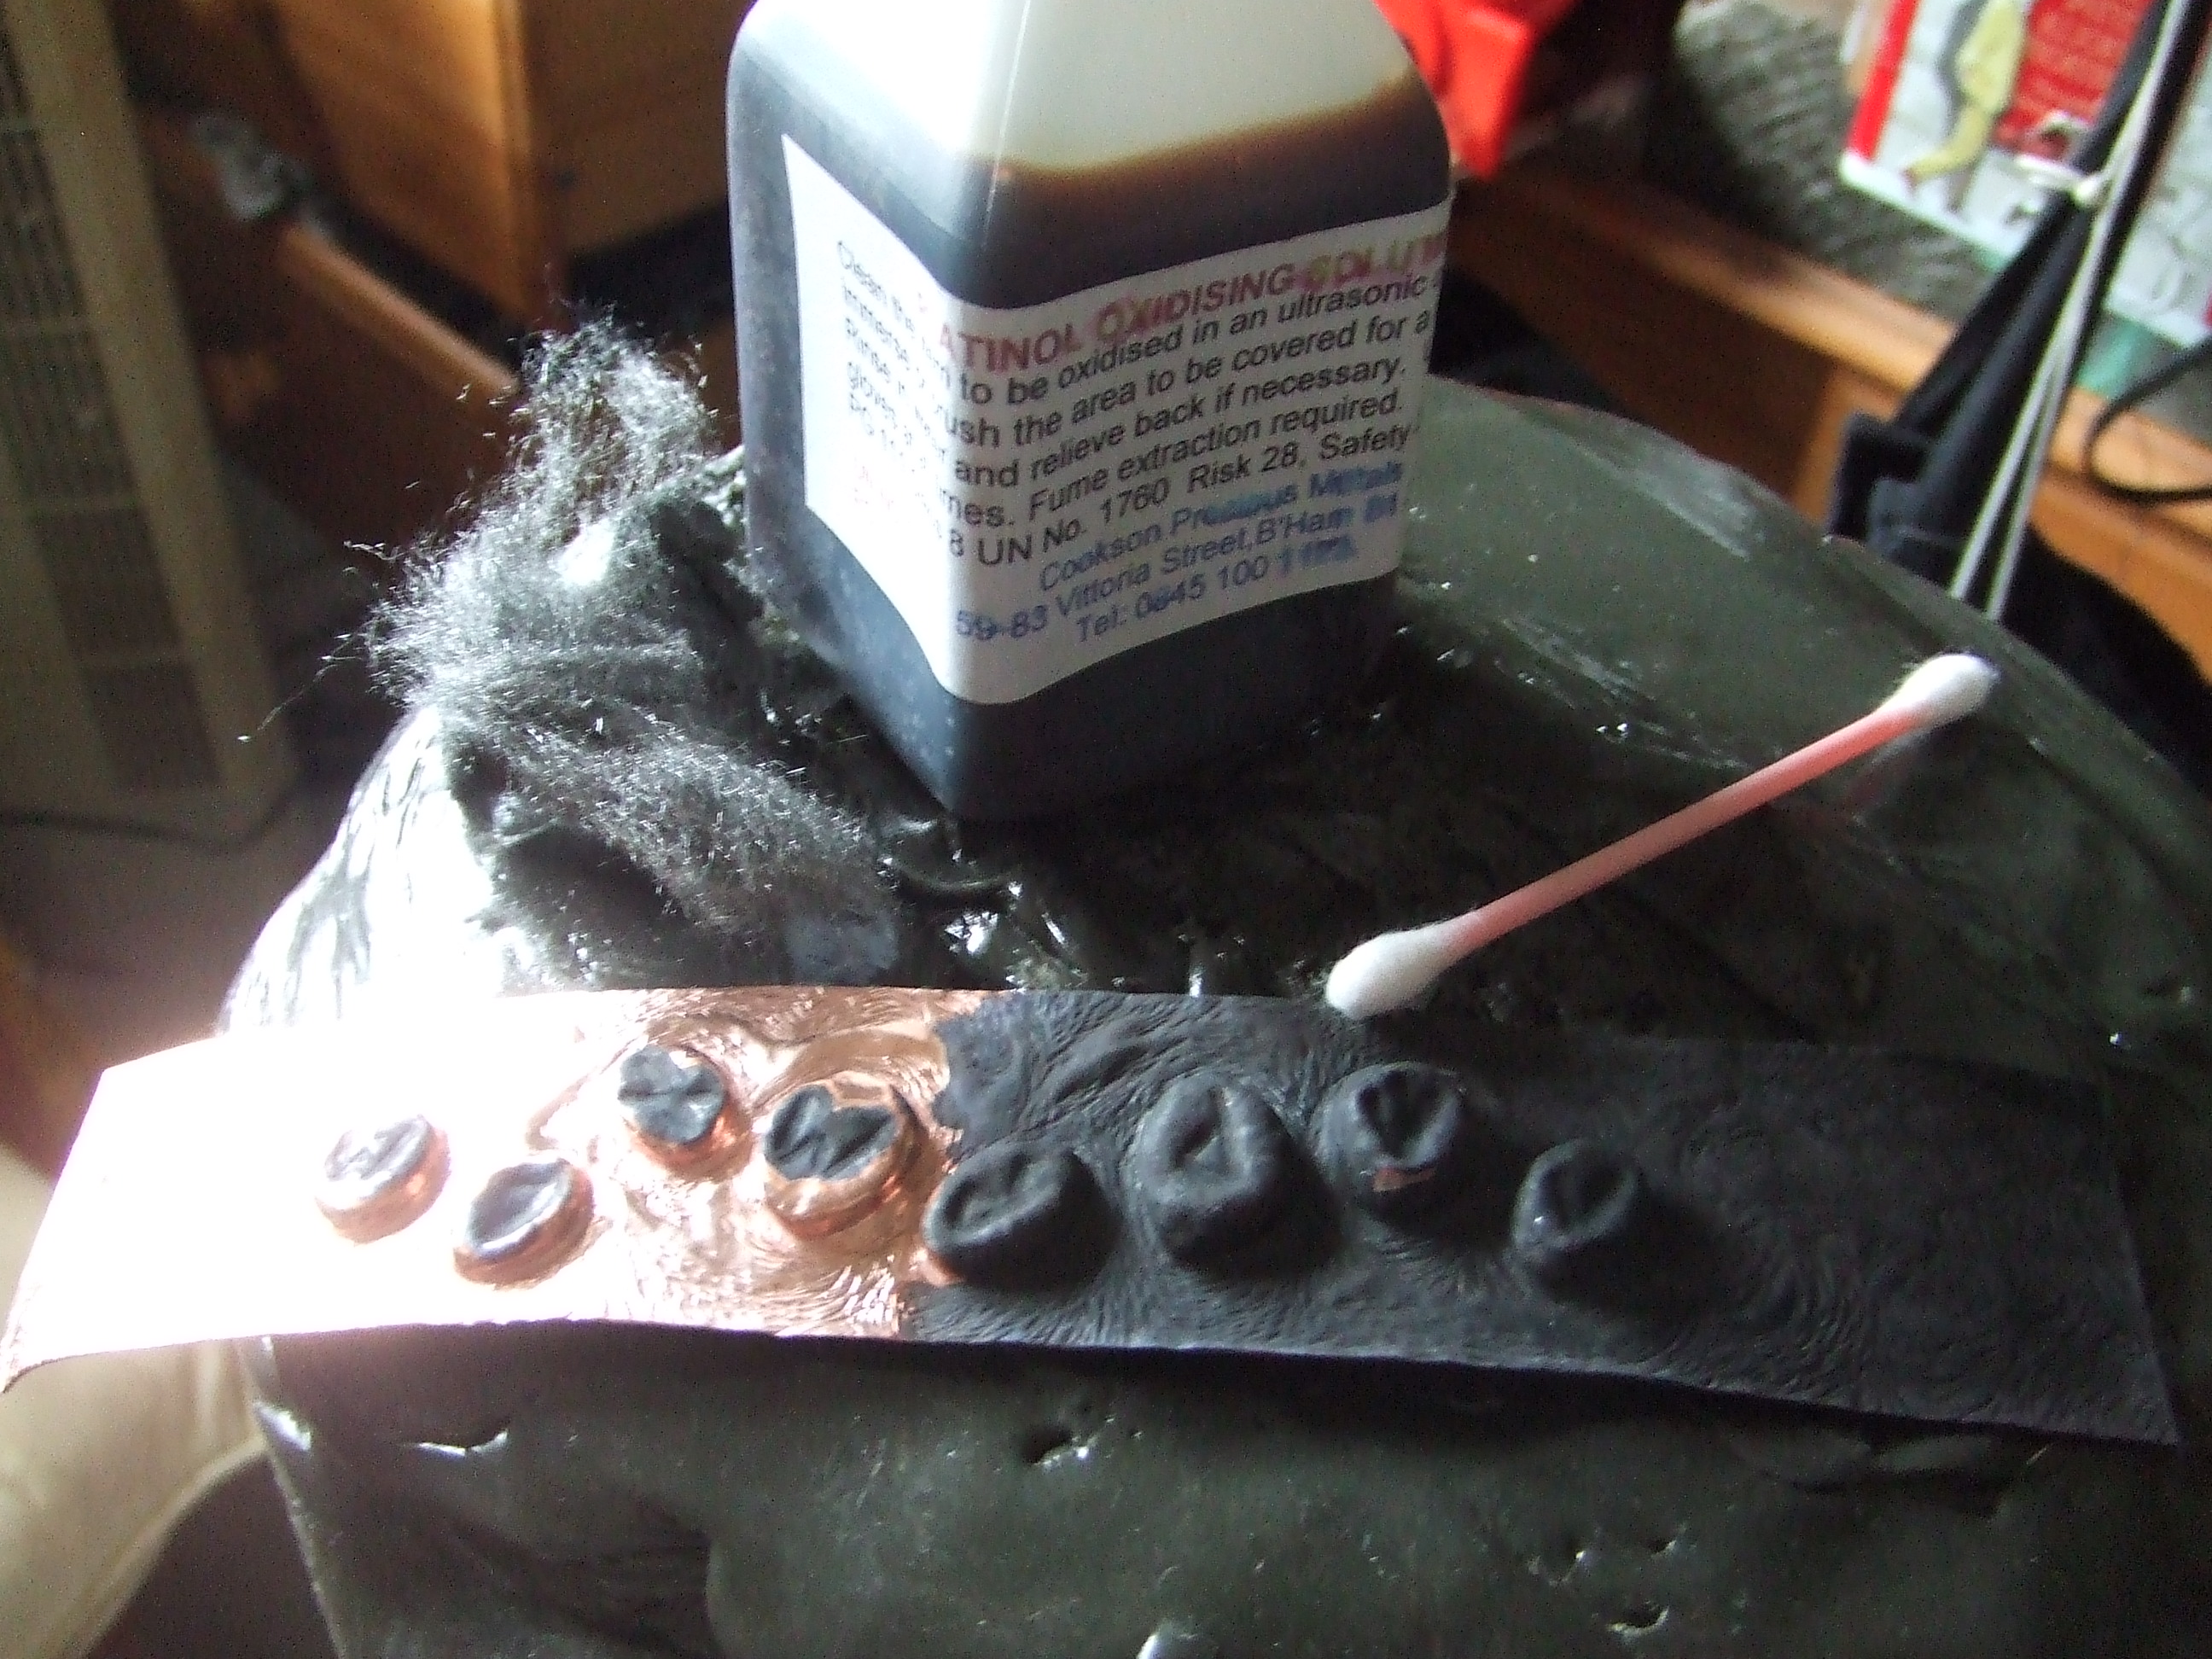
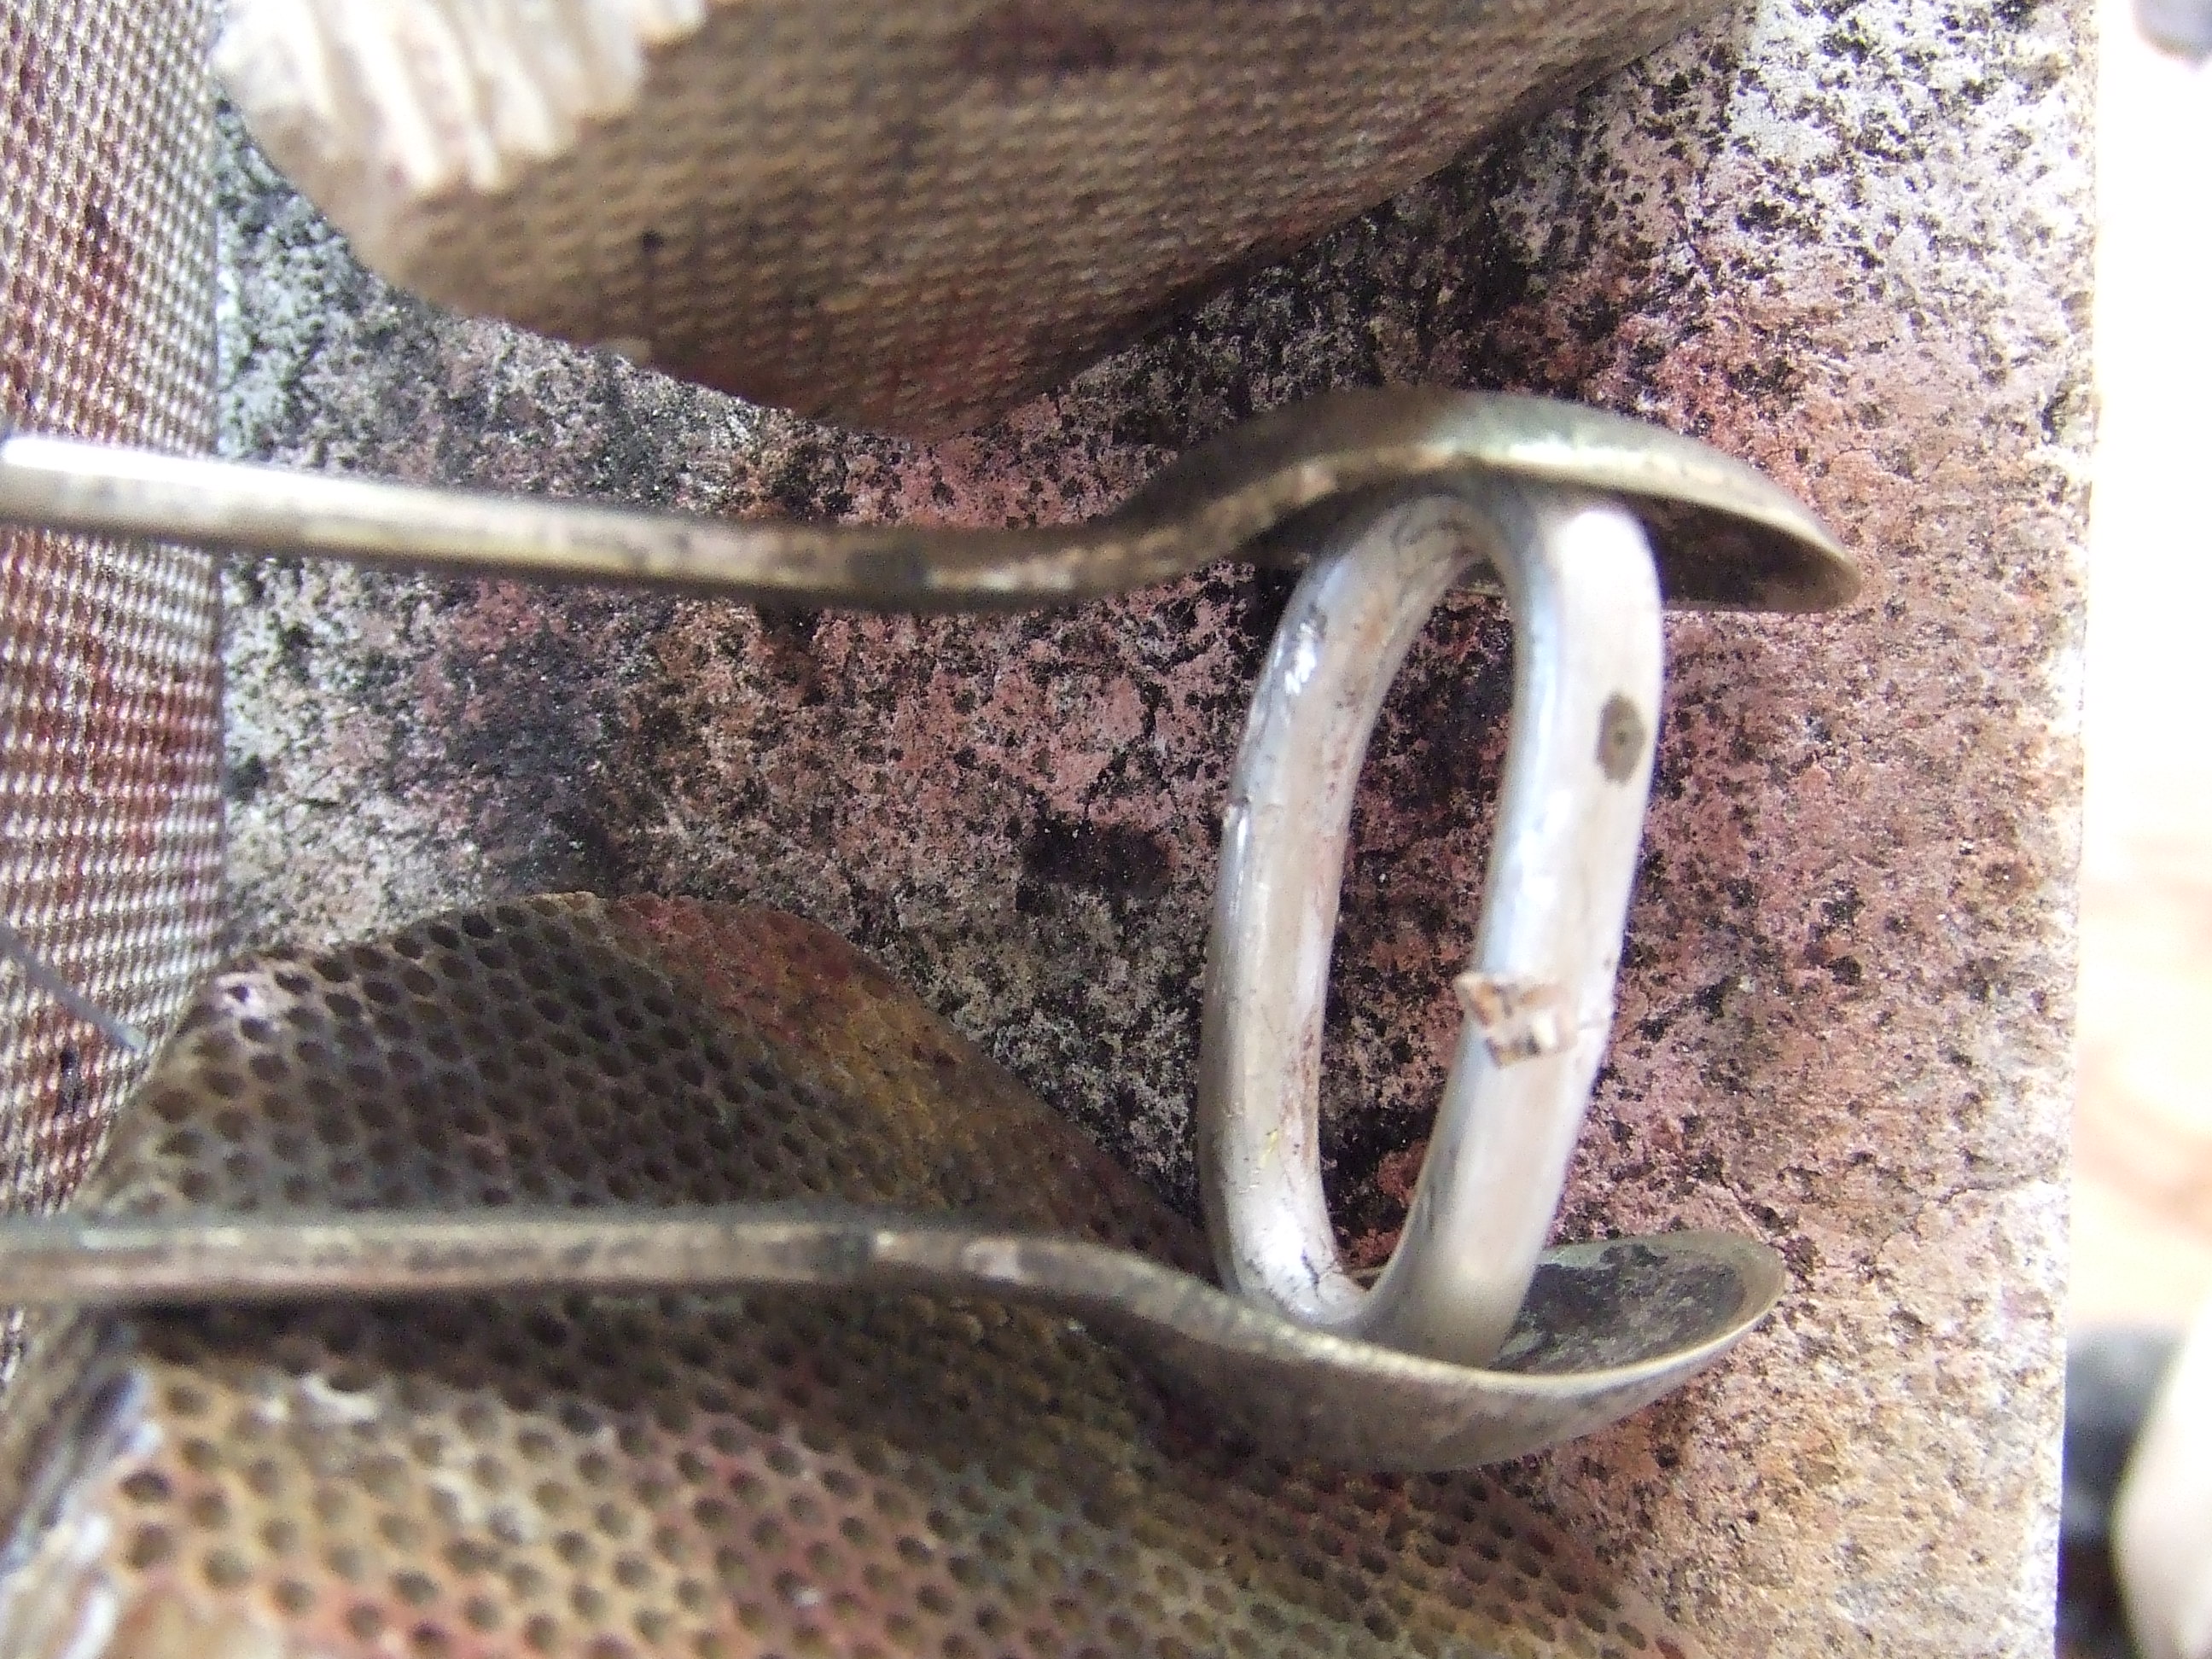
When people know you make things, the best of intentions come out, though sometimes misguided. My mum found these e.p.n.s. sugar tongs at a boot sale. ‘thought of you Stuie, any good to you’?  You don’t like to say no when the thought was so nice and well intended do you. Off they popped into my dead, damaged and what the hell is this for, tool graveyard.

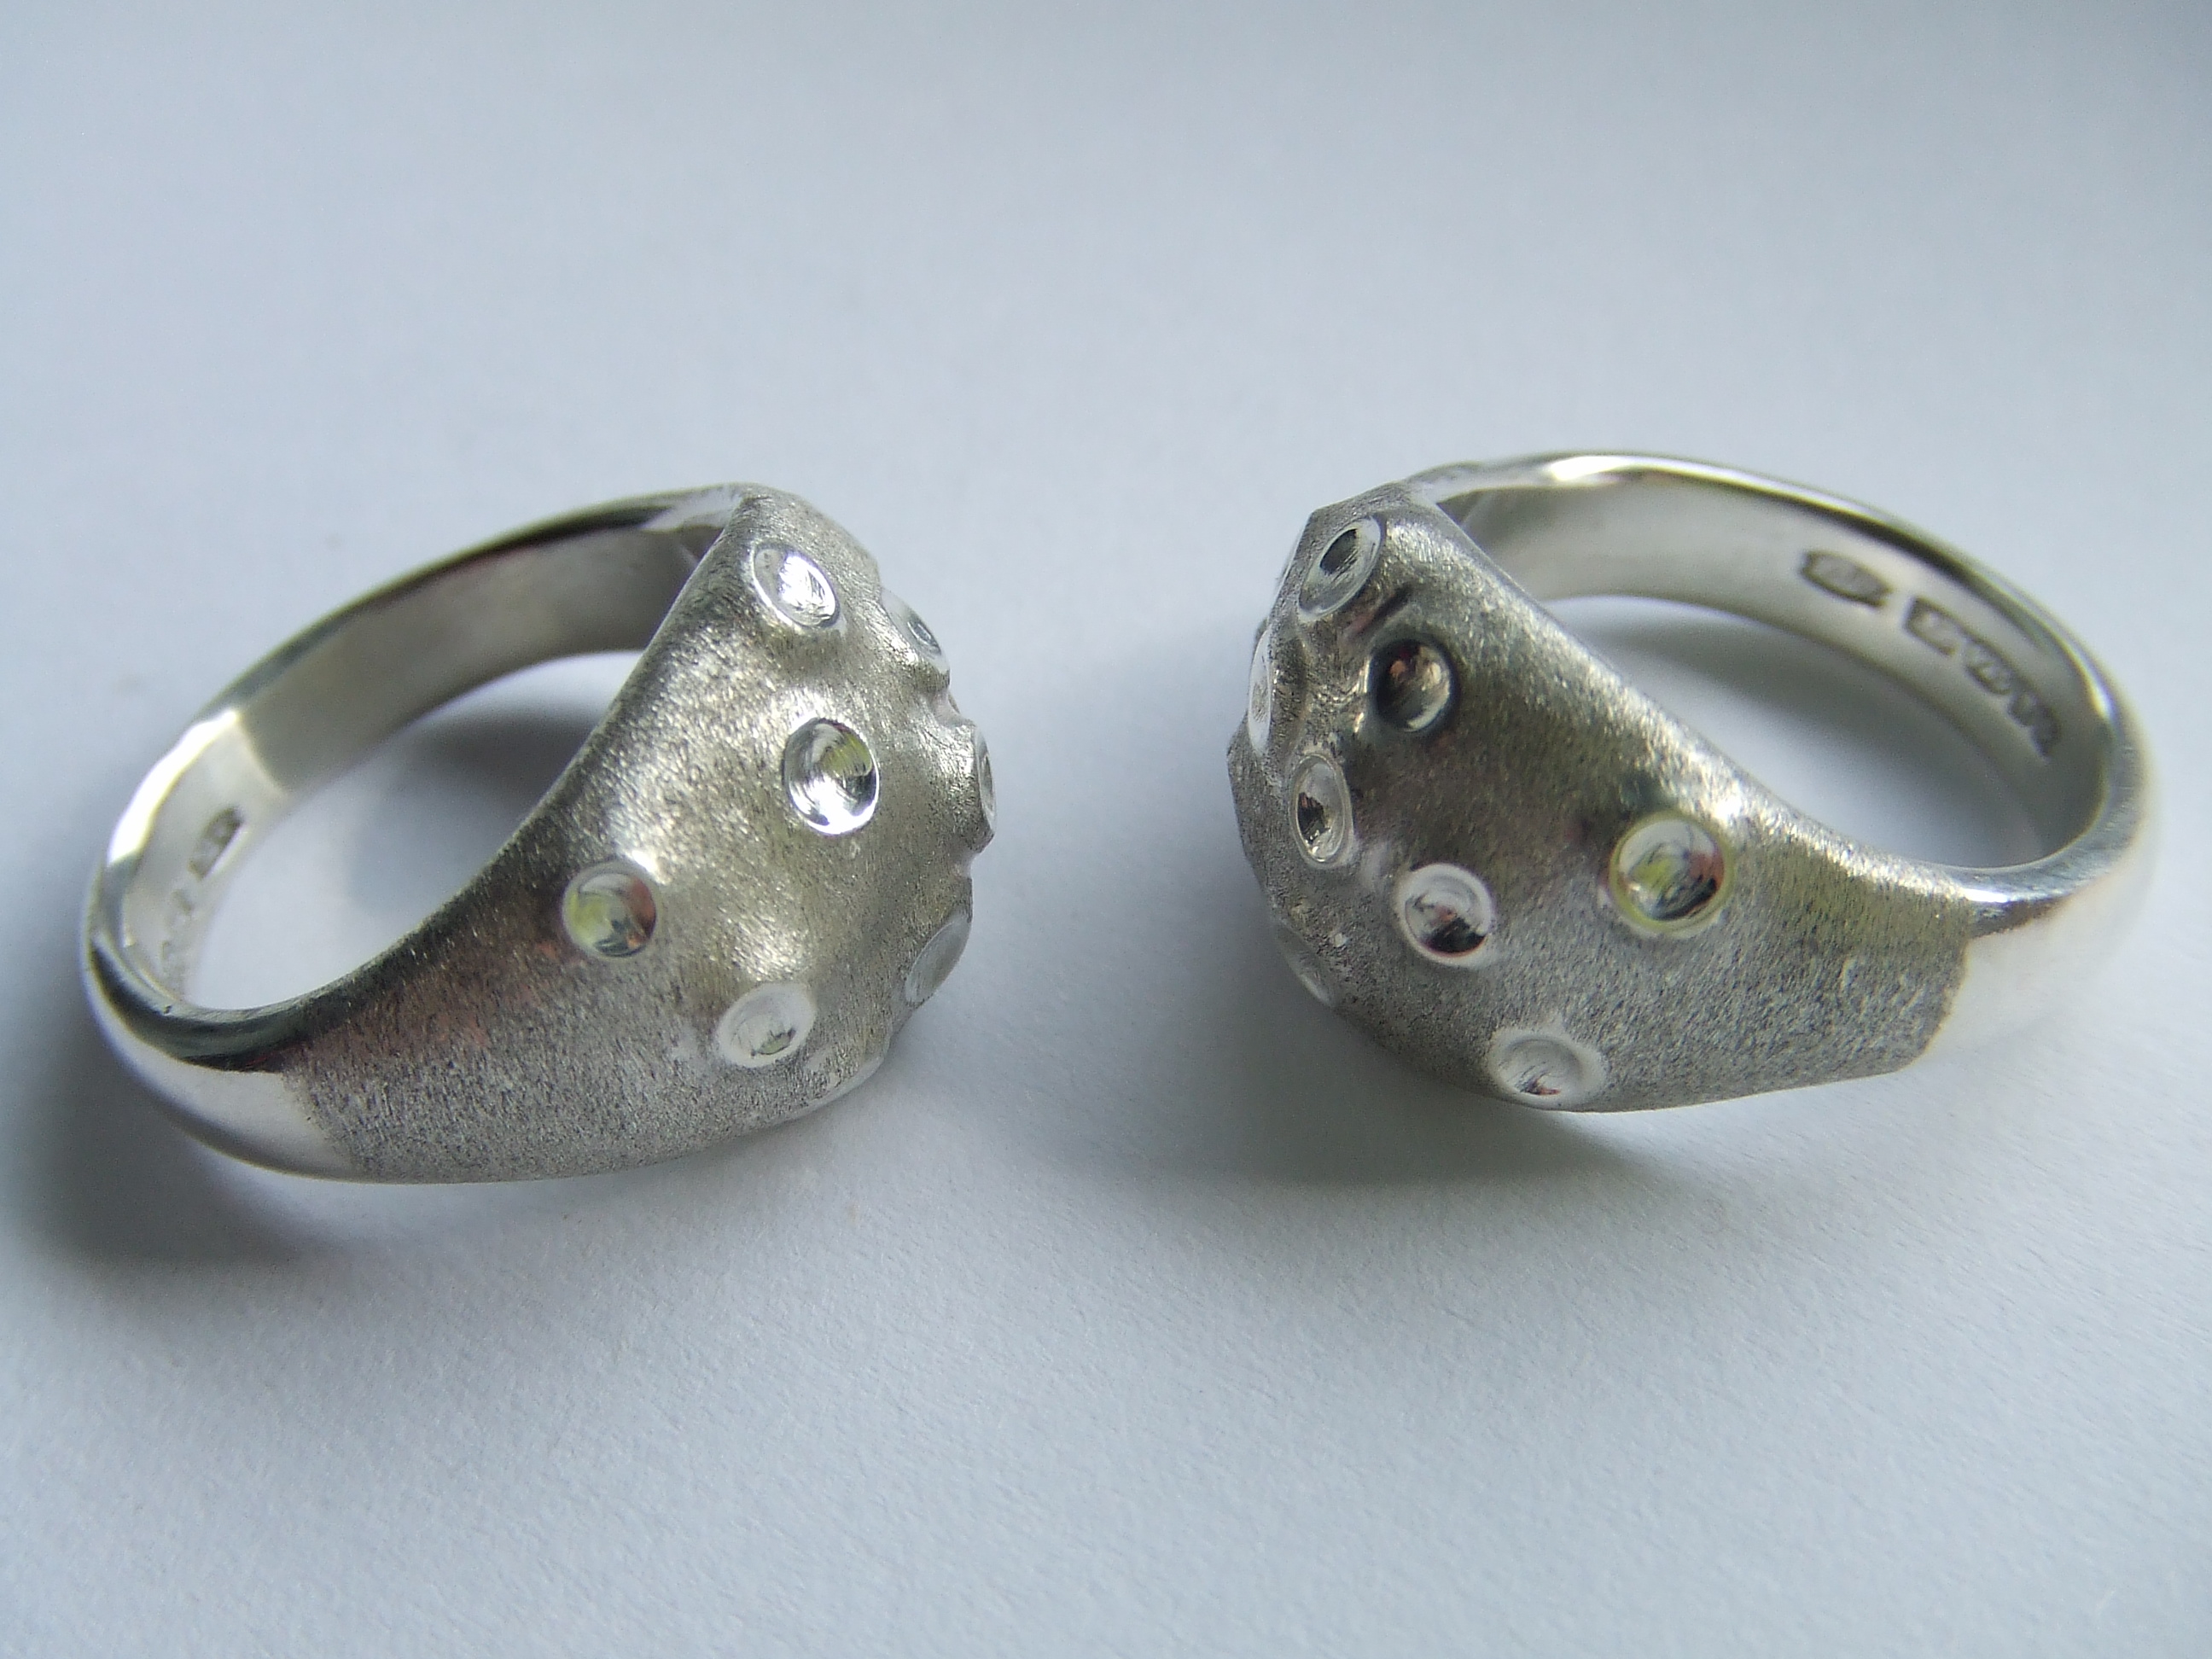
As you see in the final two pictures; brilliant for this job, the spoon end ‘cups’ of the tongs cradle the link and stop it skidding about. Wrapping binding wire around the handles, exploiting the natural spring in the tongs gave just the right amount of pressure required to close the gap, whilst giving the smallest of footprint to prevent too much heat loss through the heat sinking effect of having another metal object in contact. Also as the tongs are very much thinner than the link, this really helped to get the heat where it was needed.

I hope you come away from this post refreshed from the horrid last couple of navel gazing business oriented ones. If you get something from this post, please do let me know. I will share other tools I have made or modified in future posts. Until then, as always thank you very much for sharing the journey.

Very best wishes.

Stu.

Advertisement

Sterling silver forged bangles and a brooch that doubles as a pendant

SH_05SH_01 SH_02 SH_06SH_04SH_03DSCF3537DSCF3531DSCF3532

Wato wato all

Opportunity is a double edged sword isn’t it, my friend, also a survivor of ‘education’ from the previous year, Nicola Bottono http://nicolabottono.co.uk.websitebuilder.prositehosting.co.uk/

asked if I would drive her to see Paul Mountsey, the photographer who now takes all of Cornwall Crafts association pictures, as well as my previous professional pictures

http://www.paulmounsey.co.uk/

http://www.cornwallcrafts.co.uk/view-craftsmaker/221

You will love her work, dedicated as she is to her vessel pendents, go have a look and read about her inspiration, the pictures taken of her work are fantastic to see.

I have had a bit of a run on these forged bangles, the Jewellery Workshop has sold quite a few. I was in the fantastic position, for the first time, of having to pull my finger out and make some more to cope with demand, great stuff eh. The summer here in Cornwall is good at this time, the children have broken up from school and the tourists are flocking to Porthleven, and buying my work.

Never a great time, I wanted to spend more time on this batch to go to be photographed, Nicola, alas, had time constraints and had to be there on a day that suited her busy schedule. I had to complete my sample, just back from Assay, completed on the evening before. I am not 100% happy with the results. Proof positive that rushing is never a great idea in our chosen field. However they do convey something of the wave like appearance they present as they are twirled around ones wrist.

I also found another hammer at a second hand stall, modified it and had a play. The two finishes offered, one just lightly planished, great for refracting light. The other, with the aid of two hammers, are given a directional finnish to accentuate the curves as they spread out in the wider parts, compressing in the transitional parts of the forged design.

I also like the way, when looked at the opening, the directional way the four opposing waves present each side, give the impression the bangle is square. I’m bound to say I’m over the moon with these, all sizes have a subtle difference that is best seen up close as the pictures have a job conveying the way they are over the three widths. I started with 3mm, 4mm and 5mm sterling silver round wire, soldered into a round. I made a stake especially for these that gives me a consistent angle as the ‘waves’ are forged, four one side, then flipped over to do the other side. The smallest (narrow gauges) are able to be completed in one, sometimes two annealing stages. The 5mm ones are quite a grunt to get them to move and require more work than their appearance would at first suggest.

I received the pictures, then put in my application to sell through a web based retailer, I will tell you all about it when I get some feedback, don’t worry, warts and all 🙂

As many of you know, it has been a struggle for me to come up with more commercially viable work. I will continue to chase and repousse some work, however I intend to concentrate more the forged line as fewer people appear to be doing such work. Now I’m very aware, this is also the case with repousse, the difference here is the cost of completed work. This is very much more affordable due to my being able to make forged work very much more quickly.

Some may remember me mentioning, I started my working life as an assistant to a farrier, a blacksmith specialising in making and fitting horse shoes. When I attended College, silver prices were very much higher, I wanted to go back to forged work then, a mixture of ridicule and price made me re consider. This is not an issue now, bound to say I feel like, a little tongue in cheek, an adolescence is being re lived a little, great stuff.

I have had steady sales priced at £69.00 3mm, £129.00 4mm and the monster 5mm is £189.00. I will put these on my website ASAP to go with the other directions written about above.

Now to the pendant and brooch combination. I felt that it would be nice to give added value to some repousse work by making a pendant that can also, if chosen, be pressed into service as a brooch. This has been very well received and ameliorates some of the cost considerstion. A bit like buy one get one free if you like.

I have posted pictures I took alongside the professional ones to give you some idea of how I did it. The pin is made from dental grade 1mm stainless steel wire, I made the silver tube for the pin to pivot in. The catch incorporating the pendant loop was made from a single piece of Sterling silver wire, forging the pin retainers, bending them into loops before soldering. If you would like more information, please let me know, I’ll post more detail if you’re not clear.

I have a huge favour to ask of you all. I know most all of you are fellow makers, not buyers. When you see fit, please pass on my details to others who may be interested in purchasing, or selling on my work. Needless to say, I would be overwhelmingly grateful for any leads you are kind enough to share.

I havent forgotten the ‘dirty’ workshop piece that is to be shown, still later than planned. Bit of an embarrassment to share; being a lumbering, clumsy oaf of a chap. The door to the shop was sticking, I bumped my hip against it to secure its closure due to the swelling of the door, damp here you see. The resulting crash of broken glass and splintering of broken door meant I had to tarpaulin over the hole, sheltering my beloved lathe behind it. The resulting furniture needed to keep it waterproof whilst a replacement is made means the shop doesn’t look much like it should right now.

Now I have some funds, a replacement door should not be too long coming, then I will post pictures and explanations of the various bits and pieces I use.

Until next time, thank you again for keeping in touch.

Kindest regards and very best wishes.

Stu 🙂

sterling silver stone set cabochon rings from scrap

DSCF3522

Carved depression into charcoal block

DSCF3524

After melting the scrap, this is the ingot before forging and subsequent milling down to size with rolling mill.

DSCF3525

The moonstone was mine to start with. Paul and Clair at the jewellery workshop Porthleven kindly gave me all the others to play with

DSCF3526

My attempt to try and KISS – keep things simple stupid 🙂

DSCF3528

The shanks were made from 3mm wire, rolled into a semi ‘D’ section. I already had the wire, only the settings were made from scrap.

Wato wato all

Alas I didn’t take a picture of a moonstone ring I made from parts of my disastrous journey into the world of outscoring casting. I had my moon series domes cast in three sizes to make bracelets and earrings. The results were not great.

Going through my scrap bin, I found one of the damaged domes and decided to make a moonstone ring with the moon dome as the setting. I wasn’t overly keen on it, to my mind it was too tall. Reen insisted that she wanted Clair and Paul to take a look, they sold it within a couple of days!!!

I always battle with what will be attractive, taking every effort to try to keep a bit of my personality in a piece the same time. I realise that this a case of mind over matter; People don’t mind cos it don’t matter 😉

Buoyed with this success, I have made these rings as simple as possible, no trace of an individual maker.

Paid work, therefore funds, still being somewhat illusive at this time, I was forced to recycle some scrap to make the bases for the stones and the bezel. Luckily I had some wire, if not I would have had to make a draw plate to make my own. I put the wire through the ‘D’ section of the rollers and partially rounded the ends. I have noticed, around here anyway, most rings in the art jewellery sections appear to use mainly round wire. I think the extra surface area of the inside of a flat shank is more comfortable. Also, the size of the stones used, I think will stop them flopping on a wearers finger.

As you see in the pictures, I used a block of charcoal to make a depression, doubling as a crucible and mould at the same time. I’m not sure as the wisdom of this, the amount of heat it took was, to me, disproportionate to the amount of scrap in the hole. I can only surmise the block took away much of the heat. For the second batch I used a crucible, it was faster. The reason I wanted to melt into the charcoal was for the reducing effect. The carbon, when heated, takes away/uses up the oxygen, less fire-stain as the ingot cools in a much reduced atmosphere.

Fingers crossed this could be a far more productive avenue for me to potentially take in future. I feel bound to say, if you wish to inject some of your personality into your work, you may need to consider if your personality is attractive enough to share. This is a lesson I am learning. I was looking through my library of books and came across; Silversmithing a basic manual by Nicholas D Humez ISBN 0-316-38151-9. I wish to share with you a passage written there that made me think, perhaps it will do so for you also;-

Third, a word about attitude,or where your head is at. When you sit down at the workbench, if you are not prepaired to commit yourself to being all there – not thinking about lunch, or where your rent is coming from, or why so-and-so is peeved at you, or even how groovy you are sitting at this workbench – you are doing yourself and the metal no favour and will probably botch the job in front of you, possible exposing yourself to danger as well, should your torch or buffing wheel malfunction. Similarly, if you are furious at the world and take it out on the silver, your problems will not go away and your work will probably lack subtlety, even if your aim is good. And if you are just plain sloppy, your work will show it, and in a soberer moment you will be ashamed to have wasted your bench time so. To a certain extent, you will smith silver with the same style with which you run the rest of your life; hence “cleaning up your act” on the bench – that is, trying to do as good a job of being a silversmith as you know how – will work or not according to how well you are coping with the world outside the workshop. Don’t hope to do your best piece of the day after your cat dies: it is simply too much to expect of yourself.

Wow, wisdom and not more than a little kick from 1976. Now I know where I’m going wrong. Time to make more plain work I think 🙂

Until next time, very best wishes.

Stu Art


Sterling silver moon ring how to with home made tools. Part 2

DSCF3473

This is the nylon hammer I used. Wood or leather would have worked. 15mm doming punch used to refine after the doming block stage.

DSCF3441

Bolts used for forming, I used all three. Study the photographs, you can see the increased angles; the middle one first, the one in the foreground second, lastly the one on the right that I made in the metal lathe.

DSCF3479

Test fitting with line drawn in the middle as a guide for forming with the nylon hammer and the modified bolt stakes. I refined the design as I went along. The final version was more rounded, I also cut away the bulky shank. Compare this to the completed ring.

DSCF3480

Final rounding of the shank.

DSCF3481

I made this asymmetrical to give me a choice of profiles.

DSCF3486

Small hole drilled in shank to let gasses escape when soldering. I have never used easy solder before, I will in future. Use plenty of it.

DSCF3488

I’m not sure I fully recommend it; look at the top of the picture. The marks are left by the placing of the pallions of solder. I would normally turn the ring over and re apply solder to the other side. In this instance the solder ran clean to the other side, fully sealing the piece without additional soldering.

DSCF3490

Sawing off the unwanted parts of the shank.

DSCF3491

Savage beasty this, be careful, really fast though, saves lots of time roughing out. Notice I stopped just shy of being flush to the surrounding silver.

DSCF3492

Large half round file, almost but not quite nearly 😉

DSCF3493

Last of the files, small half round needle file, now nicely blended, ready for final polishing.

DSCF3478

Close fitting solder joint as I cut through both sided at the same time, making sure they would fit the shank.

DSCF3495

Photographed outside.

DSCF3502

Wato wato the end of the ring project.

This is a great example of wanting to make something but not having to hand the tools to realise it. As time goes by, I understand more and more why I’m not currently able to sustain myself in this craft. I spend far too long procrastinating on designs, making tools to realise far too many failed copper models before coming up with something I think will appeal. Only to discover I’ve barked up the wrong tree. At best a niche item, nowhere near commercially viable.

I now, with huge regret and not a little embarrassment, view my metalwork/silversmithing as a hobby only now. All ambitions of being able to support myself financially through my chosen craft showing as unrealistic at this time. I feel the clue here is in the realisation that I associate myself with the term craft, rather than designer or artist. As I become ever more bewildered as to what is marketed, I come to realise my place as fairly and squarely a maker in a world than no longer needs makers. Concept appears to be king. I feel its akin to being a computer, fantastic at maths; however it takes the genius of a mathematician to make beautiful equations. I aspire to be more conceptual in my approach to the craft. However my first love is the love of learning more about past masters and the techniques they employed to achieve wondrous constructions. The past machine age is pure romance to me. This is lost in a new era where, at the push of a button, designers/artists realise three dimensional objects, made by unseen operatives with mass production machines in such vast numbers as to make pretty much anything commercially viable. I have neglected to fully understand what is fashionable, wearable and viable. That’s the negative. The positive is that now I am no longer attempting to make a life for me and mine using just my hands. My resulting, more relaxed attitude towards this craft will, with luck, result in a positive re think. Trying to become a ‘mathematician’, not concerning myself as much with the mechanics, ‘computer’ aspect of creating wonderful objects. Working towards becoming a creative designer, rather than just as a solver of technical challanges. Watch this space 🙂

If you look at the bolts I modified for this job, I looked at stakes from established tool supply houses. Here in the U/K it is becoming ever rarer to source forming tools, the ones that are available are prohibitively expensive for a hobbiest. As we use very soft, non ferris metals, even a common or garden bolt will suffice for forming. If you wanted to make a more permanent, planishing stake from a bolt you can buy/salvage hardened steel bolts and fashion them to the shapes you desire. Cylinder head bolts work very well, you can look up through fastener suppliers, the hardness rating of a bolt, if you wish to purchase new.

I used a metal lathe to make these. I was thinking though that those of you without access to such a machine could use a drill and a hand file to create a similar stake. Chuck up a bolt that you have founded off best as you can in a vice, then spin it in the drill, rounding as you go with a file. Finish off with coarse to fine paper whilst still spinning in the drill. Be careful as the bolt will get hot. Try to use a drill stand so as to keep it all steady and have both hands free for proper filing. I also add chalk to the file and paper. This gives a better finish as it prevents the build up of metal particles in the ‘tooth’ of the file or paper.

My aim with the next post is to introduce you to my garage machine shop. Fair warning to those of you not interested in such things.

If you have any questions about the ring, or anything else, as always, please don’t hesitate to ask. Thank you for looking.

All my very best wishes.

Stu Art 😉


Sterling silver moon ring how to with home made tools. Part 1

DSCF3504

The completed, hallmarked sterling silver rings.

DSCF3508

The first, spiky example was my first attempt at a ring at my first year of College. I am drawn to this type of construction, though I wouldn’t recommend this ring. It was a good exercise on many levels, not least, how to make something totally unappealing 🙂 it taught me a lot about soldering though. The second was my first attempt to make a ring with repousse and chasing techniques to take advantage of the ‘skinned’ or two part hollow nature of these rings. The third is where this project takes off.

DSCF3424

To give you a flavour of the process, some experiments, drawn, paper mock ups and copper blanks ready for the next stage.

DSCF3422

This is not the final patter, though pretty close. If you do something similar I would recommend using graph paper, I did in the end. The reason is, when cut out you notice, especially in the following processes, that your pattern isn’t quite symmetrical. Graph paper makes this far more preventable.

DSCF3423

Some of the directions from the comfort of my drafting table,. Told you I couldn’t draw 🙂

DSCF3432

I can’t remember where I picked up this tip. Fabulous stuff this rubber cement for sticking paper patterns to metal. Cover the metal and the paper with the glue. Blow on the metal until it goes matt, slide the paper pattern and leave for a min or two. Saw up to the pattern, great stuff.

DSCF3434

Blank in copper domed in the block with a 15mm doming punch. Starting in a larger depression, moving down a size, four or five times. If you try too small too fast, it created nicks in the corners of the piece where it is trying to compress too quickly. Anneal if you feel the need.

DSCF3436

From a previous post. remember my, made from copper, filled with lead pitch bowl. This parcel tape fits the bill as a great stand for it. Some grippy cloth in-between keeps thins nice and stable.

DSCF3437

2mm and 3mm doming punches for repousse stage.

DSCF3438

Same again for the chasing part.

DSCF3440

Using a suitable sized doming punch, to fit the ring shank you need. Mark the overlap, cut through both layers (each side) to create a perfect soldering joint.

DSCF3441

Some of my miniature metalwork forming tools. See text.

DSCF3443

Showing how to round off the shank. Use a soft hammer, not metal as this will stretch the metal. Remember this if your outer is too tight to fit the shank. You can use a metal hammer to the stake to stretch it to fit.

DSCF3442

You can just see the air gap. I will go into more detain in the next post.

DSCF3469

The silver blanks ready.


Wato wato one and all.

This ‘moon ring’ was a request, I have no idea if it will sell, made a couple just in case.

This journey is in two parts, this one shows you a little background. Also the refinement of the design and the tools needed to realise it.

The references to looking to the text will be covered in detail in the next post. Hope you enjoy reading about it. Also I hope it inspires you to look at the things around you in a different way. You never know where the next tool is lurking, just keep looking.

Until next time. Very best wishes.

Stu Art.

Chasing and repousse´bowl, new German red pitch used for completing sterling silver ‘Lawrence cuff’

DSCF3393

See text for explanation of hot air/paint stripper gun.

DSCF3394

Because of the hight required for the ‘runes’, also the definition/separation from the background I wanted to achieve; you can clearly see the material ‘gathered’ from the surrounding ares of each stone to push more silver where thinning will inevitably occur.

DSCF3396

German red pitch, I now have experienced, is very much more supportive. To get this flatness with my normal green would have meant transferring from the pitch to a flat plate, using planishing punches to push back surrounding areas.

DSCF3399

To cover up the marks made whilst gathering material, starting to use different curved liners to give the impression of flowing water.

DSCF3400

Not shown, look at the slightly raised areas made by turning the piece over in the pitch to repousse´ small water eddie type effect.

DSCF3401

Close up of the water eddie effect I was shooting for

DSCF3402

After all the water flowing decoration was applied I planished each rune as best as possible with planishing punches. From the pictures of runes I have seen, many appear to be smooth and shining. Not my normal approach, I much prefer the planishing marks, however for the effect I was looking to create, polishing was next.

DSCF3403

After polishing came the application of the name Lawrence in the rune alphabet.

DSCF3404

All done 🙂

DSCF3412

DSCF3413

From a previous post, remember the copper ‘sketch’?

DSCF3414 DSCF3415

DSCF3417

Another bonus with the German red pitch. Look at the impressions left after removing. It releases much easier, is a lot less messy and so much easier to clean up.

DSCF3418

Fingers crossed Lawrence likes it

Wato wato one and all.

The German red pitch is brilliant, I’m a convert. The green pine based pitch will still have a place in my workshop, I wont be throwing it out anytime soon, horses for courses as the saying goes. For rapid ‘puffing’ or the repousse´ stage, it still has a lot to offer, being as it is far softer than the red. At this time I feel confident in stating I will in all probability not use green pitch ever again for chasing. After using the red, it just isn’t supportive enough. When I made the copper model, yes I know its softer to start with, however I had to, after each course, return to a steel flat plate and return the surrounding areas to flat with mallets and punches. Not once did I have to using the red.

You will perhaps remember when I attempted to put in ‘Lawrence’ into the copper runes, they pretty much all collapsed. I feel very confident that would not have been the case if I had used the red, rather than the green pitch. Yes, the silver is stronger, remember though the amount of raising required to get the hight will have thinned the silver quite a bit, so perhaps not as strong as we may be lead to assume.

In conclusion, green for rapid and less precise repousse´ stages. Red for chasing and more refined lines, less planishing and more support. I hope this is helpful to some of you who, like me, wanted to know the difference. I still haven’t found anywhere on the web where comparisons are made, probably not looking hard enough, please let me know if you find such a site.

A very nice lady, check out her blog  http://patriciacarlson.wordpress.com/  told me of a workshop she attended with a master craftsman, David Bigazzi:-  http://www.dbcollection.net/

She very kindly passed on a tip she picked up whilst there. I show, in the first picture, a heat gun that I have always used for softening my pitch. I find the thought of playing a flame over it and all the associated soot, not good. My Dad is a heating engineer and he has a supper dooper programmable digital heat gun used to check out thermostats. I couldn’t afford one of those, but I got the idea this one. Its great for the job and has a variable heat setting that I find very controllable. Patricia also says DB uses such a gun for annealing!! How cool is that. I must confess I haven’t tried it yet, I will though. Could it be a better way, less risk of overheating and firestain. I will let you know, Thank you again Partricia.

Thank you all again for looking at this blog. Remember if you wish to see something, don’t hesitate to let me know, I love a challenge. I hope to show you next time some ring projects I have in the pipeline. A lady likes my moon series, but wants a ring made. I have done a copper model (no really 🙂 this will be a hollow design needing stakes that I made out of old bolts to create, I’ll show you how. Reen had been asking for me to do a moonstone ring, aaarrrrhhh stones, colour, get behind me Satan. I pays to get out of your comfort zone once in a whilr – right ;\

Until next time all my very best wishes.

Stu Art 🙂

Chasing and repousse´bowl to take new German red pitch for sterling silver ‘Lawrence cuff’

DSCF3376 DSCF3377 DSCF3385 DSCF3387 DSCF3388 DSCF3389 DSCF3390 DSCF3391

Wato wato all

How the jolly well are you, I trust all is tickety boo with you and yours. If not, look on the bright side; this time next year you wont remember least alone care eh :/

It has been a while since I have tried to make something, back to regular work now, night shifts are such a bore. My own fault, should be better at this by now. The good news is that I now have some cash coming in to purchase things like the German red pitch you see here. Not a huge amount, I got it from Amazon U/K as postage from abroad to import it was shocking. I also wanted to see if it was any good before committing to buying larger quantities.

The cost of a new pitch bowl, combined with the postal charges – they are heavy cast iron after all – was, again prohibitive. The solution was to turn to my trusty supply of copper hot water tanks, sink a spherical bowl and use that. At approx 0.6mm thick, the copper was way too light on its own. Also the amount of pitch I ordered would not fill the 10cm bowl I made to accommodate it. A solution to kill two birds, as it were, was to 3\4 fill the bowl with some scrap lead I had given to me. The pictures show the block in mole grips, held over the bowl. Using a propane torch I dripped the molten lead into the bowl.

The bowl is now heavy enough to prevent it skidding about as I use it. I know the lead is not a great idea, health and safety and all that, so I decided to contain it with a disc of copper. To secure the disc I chose to use body filler as it will not get hot enough in use to cause an issue. The low melting point of the lead makes it, to my mind anyway, impossible to solder, so this was a solution. The beauty of the body filler is that it will fill the gaps, making a permanent barrier against the contamination of the pitch with lead.

As you see, Lawrence does want a silver version of the copper cuff of a previous post. I have ‘puffed out’ the ‘runes’ as far as I can on the plaster scene at this time. Next job is to fill the new bowl with the German red pitch and see how it goes.

Thank you again for joining me on the never ending journey. Until next time, don’t let the bounders grind you down.

All my very best wishes

Stu Art 🙂


Sterling silver forged wire bangles

DSCF3335 DSCF3343 DSCF3340 DSCF3338 DSCF3348 DSCF3347 DSCF3346

Wato wato, my last post of 2013.

As you know I am a huge fan of chasing and repousse´, given the opportunity, would do little else. The cold fact is, in no small part due to the time it takes to complete a piece, I am struggling to…. No lets tell it as it is, I can’t sell anything at this time. I feel sure I have put the cart before the horse, so to speak, concentrating on this type of work without a reputation and grounding that comes about by making and selling more mainstream and faster to create work.

My earliest introduction to metalwork was whilst I was still at school, my less than possitive experience made me not a huge fan of this institution. I found the majority of my educators not warming to a child who sought validation and further explanation rather than accepting what is told. I was not inclined to get on with what was set without question, many teachers were seemingly not comfortable outside of their scripts. This clash of ideals inevitably leading to me to be farmed out to the more practical parts of the schools I attended. I had a great careers officer in my last who knew of a farrier and gave me the chance to do work experience. Revelation, freed from people who talk, to experiencing first hand craftsmen who do. It was a huge thrill for me and, fair to say has been the biggest influence upon my attitude to work that I can think of. It has, albeit indirectly, led me to the point I find myself now. Namely the wish to be a craftsperson, rather than a desk jockey.

I loved making horse shoes, forming shapes and objects like toasting forks from old worn out shoes. Now that I have a better understanding of what is likely to sell, I have decided to resurrect the joy of forging to make it far more prominent in my repertoire for the coming year.

Living by the sea and understanding customers wish to relate to work, I have come up with the wave bangle. Bit of a challenge to photograph, I will, providing I can sell enough to warrant it, return to Paul Mountsy photography who will be better able to highlight the effect, hopefully in the near future.

I continued forging all the way over and created the faceted one also, this was the result of a successful experiment whilst shaping stakes to make the wave.

Coming soon I will post pictures of two copper leaf brooches, along with abridged construction photographs. I am trying to gain a greater influence by nature and shapes formed as a result of movement. This movement, albeit fleeting, as in the patterns in flowing water, to the more solid and slower creations, say in the bark or grain of wood, to name but two. Man cannot live by his own vision alone, unless it is shared by others of course.  As mine isn’t, its time for me to look seriously at what others like, rather than just hope eh. Be careful what you wish for. At the start of my making journey I was very keen to connect with people on an individual level. I come to realise that however much people say they want something different, it still has to conform, be safe if you like, to associate with something more mainstream. Lesson learned. I said I didn’t want to make jewellery for everyone. What I didn’t expect, or want, was that so few associate with it that it became a curiosity, seen as something perhaps clever, well made even, though not desirable. I love to explore new possibilities, and will continue to do so. I thought of an example of how I feel this process has crept up on me, the following is a kind of analogy to better explain it as I see it.

Near where I live is a beautiful place called St. Agnes. On favourable days it attracts hang gliders and paragliders. When the sky is clear and the sea is welcoming people will notice from the road the sight of the colourful sails as they play on the natural thermals and updrafts from the sea. Curious onlookers will drive down to get a closer look, some even have picnics and make a day of it with the children. On summer days holidaymakers will swell the numbers, cameras scanning the skyline capturing the action. As I walk around the people gathered, all shapes and sizes, ages and creeds. The one thing that I notice is the common response that even will induce strangers to talk to one another, united in their assertions that, fantastic though it is, ‘there is no way you would get me up there on one of those things.’ Another topic of conversation that I have noticed strangers talk about, after where are you from, what do you do is, where did you go on holiday last. The result will often be far flung destinations that will involve flying.

Whats my point? Well, as I see it, people are generally not afraid of flying. Even if they are mildly so, they will control it, looking to the goal of the beautiful destination they have saved hard for all year to reach. How they fly is important, they don’t necessarily wish to enjoy the flying experience, just the getting there. Think – must have a diamond solitaire for example. It’s not the ring, but what it represents that appears to be important. The design is a classic, a must have to be ticked off of life’s check list. The piece is invariably judged by the size and sparkle of the stone, the setting being largely ignored.

This is a long winded way of saying I need to be in contact with more lovers of flying if you will, as opposed to destination seekers. My narrow focus on making at the expense of design has led me to a point where I am not able to find a sympathetic audience for my work. All is not lost, I hope the wire bangles will be the start of more mainstream work that will enable me to continue making, whilst searching for outlets that attract people who really do want something different.

I do find myself drawn more to vessels, so 2014 will see me exploring more possibilities for these, both chased and plain alongside, hopefully :\ a more commercially acceptable line of jewellery to help fund it

Until next time.

All my very best wishes for the coming new year.

Stu Art

Repousse chased copper model of a custom cuff bracelet from conception to completion in pictures

DSCF3268

The drawing given to me with the rune alphabet and the caption as wanted. My interpretations at the bottom with the copper blank ready for lining


DSCF3270

Without annealing, turn the lined piece over and use a rounded punch. Follow the outline, as made by the liner in previous stage, working towards the middle.

DSCF3271

Turned over, on the plaster scene from previous stage, you can see the ‘runes’ taking shape. The surrounding material needs to be straightened out now.

DSCF3272

You can see this was an allen key, most of my tools start as allen keys, great cheep tool steel. The face, as most all of my chasing and repousse tools are, is mirror polished to prevent scarring of the material whilst working. The background is gently pushed down, again use the largest planishing punch as you can to minimise the overlapping tool marks that can lead to an unwanted planished effect. You are just ‘placing’ the material back, not forming it, just be gentle as you will need to repeat this again later.

DSCF3273

First annealing stage, pickled ready for more working.

DSCF3274

Because the material was work hardened in the previous stage this would likely not have been successful before this annealing. This takes the last stage to its conclusion, making the ‘runes’ return to the same level as the surrounding material. This allows you to separate the elements better later and allows you to see how high you have come, more importantly how much further you need to go.

DSCF3275

The underside after outlining the individual runes from the front, notice the clean edged as they have been encouraged back to the steel plate.

DSCF3276

A more focussed push tool is used for the second puffing out round. Same again, start from the outline and work towards the middle of each separate element.

DSCF3277

Compair this with the previous annealing, I need to start to think about making the runes look like separate elements rather than the balloon like appearance they have now.

DSCF3278

I will repeat this later. You will no way get this amount of height this early on working in any type of silver. You need to think about that as you may end up becoming despondent not being able when you try. Ask how I know 🙂

DSCF3279

Ready for undercutting now to make the runes look separate from the surrounding sheet.

DSCF3280

This is the sort of angle to use to give some material for undercutting when the piece is the right way up.

DSCF3281

Two sizes of planishing punch, smallest one for the tighter gaps between the elements.

DSCF3282

Annealed and pickled, round three.

DSCF3284

Lined onto the metal plate again. Please be careful, too heavy hammering on this repeated process thins the material and a real risk of breaking through exists if you are a little exuberant at this stage. Guess how I found out : \

DSCF3285

Straighter sides ready for undercutting, helping to further shape the illusion of separate pieces.

DSCF3286

This type of tool with a rounded blunt profile is used at this kind of angle.

DSCF3287

The shiny parts show where the tool has contacted. A little imagination is needed to envisage how you wish the elements to look from the front. This will dictate the profile, as well as the angle you choose to employ

DSCF3288

Much more defined and starting to look more like separate elements. Its over to the pitch now as the final shaping requires more support than the plaster scene can provide.

DSCF3289

A Victoria Lansford tip here, cooking oil applied to the side you are adhering to the pitch will aid its removal when completed.

DSCF3290

Sorry to say, imagination will have to guide you better than my words here. Study the two tool profiles, the blunt one is driven into the side to undercut each element. The other tool I made up from previous attempts to ‘lift’ elements. I made this type of tool for ‘wear your heart on your sleeve’ cuff when I was having trouble making the veins stand proud of the surrounding material. I find it effective, good luck if you wish to try your own. Better still, do you have any profiles you may wish to share?

DSCF3291

Another view of the two tools. The ‘lift’ tool shows the ‘belly’ I shape into it. Picture the effect this has when struck. The belly forces the tool to follow the rocker profile, the scoop profile then shapes and tucks in the element as it is described around each one.

DSCF3292

Just like the plaster scene stage, this is for making crisper definition that the more supportive pitch allows.

DSCF3293

Playing with the runes theme, elements and the like, I thought water flowing around would give a greater visual impact. Back in the pitch, face down, this blunt rounded tool is used to create raised ripple like effects as seen from the front.

DSCF3294

Off the pitch, from the front on a steel plate.

DSCF3295

Chasing the flowing patterns, this is one of the curved liners I used, more in following pictures.

DSCF3296

All the ‘flowing’ chased detail applied, shown are all the liners I used to attain this pattern.

DSCF3297

A blunt tool was used to mark out the rune letters that were requested. This is an example of spoiling the effect trying to rush. If you do this, remember to fill each element with pitch BEFORE you attach the whole piece. As you see some of the runes are sunken. This is due to be omitting this stage and having to contend with air pockets that do not support, leading to a collapse, shown here.

DSCF3298

Cleaned up and fresh from the barrel polishing machine.

DSCF3301

For illustrating options I chose to present this model half patinated to allow the chap to express a choice. I use a cotton bud as I find the solution wrecks brushes. The fine steel wool is used to take the black off the higher elements.

DSCF3302

One half patinated, the rest shiny, decisions decisions.

DSCF3303

Close up of shiny, clearly showing the ‘reward’ for lack of patience, the rune squashed, what a twit eh.

DSCF3304

Patinated and high spots removed with the wire wool.

DSCF3305

In 0.6mm copper, not very durable, nonetheless a good example of what could be if the chap decides he wishes it made in silver. This is a great example of my approach to ‘sketching’. I could not draw this, no problem making it though, it is a communication tool that allows me to have a dialogue with a person as they finger the surface and are able to better communicate what they want through seeing a representative model first.

DSCF3306

I have added this image of a packet of Plasticine. If you go to an art shop and ask for the generic equivalent , you get much more for your money.
As a thought for the people who wish to dip their toe in the repousse and chasing water, without going to the expense of purchasing pitch and the associated equipment needed to use it, I have had a thought. If you push the plasticise firmly into the depression you wish to add detail to, perhaps experiment by putting it in the fridge of freezer, this will stiffen up the plasticine, obviously you will have to work out how much support this will give, making allowances and decisions when to return the piece to the cold as it warms.
The pitch is very much more supportive, better to use for limited amounts of puffing that traditional low relief chasing and repousse require. The higher relief style I like, I find the plasticine saves time by yielding more, giving me more bang for the annealing buck as it were. Also the pitch will give a pretty accurate indentation for the tool used. Imagine poking your finger up inside a stretched piece of fabric. Your finger will make an impression of a tent as the material around is also pushed up. Depending on the pitch mix/hardness this effect can be, to a greater or lesser degree, avoided, making for crisper definitions of elements. The plasticine will drag material from further around the initial tool impression making ‘hills’ if you like.
If anyone does experiment with cold plasticine, I would be very interested to hear how you get on.

Wato wato

I thought this example of a commission I have received will help to better understand the chasing and repousse methods I use. Better still I sincerely hope it will encourage you to have a go, please do ask me for any further clarification should you need it. I would also be thrilled to see anyone else’s work if they would care to share it.

Lawerence is a fantastic chap who is into shamanism, ooooookkkayyyy I hear you say. I know I know, perhaps a little eccentric, better that than the abundance of dullness I say. A thoroughly decent and nice chap to boot as well and someone who I am very glad to say I now call friend.

Lawrence saw Clairs bangle, you know the pebble one, look back or go to my Facebook page if you need reminding. He came up with the idea of having his name in runes, the drawing in the first photograph will give you the gist.

I will let the pictures do the talking, well they do have some explanations attached, as I say, please do ask if I have not been clear.

As for the silver final piece, well I will have to wait as I have you to show this to him for his opinion. Rest assured if he does decide I will post a picture when I have completed it. As I state in the pictures this model was made in very thin, ex copper water tank, 0.6mm. Sterling silver will be the material of choice for the ‘real’ one. It will take, if I’m lucky twice as many annealings as it took to realise the model working as I do in 0.9mm stirling silver sheet. Please bear this in mind if you jump right in with your own projects, it takes very much longer and is much harder to move than the copper shown here.

As many of you already know I’m no artist and find drawing skills frustratingly illusive at this time, though I am still working on it. To my mind this approach is not much more time consuming than a fine rendering in different aspects that a silversmith or jeweller may need to satisfy a client. As a bonus my ‘handicap’ means I am continually learning in my chosen medium by practicing in it most of the time through necessity. Thin gauge models work for me, go on try it, you may like it.

I hope you enjoyed the photographic journey to the end and it encourages you to have a go for yourself.

All my very best wishes.

Stu Art