-

-
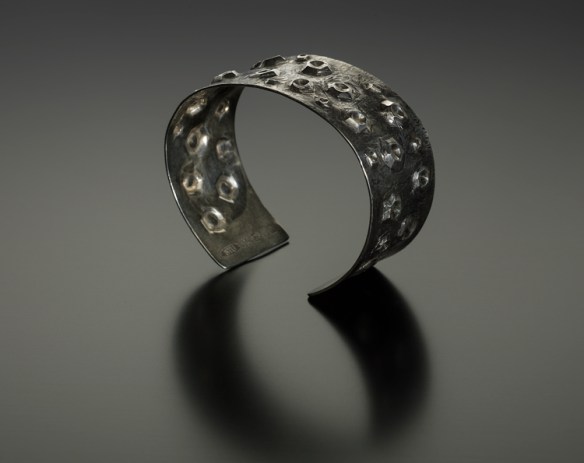
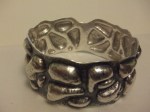
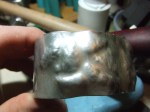
Completed bangle
-

-
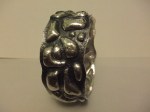
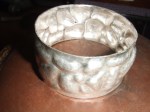
Texture and patternation added
-
-
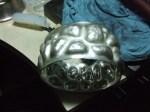
Notice the deliberate break in the pattern left to allow adjustment
-

-
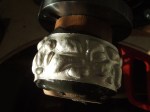
Showing the wave like edge following the ‘pebbles’
-
-
The idea was to keep the design flowing. Clair wanted less black and more polished pebbles. Today this piece looks a little different to make sure the lady has what she wanted. Lets be fair, would you trust a man to get the result a lady has in her mind ; )
-
-
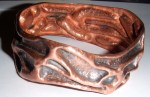
Where it all started, the original wear your heart on your sleeve cuff bracelet model, please read text for a full discription
-
-
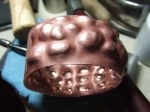
The last prototype on copper before going to stirling silver.
-

-
Tricky lining now done, first round of repousse
-
-
After two rounds of annealing
-

-
I lost count of how many annealings, now starting to ‘grow’
-

-
Staring to define the shape coming along nicely now. Fractious as the metal is stretching to, ‘do I dare go any further’ stage. Look at the inside and the softness of the boundaries. See text for explanation.
-

-
Starting to look for wats to make pebbles stand proud, to look separate from background.
-
-
Inside, now see the sharpness between boundaries.
-

-
Still too soft from the perspective of the viewer when worn.
-
-
Wooden and plastic punches made to push and define pebble shapes without marking or denting them as a metal punch would
-
-
This ‘mandrel’ was made from an old rolling pin I found in a skip, sawn off and held in a woodcarvers vice to enable me to get around all the cuff unhindered.
-

-
The edges cut away to imitate the path water may take to go around pebbles.
-

-
The last undercutting before texture and patternation added. Note the ‘moats’ surrounding each stone, please read text.
Wato one and all
The year is going at a gallop as my course is up in June so time to get my finger out and settle upon a design I will be using for my final projects and the precious metal bursary that I was fortunate enough to receive from Goldsmiths Hall London. I have, to this point, just keep things pretty much technical in this blog, I find this relatively easy but will stretch myself in future to share some of the roller coaster journey that this course has presented to me. As you can imaging this will be largely subjective and in no way verifiable or necessarily relevant. Perhaps even unrecognisable to others who have walked a similar path. One of the attractions of this blog, for me, was the opportunity for others to be candid and open with differing views that will inevitably lead to other perspectives; perspectives that I may not relate to. However all comments will bury themselves somewhere in the unconscious. This will only serve to make me more aware and rounded as an individual, difficult as I appreciate it sometimes is to be open face to face, the relative anonymity of this vehicle allows me to be open. I hope you will find it similarly conducive to getting your candid opinion accross safe in the knowledge that we will likely never share the same physical space. I very much look forward to being pushed and challenged, after all nothing can be forged without heat, come on, turn up the burner 🙂
This cuff bracelet was made for very dear friends as a birthday present for Clair. In another post I will introduce the extraordinary force of nature that is Paul and Clair Pennington of the Jewellery Workshop in Porthleven Cornwall.
http://porthlevenjewelleryworkshop.co.uk/
It would take too long to tell the story, suffice to say that in less than a year has seen them become such a successful team that it can be called nothing less than an inspirational tale of guts and determination.
Paul is enrolled on the same course as me and was taken by my, wear your heart on your sleeve, bracelet design. He commented that the inside looked like pebbles on a beach and the forming process left a pleasing sand like look on the inside. As Clair is a lover of such subjects Paul asked me to look at ‘just doing a reverse heart on your sleeve’!!!
The exclamation marks are to warn the unwary of being complacent, on the face of it nothing could be simpler, right? I show the original copper model of this piece to show you what Paul saw in the original design, I will now explain the journey.
The copper model was one of many, actually this is one of two rounded models, the other being a lesson  (hideous). Along with this were many flat copper experiments to test punched that I made to try to replicate the effects. I have mentioned this before but it pays to repeat. Working in thin gage copper, approximately 0.6-0.7mm thick is very different and far easier than the 0.9mm Stirling Silver sheet used here. The silver is very much harder to move and requires more annealing stages to obtain similar results, don’t go too far too soon, give yourself more time than you would in copper.
Not shown her is the initial lining as I wanted the stones to look placed on the surface the lines on the outside would spoil the effect. I lined the outlines when the silver was flat on a bench block before bending it to shape with a bracelet mandrel and soldering it together.
Here lies another challenge with a closed form, if you recall it is best to keep the chasing and repousse punches near vertical for them to work at their best. Now you will have to work from either opening of the bracelet. Shown here on my plaster scene, I try to use this as much as possible as the pitch stage is time consuming to set up and messy to clean up.
I chose to anneal often and not go too fast as the unequal stretching that working from either side made overstitching and miss shaping a real danger, so slow and steady. The challenge with this is to keep concentrating on the future as each annealing stage can be a little soul destroying when completed as it appears you have not achieved that much as the rounds count up.
Now as the shapes are coming along nicely the problem presents how best to separate the pebbles from the background. Working from the inside using push tools and planishers define the surroundings of individual elements.
After you have gone as far as you can from the inside consideration turns to the front. I did not want to mark the pebbles as I wanted to keep the finish more subtle, now comes the fiddly part that you have to work out as you go. Using bits of wood and plastic or delron nylon extruded bar shaped with saws and filed to fit a the recesses, carefully knock back the background. As you see from the pictures this still will not define the shapes as separate, for this you will need to undercut each stone from the surrounding.
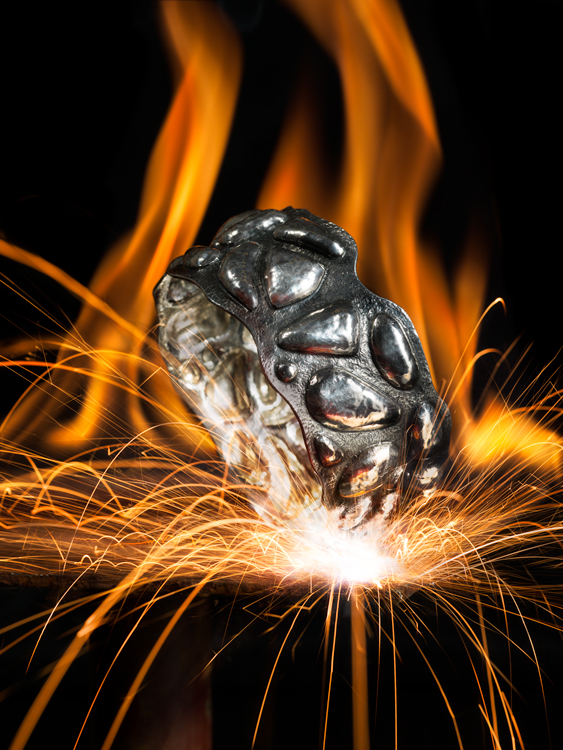
As one of the last stages it is also a very nerve wracking process. As you can imagine as all these elements were raised from the surrounding sheet. As a result they have streatched and thinned, any careless blows will likely be met with a break through, tearing the silver and necessitating a time consuming repair, worse a piece of scrap, nasty lesson learned.
You see the ‘moats’ or ‘troughs’ surrounding the pebbles. With the undercutting punches I used surrounding material and pushed it towards each element. My reasoning was that as it was moved from untreated areas it would pool up against the edges. This was to ensure that sufficient material was present at the edges of each stone, reinforcing it if you will and making the undercutting process less hazardous, less likely to result in breakthrough. Good luck or practice, I know not what, I had no issues and all went well.
The cutting and finishing of the wavy pattern was done with a jewellers fret saw, files and sanded to acceptable standards before returning to the pitch for final texturing. After putting on the pitch it was left to cool so as to create a hard stake like effect that would support the shape, preventing distortion whilst the texture was applied with liners and planishing punches.
The deliberate break in the pattern was made to ensure that I had enough material to be able to make the piece smaller as I was concerned that with the extreme shaping would result in a possible modification. I feel bound to say that when Clair found it was indeed too big I was glad I did. Fair to say the sawing of it in half and removing a section before soldering back together was another lesson learned. If you find yourself in a similar situation may I suggest that you anneal the piece before you saw it in half. All the forces that had built up whilst final forming and texturing made it distort when I cut through it. I kid you not it took an age to straighten it up and re join it, this would not have happened if I had annealed it first as it would have equalised the forces and made it far easier to modify.
I hope you like it, better, I hope it inspires you to try something for yourself. The next time I will start to show examples of hand raising and making bowls, until then.
All my very best wishes.
Stu Art