Silver repousse cuff bracelet ready at last!

Wato wato

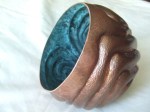
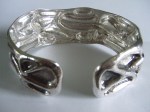
At last this cuff is finished! After completely messing up the first one and having more than a few challenges with this version I am happy to see it go to its new owner. I call this piece ‘wear your heart on your sleeve’. If you are in the area it is on show at the White Out exhibition in Truro until Friday.

It now belongs to Paul Pennington. You may recall his wife runs the Jewellery Workshop in Porthleven. He wanted this design to compliment the pebbles bangle I made for Clair that is shown in a previous posting. For those interested in the name it came about as a result of a College brief.

I thought that hearts abound in fashion, design and jewellery, as a child I was always fascinated by the very small. Typically beastly boy always muddy, grubbing about in the soil and ponds looking at amphibians and insects. When I discovered microscopic images I was blown away by the complexity and beauty of the hidden world right in front of us that we are not able to see with the naked eye. As an adult I was fortunate enough to be given a microscope for a birthday present, I wish I had more time to look at it, ah well the time constraints and pressures eh!

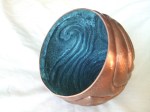
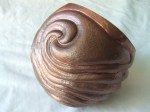
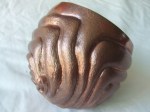
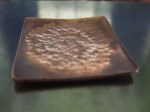
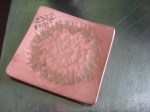
I went on-line and looked up microscopic images of heart muscle. At relatively low magnifications the heart muscle is like interconnected worms, well thats how it looks to me anyway. I took this set of images and interconnected them to make it more visually interesting and came up with the design you see here. As a bit of fun and a total fluke, the theme allows me to use the old saying of wearing your heart on your sleeve, I find I’m as chuffed about that as anything else about it. I love the fact that whoever wears it will be able to play guess the theme with whoever is looking at it.

Being a very highly raised design it stands out very well, not one for shrinking violets 😉 Being a chap I had given no thought to the gross factor that some of my lady peers expressed at the thought of wearing a representation of heart muscle, is it me?

The good news is that most people who view it for the first time associate it with interconnected vines or tree roots, good oh eh, far less embarrassing for me and another fantastic fluke.

Going on like this, I hope to give you some idea that beautiful accidents do happen. Think design opportunities, not mistakes. Again this is another creation of mine that has not universally won all popularity contests.The way I see it is that if you try to please everyone, not only is this not realistic, it is also timid.

When I bump up against a creative wall as it were, my long suffering supporter, best friend and brutally honest wife Reen has taken to telling me; ‘Just @*ing hit it” This has served me well on more than one occasion.

I respectively pass on her words of ‘encouragement’ to you as I am easily paralysed by indecision, as I’m sure many of you are. Know this however if you make a mess, at least you made something and a lesson was learned by you empirically in a world seemingly paralysed by academia, theory and the fear of getting it wrong. In a world of armchair experts it’s your opportunity to plough your own furrow and enter a wonderful, thrilling and ultimately sometimes scary world of the unknown that holds the promise of great adventures yet to be discovered. Until next time, JUST *@ING HIT IT 🙂 All my very best wishes. Stu Art.

Truro exhibition of students work. My completed bowl influenced by David Huang

Wato wato.

I’m almost at the end of my third and final year of my degree course. Truro College runs a yearly show to exhibit all students work in the arts. My copper paternated chased and repousse bowl is finally finished. I would like to take the opportunity to, both, introduce you to a very dear friend and awesome metal artist, publicly thanking her for all her help in the final finishing of this bowl.

http://www.thelanegallery.co.uk/nicola-bottono/

Nicola Bottono works in the above gallery, alas at this time she does not have a website, please look her up. We were on the same Silversmithing and Jewellery course, Nicola graduated last year and is continuing to develop her range at this time. I commented that I liked the patternated finish she achieved with a College project and she, very kindly, offered to apply the finish to this bowl. I thought it would be great to patternate the outside, Nicola thought inside would be better. I think she was right, I’m over the moon with it and hope you all like it also. Its great to have people around you who will guide you towards better decisions rather than allowing you to, potentially, make an error that you will see in hindsight that will be too late to rectify. Very many thanks Nicola 😉

This bowl is not without errors, this is the first time I have tried to chase a design on a hollow form. I feel bound to say however that I am chuffed to bits with the end result of what has been a rocky journey to get to the end. If you would like to see the pictures showing the bowl from flat sheet to as you see it here, please let me know. I hope you forgive my enthusiasm for this piece as I see it as a very great start on the road to making more beautiful forms in the future.

Much of this blog was made to help others avoid the pitfalls and inevitable mistakes that I have made to get to this point. All who are close to me will tell you that I struggle with the design aspect of making, this may not be the most ground breaking thing you have seen. From a personal perspective I must say that it represents a major achievement and milestone for me that many times I thought would not happen.

It is all too easy to become despondent and think your work amounts to nothing at all, my tutor for example thinks this is awful. I would be fibbing if I said this didn’t sting somewhat, however I am reminded of the fact that very few individuals would know where to start, let alone finish such a massively time consuming piece. The lessons I have learnt along the way are worth more than gold to me. The tools I have made and customised to complete are a permanent addition to my ‘alphabet’ of tools enabling me to better communicate with less and less effort in the future.

The mistakes and blemishes are the rights of passage for anyone wanting to undertake a large project. All too often I see and hear others wanting to create masterpieces and afraid to fail or look silly. There were many wrong turns, leading to this, to me and others who have seen it, wonderful and fruitful destination. If I allowed myself to be swayed by people who could not care less, this bowl would not have happened. Please please don’t let that happen to you.

Next time I will start to show you the peened disc of Britannia silver that I have used to create a silver bowl. Peening is used to thicken the edge as it is raised. Remember the previous post on making shallow forms with a bench block and a ball peen? The technique is very similar.

Until next time, all my very best wishes.

Stuie

An approach to make curves or shallow bowls in metal

Wato wato

I have to get a silver vessel ready for a show in Truro the week after next and have neglected my commitments here.  As promised, I will illustrate a way to create curves or bowls without stakes or depressions to form into.

The piece of copper was from a scrap corner of a disc I cut to make a raised copper bowl, more on that in a future post. I deliberately made it square to help you to think about curves in a different way. If I cut a circle then, perhaps, you may think why not just use a doming block or punch? If you try this with a square you may find the points don’t behave as you think they would, tending to crumple and become marked by the doming block, no such challenges with this way.

Please be aware that this is ‘a’ way; not ‘the’ way to approach making effects photographed here. I am minded to think of when I started and looking at all the stakes and hammers on offer, which one? How many? I feel certain you will have experienced just such confusion. I offer this way to you as I feel sure you already have, of can inexpensively come by the tools shown here to experiment,  creating your own sculptural shapes, adding to your deeper understanding of how to problem solve when you hit a creative wall as it were.

A steel bench block and a ball peen hammer are all you need, good oh eh 😉 if you are just ‘sketching’ as I do, then you will not even have to worry unduly about the surface finishes of the block or hammer. In fact you may be able to produce some beautiful effects with less than perfect surfaces, unique to you. It just gets better don’t you think.

I deliberately did not freshly anneal the piece to start. If you look further along the sequence you will see I have highlighted the help that a freshly annealed and pickled surface give to you as a guide to facilitate more accurate placements of your hammer blows. You may wish to start with a freshly pickled surface, your choice.

The idea behind this, and I will descend into metaphor to help explain to you how I see it; Again, before I do I am bound to say that this is how I see it, if anyone knows a better way please please do let me know and I will alter to be clearer and less confusing. Metal works like slow motion clay, also it flows a little like water under the hammer blow making a small ‘wave’ of material. If you hammer quite hard with the ball end of your hammer on a freshly annealed piece of material, copper silver or other types, on a steel block you will notice the contact point sunk with a ring of material surrounding the mark. Try it with a cross peen and again the ‘moat’ or wall of material will surround where the hammer has struck. This is the softer, un work hardened material being squished away from the compressed area.  The outside edge that I hammered to start creates a ‘moat’ or barrier of work hardened material. When you then go from the middle, overlapping blows you are trapping the soft state, not yet hammered and work hardened material towards it, eventually meeting a barrier it cannot cross. As the distance is covered the ‘wave’ is larger and will cause the material to curl as it gets closer to the edge.

Where the analogy with clay breaks down a little here is the one shot deal you get with metal. Metal will not stand repeated blows and will eventually crack if continually hammered on the same spot without annealing. For safety sake it is best to do one round, re anneal, pickle and start again. This way you will not be likely to cause the material to fail by overworking. Another bonus is that you will become far more accurate as you become aware of sticking to this one hit rule and using the colour change as a guide as the struck area becomes shiny.

I have only done three rounds to show what is possible, nothing to stop you taking it further if you wish. You will come up with limits eventually as you continually thin the material, as a result this is perhaps best left to create shallower forms. By holding the sheet at increasing angles as you strike it you can alter the depth, even making different depths on a single piece.

The other photographs illustrate this as they clearly show the way I have held the brooches at shallower and steeper angles to the block to obtain the transitional curves seen here. The ‘shrinking marks’ shown are made with a cross peen. I will explain how this works with examples an another post. To get you thinking about shrinking, (a poet and didn’t know it 🙂 think fold forming. I hope to show you why I think of metal as a kind of slow motion clay, try to think ‘barriers’ stretching and compressing waves.

Thank you again for reading and the kind messages. Until next time.

All my very best wishes

Stu Art