-
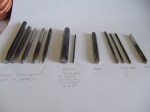
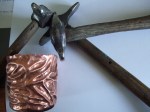
- An overview of the most common types of planishing punches I use
-

- For details of these types please read text

-
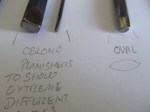
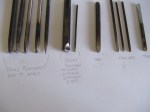
- Showing the extreme sizes of tools that share the same profiles. In other words having ‘a’ tool may not be appropiate for the task ahead. Scaling to the work is important.
-
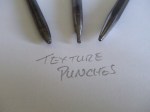
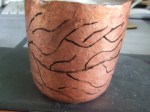
- Just a small example of the tools I use for texturing. I also use the lining tools shown in a previous post.
Wato to one and all.
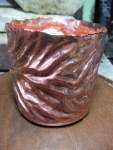
On my holidays next week, off to sunny Dorset, well Dorset anyway. A great place to go for the Jurassic coast and all the fascinating fossils just laying around on the beach. A good place also to look for some inspiration for repousse and chasing work. Some of the fossil forms, I feel, lend themselves well, replicating the textures and surface undulations to create interesting silver or copper jewelery. The copper may be best when combined with some patination to give an old world look that would compliment well with the subject matter.
As I said previously I will now introduce some basic planishing shapes, this is not exhaustive as I will explain later. To begin with lets look at the round planishers If you look to the left you will see the disc is paper thin. Try to imagine a tight valley that meets with another, a little live a V shape if you will. This it the only way to planish each side without interfering with the other. I will give examples next time of my work that uses the different planishers. The next one is polished on the sides and slightly rounded. This allows you to go up to a ridge and planish up to it without damaging the raised part as you flatten the surrounding material. This is why I polish all of the punches that come into contact with the metal to as near a mirror shine as I can, preventing unintended tooling marks. The next two are degrees of concavity that allows me to planish into curved, bowl like, depressions. I waist the end of the punch to make it easier to see where I’m going and where I’ve been as I planish the depressions in a design. Notice I did not polish the sides of these, no need as they will never contact the work. Lastly the very small tool is used for tight corners and texturing. Please keep this in mind as if you are after a smooth finish the larger the tool the better. The fact you can create interesting textures with this tool over larger surfaces will help you to understand; for smooth surfaces at least, the larger the overlap of the tool the smoother the overall finish will be.
Next the oblong or square planishers. All the tools shown here will have the sharp edges rounded of to prevent digging in and scratching. This is especially important to address for these shapes and the following as they all have degrees of straight lines and points. Your style as well as the piece you are working on will determine the degree of both flatness and rounding of the corners. When you explore the working surfaces of these punches with your fingers you should kind of glide around the tool rather than meet with obvious and sharp directions. It should feel like the elements blend together. All of my planishers have a very slight rocker profile to minimise the danger of striking the tool edge on and creating a whelp in the piece of jewellery of hollowware I’m working on. This should not be so pronounced as to make the tool more like a push tool, shown in a previous post.
The tear drop and triangular planishers are made and used in a similar way as the square, oblong types, up to and defining raised elements from flat surrounding areas.
I put the texture punches last as they, to my mind anyway, are filed under the beautiful accident category. The three you see here were the result of my early attempts at making the first type of round planisher at the start of this post. Hardening and annealing, essential tool making skills for the silversmithing fraternity, need to be understood. I will cover this topic in a future post if anyone is interested, please let me know if you are.
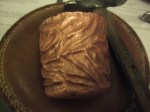
When tool steel is hardened it becomes very brittle. If not properly annealed then it will shatter or just snap off at the weakest part. As I put the pronounced waist into these punches the forces concentrate themselves to this weakest part of the punch, look who didn’t anneal his punches properly. But wait, before you get disheartened because all your hard work has resulted in a broken tool, useless now right, just throw it away and be more attentive when annealing next time right. Well, no not really, look at my moon series and most of these punch textures are created with these ‘useless’ tools. The gnarly one was reduced down on a bench grinder to facilitate better access up to the domes on the smaller earrings. Now I deliberately ‘do it wrong’ to create more texture punches as I need them.
The fresh snapped off portion of these punches will eventually dull. The metal has a very coarse christaline looking rough texture that lends itself well to texturing, it will pull at your skin when fresh and become softer over time. I will show examples of these subtle changes of finish another time.
Sorry to prattle on a lot with this post, it is difficult to convey what is needed to be understood without delving a little deeper into language to hammer home the point, no pun intended 😉
The next time I will give examples of work I have created using these tools so you can cross reference the images and writing here with completed works to enable you to go forward and make your own marks, pun most definitely intended.
Until next time all my very best wishes.
Stu Art