


wato wato,
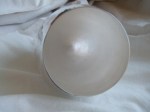
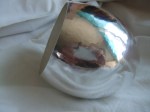
This is the completed Britannia silver bowl that I started to cover in the previous post. It was a very pleasurable and satisfying piece that has taught me a lot of valuable lessons I will share with you over the coming weeks, warts and all!
The eagle eyed among you will notice that the rim is nowhere near as thick as I intended. This was because I fractured the rim and had to cut off my hard fought for peened and caulked rim.
I chose Britannia silver as it is a little like a half way house between stirling and fine silver. I have much more experience of stirling and a little with fine silver. Later, if anyone would welcome an introduction to forging, hammer forging that is 🙂 I will show examples of rings I made from round and square fine silver lengths. Another time I will give more information about the different types, for now, suffice to say, fine silver is lush to work with, to a point. It work hardens quite quickly and goes from a soft clay like feel, accompanied by a dull thud of the hammer blow to a shrill metallic clang and subsequent shattering once work hardened.
Stirling silver is more forgiving due to its higher copper content, it is also more resistant, harder if you will, to move than the other types.
Britannia was my choice for a first silver bowl for two reasons. First the colour is, in my opinion, nicer. Being deeper, less chrome like; again this is just my opinion, not a fact. The other reason was that fine, my favourite, would be too tricky to start with as a first attempt, being far less forgiving of overworking, something I am guilty of at this point. I know coward. As the saying goes, better to be a live chicken than a dead hero, or something like that 🙂
The fact I broke the Britannia silver rim, I shudder to think of the mess I would have made if I started with fine, I’m glad I chose as I did. Yes, I would likely have not had the same challenge had I started with Stirling. But I wanted to push myself a little bit and try something I haven’t done before, perhaps not a total coward then eh!
I hope to be able to get some better pictures. I just thought, as I started the thread about the build process it would be helpful for those interested to go back to images of the completed bowl to see how the progress goes.
Until the next time, please keep your thoughts coming. Is this blog useful to you, does it help you, are my explanations helpful and clear, is there anything I missed, anything else you would like to see covered.
All my very best wishes.
Stu Art.
